
1. Pengenalan
This manual provides detailed instructions for the installation, operation, and maintenance of your OOYCYOO 100A MPPT Solar Charge Controller, model K100A. This device is designed to efficiently manage power flow from your solar panels to your battery bank, ensuring optimal charging and discharge cycles for various battery types including LiFePO4, lithium, AGM, gel, and lead-acid batteries. Please read this manual thoroughly before installation and operation to ensure safe and correct usage.
2. Arahan Keselamatan
- Battery Connection First: Always connect the battery to the controller first. Never connect the solar panel array to the controller without a battery connected.
- Inverter/Wind/Alternator/Charger: Never connect any inverter, wind turbine, alternator, or external charger directly into the charge controller.
- Bateri Voltage: Pastikan voltage is sufficient (greater than 9V) before connecting the controller.
- Max Input Power/Voltage: Do not exceed the maximum input power or voltage specified for your controller.
- Pemasangan Profesional: For complex setups, it is recommended to guide the installation under professionals.
- Pengudaraan: Pastikan pengudaraan yang mencukupi di sekitar pengawal untuk mengelakkan terlalu panas.
- Air dan Habuk: Protect the controller from direct exposure to water, dust, and corrosive environments.
3. Ciri-ciri Produk
- Teknologi MPPT: Advanced Maximum Power Point Tracking (MPPT) for 15%-25% higher charging efficiency compared to ordinary solar controllers.
- Keserasian Bateri: Compatible with LiFePO4, lithium, AGM, gel, and lead-acid batteries.
- Pengenalan Automatik: Automatically identifies 12V/24V DC system nominal voltage.
- Paparan LCD: Clear LCD display showing real-time data for solar panel voltage/semasa, bateri voltage/current, load status, and more.
- Perlindungan Komprehensif: Includes overcharge, over-discharge, overload, overheat, reverse polarity, and lightning strike protection functions.
- Output USB: Features 2*USB 5V 2.4A outputs for charging small devices.
- Penderia Suhu: External temperature sensor for accurate battery temperature compensation.
- Pelabuhan Komunikasi RS485: For advanced monitoring and control (requires additional display/module).
4. Technical Specifications (Model K100A)
| Parameter | Nilai |
|---|---|
| Kadar Caj Semasa | 100A |
| Sistem Nominal Voltage | 12V/24VDC Auto Identifying |
| Maks. Litar Terbuka PV Voltage | 96VDC |
| 12V Battery System Max. PV Input Power | 1300W (Open Circuit Voltage ≤48V) |
| 24V Battery System Max. PV Input Power | 2600W (Open Circuit Voltage ≤96V) |
| Bateri Voltage Julat | 12V/24V |
| Terminal Kuasa | 8AWG |
| Dimensi Produk (L x W x H) | 11.8" x 7.87" x 3.95" (30cm x 20cm x 10cm) |
| Berat badan | 5.6 lb (2.54 kg) |
| Jenis Paparan | LCD |
| Komponen yang Disertakan | USB |
5. Komponen Produk Selesaiview

This image displays the OOYCYOO MPPT Solar Charge Controller K100A with key components clearly labeled. These include the LCD Display, 5S Reset button, Solar Panel Terminal, Battery Terminal, Load Terminal, 2*USB 5V 2.4A ports, COM (RS485 Communication Port), Remote Temp Sensor input, and mounting holes. The image also highlights the wire gauge compatibility (6 AWG - 10 AWG) for connections.

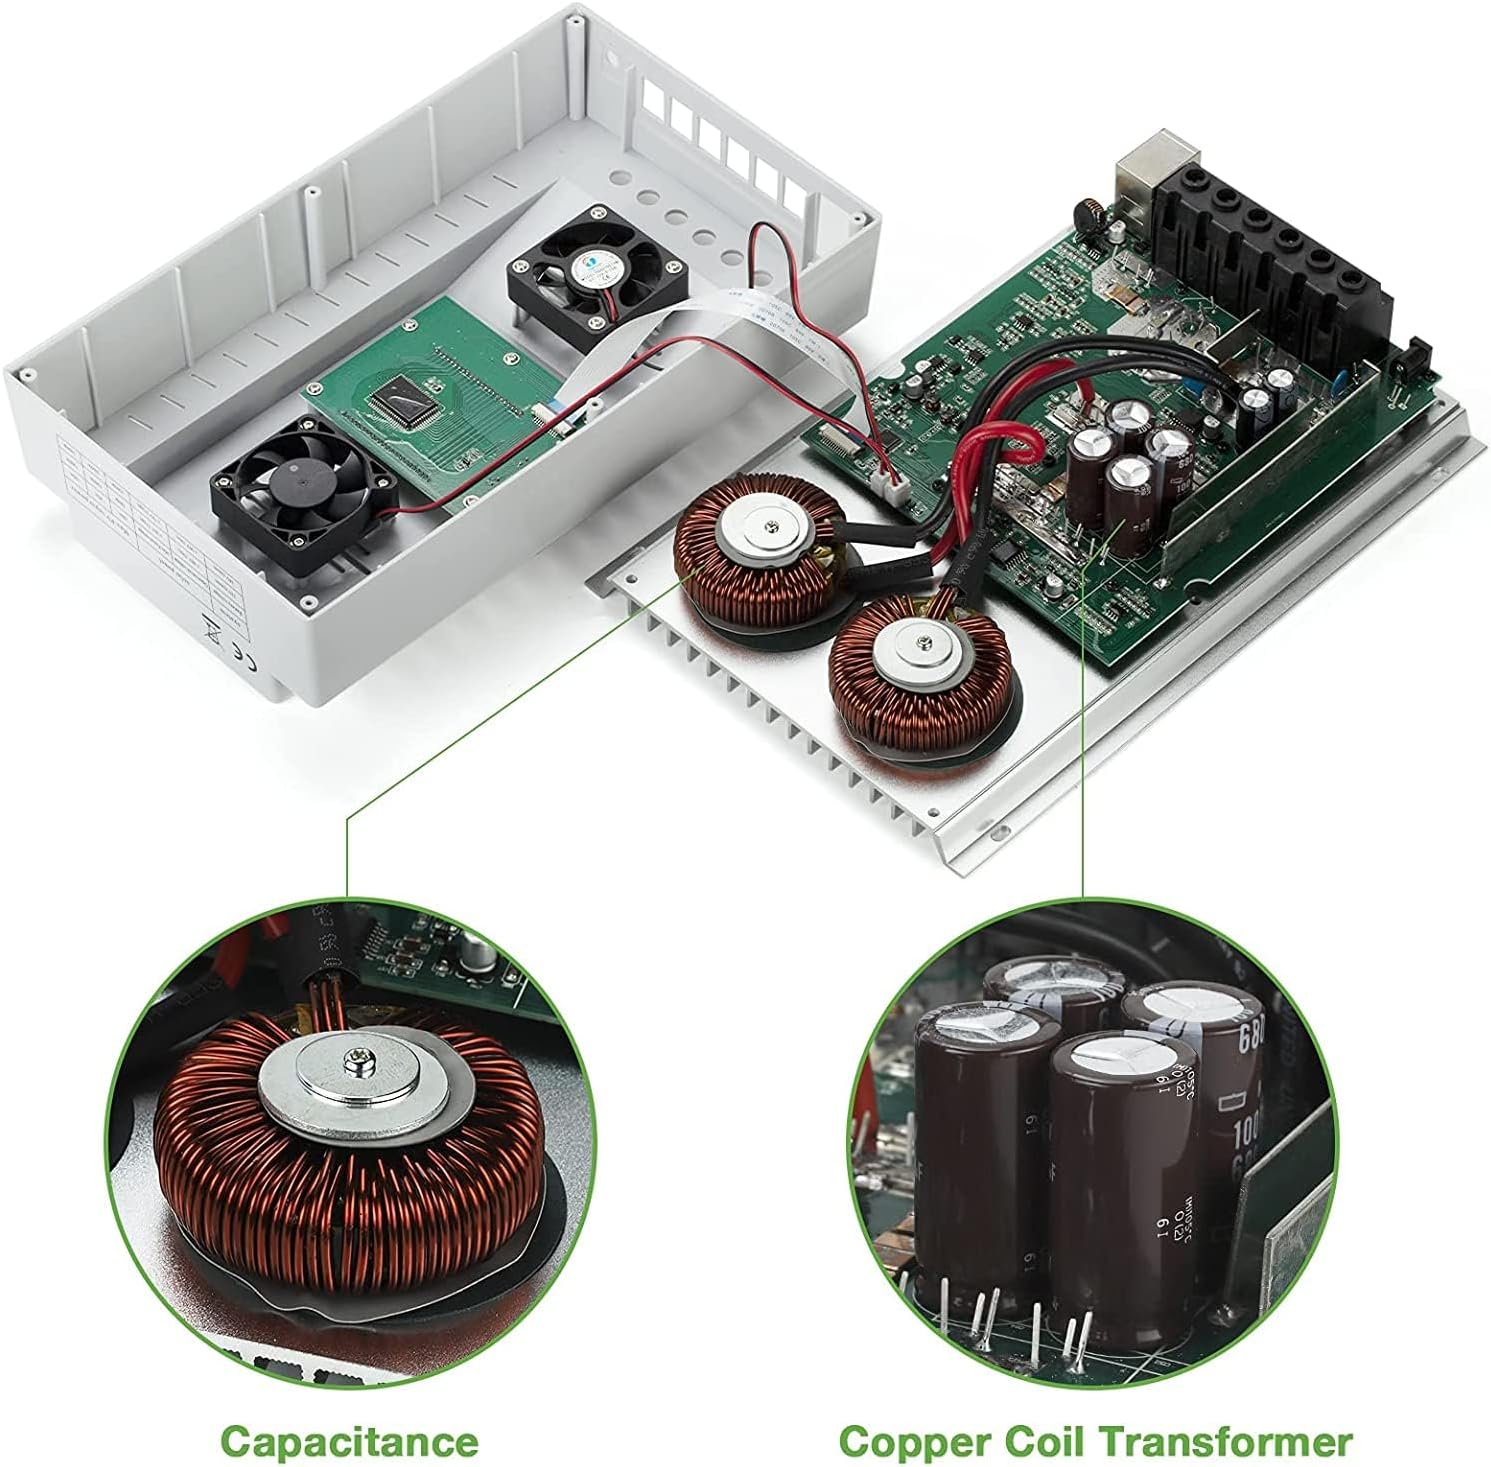
Imej ini menyediakan a view of the internal components of the OOYCYOO MPPT Solar Charge Controller K100A, showcasing the Capacitance and Copper Coil Transformer, which are crucial for the controller's efficient operation and power conversion.

This image illustrates the physical dimensions of the OOYCYOO MPPT Solar Charge Controller K100A, showing its length, width, and height, along with a close-up of the USB ports and RS485 communication port. The dimensions are approximately 11.8 inches (height), 7.4 inches (length), and 3.35 inches (width).
6. Persediaan dan Pemasangan
Pemasangan yang betul adalah penting untuk operasi pengawal cas solar anda yang selamat dan cekap. Ikuti langkah-langkah ini dengan teliti:
6.1 Wiring Sequence
- Sambungkan Bateri: First, connect the battery to the controller's battery terminals. Ensure correct polarity (+ to + and - to -). The controller will automatically detect the system voltage (12V atau 24V).
- Sambungkan Panel Suria: Next, connect the solar panel array to the controller's solar panel terminals. Again, ensure correct polarity.
- Sambungkan Beban DC: Finally, connect your DC load (e.g., lights, fan) to the controller's load terminals.
Penting: Disconnect the system in the reverse order when uninstalling or performing maintenance: first the load, then the solar panel, and finally the battery.
This diagram illustrates the recommended wiring sequence for the OOYCYOO MPPT Solar Charge Controller K100A. It shows the connection from solar panels (PV Panel) through a breaker to the controller, then from the controller to the battery, and finally to DC loads and an inverter for AC loads. Supported battery types are also listed: Lead-acid (Sealed, Flooded, GEL) and User-defined.
6.2 Solar Panel Voltage Keperluan
- Untuk a sistem 12V: PV Open Circuit Voltage (Voc) should be between 18V and 96V.
- Untuk a sistem 24V: PV Open Circuit Voltage (Voc) should be between 36V and 96V.
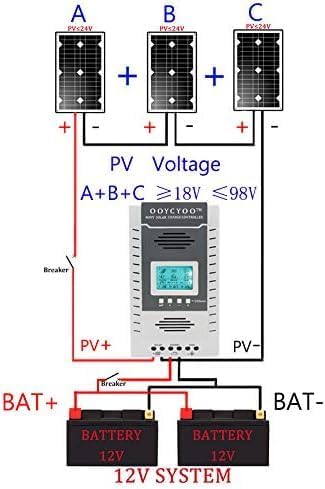
Rajah ini menunjukkan bekasample setup for a 12V solar system using the OOYCYOO MPPT Solar Charge Controller K100A. It illustrates three solar panels (A, B, C) connected in series to achieve a PV voltage between 18V and 98V, which then connects to the controller and a 12V battery bank.

Rajah ini menunjukkan bekasample setup for a 24V solar system using the OOYCYOO MPPT Solar Charge Controller K100A. It illustrates three solar panels (A, B, C) connected in series to achieve a PV voltage between 36V and 98V, which then connects to the controller and a 24V battery bank.
6.3 Pemasangan
Mount the controller in a well-ventilated area, away from direct sunlight, high temperatures, and water. Ensure there is sufficient space around the controller for heat dissipation. Use the provided mounting holes to secure the controller to a stable surface.
7. Arahan Operasi
The OOYCYOO MPPT Solar Charge Controller features an intuitive LCD display and control buttons for easy operation and monitoring.
7.1 Paparan LCD Lebihview

This image details the LCD display of the OOYCYOO MPPT Solar Charge Controller K100A, showing various real-time data points such as solar panel voltage (PV), battery voltage (BATT), load status (LOAD), charging/discharging faults, battery capacity, ambient temperature, and evening/dawn status. It also highlights the control buttons: Toggle Key, "plus", "minus", and Manual Load Switch. The Network Line Interface Indicator is also shown, with green light indicating battery status and yellow light indicating solar energy charging.
The LCD display provides comprehensive real-time data on one screen, making it convenient to check system status. It shows:
- Panel Suria Voltage (PV) and Current (Amp)
- Bateri Voltage (BATT) and Current (Amp)
- Beban Voltage (LOAD) and Current (Amp)
- Charging Fault and Discharging Fault indicators
- Battery Capacity and Ambient Temperature
- Evening Status, Interval, and Dawn Status
- Load Stop Working Hours, Float Charging Voltage, Vol Rendahtage Putuskan Voltage, dan Vol Rendahtage Sambung Semula Voltage.
7.2 Butang Kawalan
- Kunci Togol: Used to cycle through different display screens or menu options.
- "Plus" (+) / "Minus" (-) Buttons: Used to adjust parameters or navigate menu options.
- Suis Muatan Manual: This button can be used to manually open or close the load. Long press this button for 5 seconds to restore factory settings.
- "X" Error/System Failure: If an "X" appears, click this button to troubleshoot or eliminate the error.
7.3 Pemilihan Jenis Bateri
The controller supports various battery types. Refer to the manual's settings section (not detailed here, but typically accessed via the control buttons) to select the appropriate battery type for optimal charging profiles. Options usually include LiFePO4, lithium, AGM, gel, and lead-acid (flooded) batteries.
7.4 Video Demonstration of Operation
This video demonstrates the basic operation and connection of the OOYCYOO MPPT Solar Charge Controller. It shows how to connect the solar panels, battery, and load, and how to monitor the charging and discharging status on the LCD display. The video also illustrates the controller's ability to handle different battery types and its protective functions.
8. Penyelenggaraan
Penyelenggaraan berkala memastikan jangka hayat dan prestasi optimum pengawal cas solar anda.
- Kebersihan: Pastikan pengawal bersih dan bebas daripada habuk dan serpihan. Gunakan kain kering untuk pembersihan.
- Sambungan: Periksa semua sambungan pendawaian secara berkala untuk memastikan ia ketat dan berkarat. Sambungan yang longgar boleh menyebabkan terlalu panas dan kerosakan.
- Pengudaraan: Ensure that the ventilation openings are not blocked to allow for proper heat dissipation.
- Kesihatan Bateri: Monitor your battery's health and voltage regularly. Replace batteries if they show signs of degradation.
- Keadaan Persekitaran: Ensure the controller remains within its specified operating temperature and humidity ranges.
9. Penyelesaian masalah
This section provides solutions to common issues you might encounter with your OOYCYOO MPPT Solar Charge Controller.
9.1 Isu dan Penyelesaian Biasa
| Masalah | Kemungkinan Punca | Penyelesaian |
|---|---|---|
| Tiada paparan pada LCD | Bateri tidak disambungkan atau volum rendahtage; reverse polarity. | Ensure battery is connected first and has sufficient voltage (>9V). Check battery polarity. |
| Tiada pengecasan daripada panel solar | Solar panels not connected; low solar panel voltage; reverse polarity; insufficient sunlight. | Check solar panel connections and polarity. Ensure PV Voc is within specified range (18-96V for 12V system, 36-96V for 24V system). Verify adequate sunlight. |
| Beban tidak berfungsi | Load not connected; battery low voltage disconnect; overload protection; load switch off. | Check load connections. Ensure battery voltage is above low voltage disconnect setting. Reduce load if overloaded. Press manual load switch to turn on. |
| "X" error displayed | System fault (e.g., overcharge, over-discharge, overload, short circuit). | Identify the specific error code if available. Press the "X" button to clear the error. Check for system faults and rectify them. Consult professional if persistent. |
If you encounter issues not listed here or if troubleshooting steps do not resolve the problem, please contact customer support for assistance.
10. Waranti dan Sokongan
The OOYCYOO 100A MPPT Solar Charge Controller (K100A) comes with a Waranti 180 hari tanpa kebimbangan. If you have any questions before or after installation, please email us. Our professional technical team is available to guide you through installation and provide support. We are committed to providing worry-free after-sales service.
For technical assistance or warranty claims, please refer to the contact information provided with your purchase or visit the official OOYCYOO store on Amazon.