
FLINQ 8720168680396
FlinQ Mobile Air Conditioner User Manual
Model: 8720168680396
1. Arahan Keselamatan Penting
Please read all instructions carefully before using this appliance and retain them for future reference. Failure to follow these instructions may result in electric shock, fire, or serious personal injury.
- Sentiasa sambungkan unit ke soket kuasa yang dibumikan.
- Jangan kendalikan unit dengan kord atau palam yang rosak.
- Jauhkan unit daripada bahan mudah terbakar dan api terbuka.
- Pastikan pengudaraan yang betul di sekeliling unit semasa operasi.
- Jangan masukkan objek ke dalam saluran masuk atau keluar udara.
- Cabut plag unit sebelum membersihkan atau melakukan sebarang penyelenggaraan.
- Perkakas ini tidak dimaksudkan untuk digunakan oleh orang (termasuk kanak-kanak) yang kurang keupayaan fizikal, deria atau mental, atau kurang pengalaman dan pengetahuan, melainkan mereka telah diberi pengawasan atau arahan mengenai penggunaan perkakas oleh orang yang bertanggungjawab untuk keselamatan mereka.
2. Produk Lebihview
The FlinQ Mobile Air Conditioner is a versatile unit designed to provide cooling, dehumidification, and fan functions for your living space. It is equipped with an energy-efficient design and comes with a window kit for easy installation.

Rajah 2.1: Depan view of the FlinQ Mobile Air Conditioner, showing the main air outlet and control panel area.

Figure 2.2: The mobile air conditioner unit, displaying its energy efficiency label (Class A) and the included remote control for convenient operation.
3. Komponen dan Bahagian
Familiarize yourself with the main components of your mobile air conditioner:
- Main Unit (with control panel)
- Hos Ekzos
- Window Sealing Kit (adjustable window slider/plate)
- Alat Kawalan Jauh
- Drain Hose (for continuous drainage in dehumidification mode)
- Air Filters (located on the back/side)
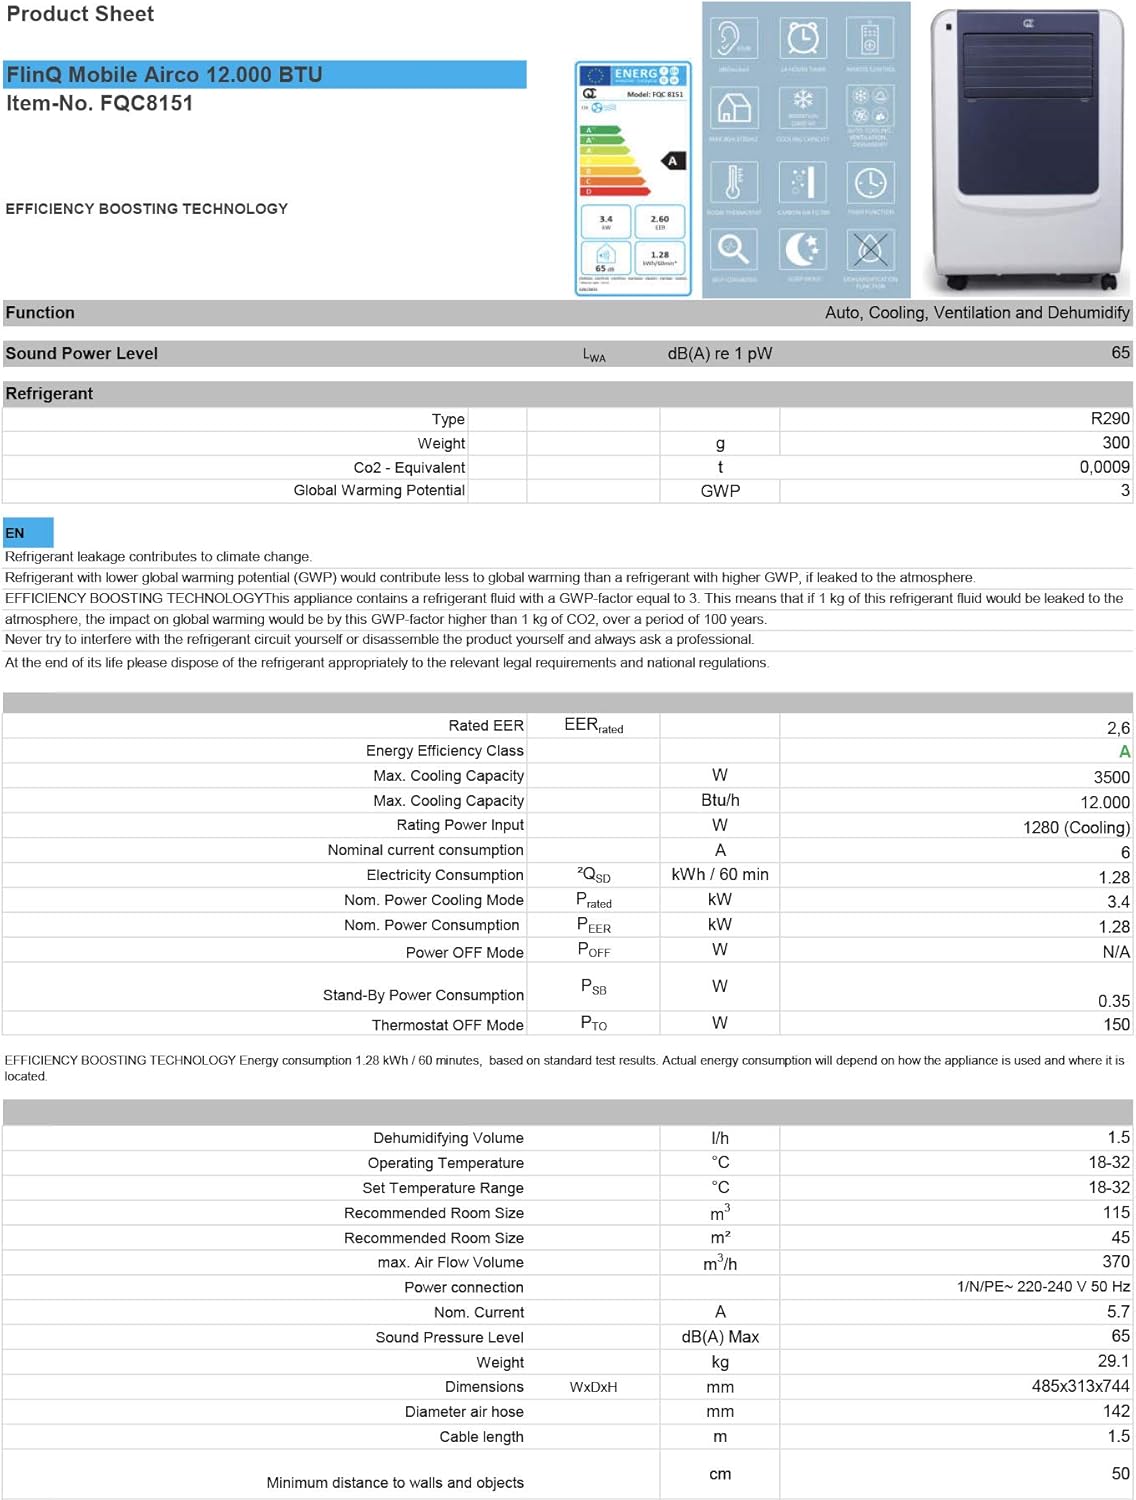
Figure 3.1: The remote control and a visual representation of the unit's key features, including noise level (65dB), 24-hour timer, cooling capacity (12000 BTU/h), room thermostat, carbon air filter, self-diagnosis, sleep mode, remote control function, timer function, auto cooling/fan/dehumidification, and dehumidification function.
4. Persediaan dan Pemasangan
4.1 Membongkar
Carefully remove the air conditioner and all accessories from the packaging. Inspect for any damage during transit. Keep the original packaging for future storage or transport.
4.2 Penempatan
Place the unit on a flat, stable surface. Ensure there is at least 30 cm (12 inches) of clear space around the unit for proper airflow. Do not place it near heat sources or in direct sunlight.
4.3 Pemasangan Kit Tingkap
To ensure efficient cooling, the hot air extracted by the unit must be vented outside. Use the provided window sealing kit for this purpose.
- Pasangkan penyambung hos ekzos ke saluran keluar udara di bahagian belakang unit.
- Extend the exhaust hose and attach the window adapter to the other end.
- Adjust the window slider/plate to fit your window opening.
- Insert the window adapter into the opening of the window slider/plate.
- Close the window as much as possible to seal the opening around the kit, minimizing air leakage.

Rajah 4.1: Sisi view of the mobile air conditioner, illustrating the connection point for the exhaust hose, which expels hot air from the room.
5. Arahan Operasi
5.1 Panel Kawalan
The control panel is located on the top of the unit and features various buttons and an LED display for setting modes, temperature, and timer functions.
5.2 Alat Kawalan Jauh
The remote control allows you to operate all functions of the air conditioner from a distance. Ensure the remote control batteries are inserted correctly.
5.3 Mod Pengendalian
Tekan butang 'Mod' untuk melihat mod operasi yang tersedia:
- Mod Penyejukan: For cooling the room. Set your desired temperature using the temperature adjustment buttons.
- Mod Penyahlembapan: Removes excess moisture from the air. The fan speed is typically fixed in this mode. Consider connecting a drain hose for continuous drainage.
- Mod Kipas: Circulates air without cooling. You can adjust the fan speed (Low, Medium, High).

Rajah 5.1: Jarak dekat view of the adjustable louvers on the air conditioner's front panel, which direct the airflow.
6. Penyelenggaraan
Penyelenggaraan tetap memastikan prestasi optimum dan memanjangkan jangka hayat penghawa dingin anda.
6.1 Pembersihan Penapis Udara
The air filters should be cleaned every two weeks or more frequently depending on usage and air quality. Dirty filters reduce efficiency and can damage the unit.
- Cabut plag penghawa dingin dari salur keluar kuasa.
- Locate and remove the air filters (usually on the back or side of the unit).
- Basuh penapis di bawah air yang mengalir (suam, bukan panas) atau gunakan pembersih vakum untuk menghilangkan habuk.
- Allow the filters to air dry completely before reinserting them. Do not expose them to direct sunlight.

Figure 6.1: Illustration of how to remove the air filter from the mobile air conditioner for cleaning, highlighting the accessible filter panel.
6.2 Menyalirkan Air
The unit collects condensed water during cooling and dehumidification. The internal tank will fill up, and the unit may stop operating when full. Drain the water regularly.
- Place a shallow pan or tray under the drain port (usually at the bottom rear of the unit).
- Tanggalkan palam longkang untuk membolehkan air mengalir keluar.
- For continuous drainage in dehumidification mode, attach the provided drain hose to the drain port.
6.3 Penyimpanan
Apabila menyimpan unit untuk tempoh yang lama:
- Drain all water from the unit.
- Bersihkan penapis udara.
- Cabut palam kord kuasa dan gulungkannya dengan kemas.
- Simpan unit di tempat yang kering dan sejuk, sebaik-baiknya dalam pembungkusan asalnya.
7. Penyelesaian masalah
Sebelum menghubungi sokongan pelanggan, sila rujuk jadual berikut untuk isu biasa dan penyelesaiannya:
| Masalah | Kemungkinan Punca | Penyelesaian |
|---|---|---|
| Unit tidak dihidupkan | Tiada kuasa; Kord kuasa tidak dipasang; Tangki air penuh | Periksa soket kuasa; Pasangkan kord kuasa; Toskan tangki air |
| Unit sejuk tidak mencukupi | Dirty air filters; Exhaust hose blocked/leaking; Room too large; Doors/windows open | Clean filters; Check hose for blockages/proper sealing; Ensure room size is within capacity; Close doors/windows |
| Unit bising | Unit not on a flat surface; Air filters dirty | Place on flat surface; Clean air filters |
| Air bocor dari unit | Drain plug not properly sealed; Unit tilted | Pastikan palam saliran dipasang dengan kukuh; Letakkan unit di atas permukaan yang rata |
8. Spesifikasi
Technical details for the FlinQ Mobile Air Conditioner:
| Ciri | Nilai |
|---|---|
| Nombor Model | 8720168680396 |
| Dimensi Produk | 74 x 48 x 31 cm |
| Berat Barang | 29 g (Note: This weight seems unusually low for an AC unit, please refer to product packaging for accurate weight) |
| Tahap Kebisingan | 65 dB |
| Kapasiti Penyejukan | 12000 BTU/j |
| Saiz Bilik yang Disyorkan | Sehingga 45 m² |
| Ciri Khas | Alat Kawalan Jauh |
| Kelas Tenaga | A |

Figure 8.1: Official product sheet detailing technical specifications, energy consumption, cooling capacity, and dimensions of the FlinQ Mobile Air Conditioner.
9. Waranti dan Sokongan
This FlinQ Mobile Air Conditioner comes with a limited warranty. Please refer to the warranty card included with your purchase for specific terms and conditions.
For technical support, service, or warranty claims, please contact your retailer or the manufacturer directly. Keep your proof of purchase for warranty validation.
Maklumat Hubungan:
- Jenama: FLINQ
- Webtapak: www.flinq.nl (Cthample, please refer to actual product documentation for correct webtapak)
- e-mel: support@flinq.nl (Cthample, please refer to actual product documentation for correct email)
Ask a question about this manual
Ask about setup, troubleshooting, compatibility, parts, safety, or missing instructions. Manuals+ will review the question and use this page’s manual context to help answer it.