
1. Pengenalan
Thank you for choosing the Arcam SA10 Class A/B Integrated Amplifier. This manual provides essential information for setting up, operating, and maintaining your amplifier to ensure years of high-quality audio enjoyment. The SA10 is designed to deliver class-leading sound quality, bringing your music to life with its powerful 50W per channel output, high-performance ESS9016K2M Sabre DAC, and low noise floor. It offers a listening experience as close to the artist's original performance as possible.
2. Maklumat Keselamatan
Sila baca semua arahan keselamatan dengan teliti sebelum mengendalikan unit. Simpan manual ini untuk rujukan masa hadapan.
- Jangan dedahkan radas ini kepada hujan atau lembapan.
- Jangan sekat sebarang bukaan pengudaraan. Pasang mengikut arahan pengilang.
- Jangan pasang berhampiran mana-mana sumber haba seperti radiator, daftar haba, dapur, atau radas lain (termasuk amppenghidup) yang menghasilkan haba.
- Lindungi kord kuasa daripada berjalan atau tersepit, terutamanya pada palam, bekas kemudahan dan tempat keluar dari radas.
- Hanya gunakan lampiran/aksesori yang ditentukan oleh pengilang.
- Cabut plag radas ini semasa ribut petir atau apabila tidak digunakan untuk jangka masa yang lama.
- Rujuk semua perkhidmatan kepada pegawai perkhidmatan yang berkelayakan. Servis diperlukan apabila alat telah rosak dengan cara apa pun.
- Produk ini mengandungi bahan kimia yang diketahui oleh Negeri California untuk menyebabkan kanser dan kecacatan kelahiran atau bahaya pembiakan lain.
3. Kandungan Pakej
Upon opening the box, please ensure all the following items are present:
- Arcam SA10 Integrated Amplebih hidup
- Kord Kuasa AC
- Alat Kawalan Jauh (dengan 2 bateri AAA disertakan)
- Manual Pengguna (dokumen ini)
4. Produk Lebihview
Familiarize yourself with the front and rear panels of your Arcam SA10 amplebih hidup.
4.1 Panel Depan
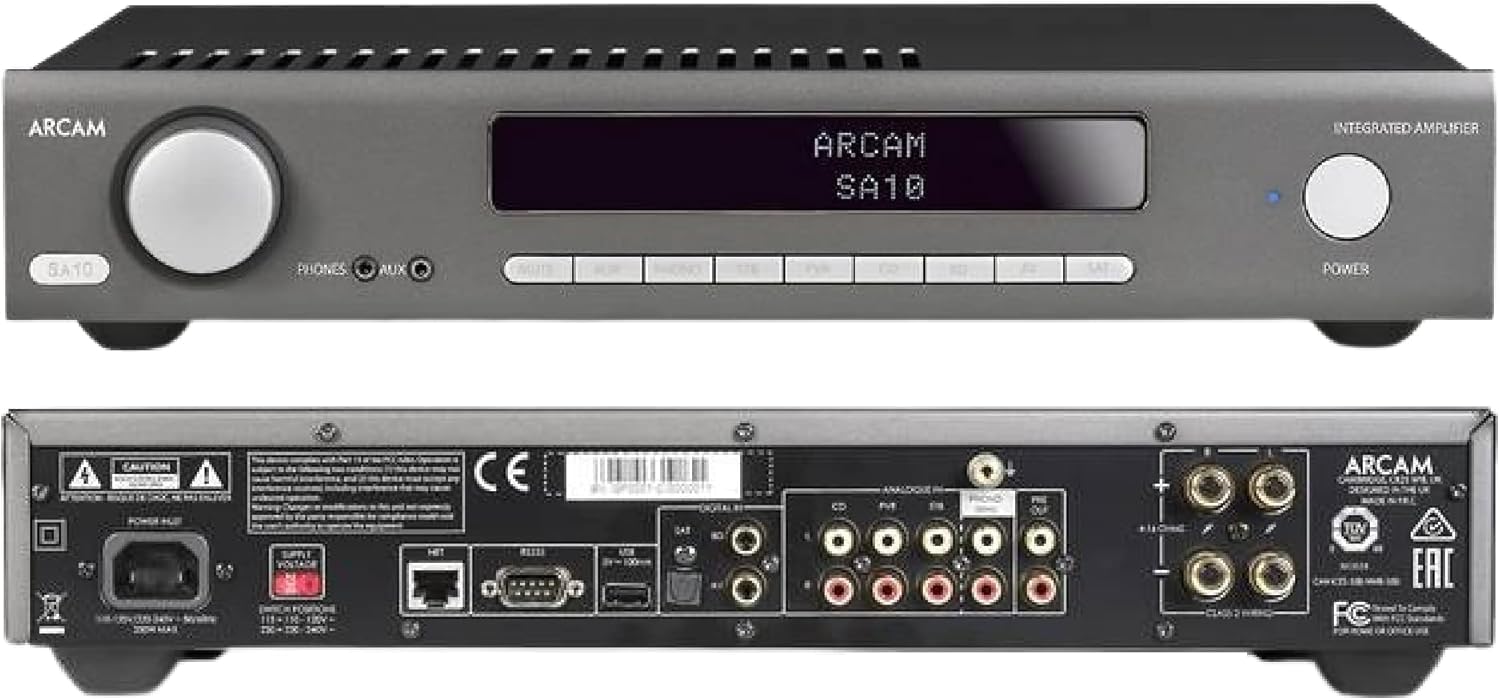
Figure 4.1: Front and Rear Panels of the Arcam SA10. The front panel features a large volume knob on the left, a display screen in the center, input selection buttons below the display, and a power button on the right. Headphone and auxiliary inputs are also present.
- Tombol Kelantangan: Melaraskan volum keluaran keseluruhan.
- Skrin Paparan: Menunjukkan input semasa, tahap kelantangan dan maklumat status lain.
- Butang Pemilihan Input: Allows selection between various audio sources (CD, Tuner, AV, SAT, etc.).
- Butang Kuasa: Togol amplifier between standby and operational modes.
- Output Fon Kepala: Bicu 3.5mm untuk menyambungkan fon kepala.
- Input Bantu: 3.5mm jack for connecting portable audio devices.
4.2 Panel Belakang
The rear panel provides all the necessary connections for your audio system.
Figure 4.2: Detailed Rear Panel Connections. This view highlights the speaker terminals, analog RCA inputs (including Phono), digital optical and coaxial inputs, and the power inlet.
- Terminal Pembesar suara: Connect your passive speakers (left and right channels).
- Analog Inputs (RCA): Multiple stereo RCA inputs for connecting analog audio sources like CD players, tuners, or other line-level devices.
- Phono Input (RCA): Dedicated input for turntables with moving magnet (MM) cartridges.
- Input Digital:
- Optik (Toslink): For digital audio sources like TVs or game consoles.
- Sepaksi: For digital audio sources like CD players or network streamers.
- Pra-Keluar: Untuk menyambung kepada kuasa luaran amppembesar atau subwufer berkuasa.
- Port USB: For firmware updates or service.
- Pelabuhan Ethernet: For network control and future updates.
- Masuk Kuasa AC: Menghubungkan amppenyambung kepada bekalan kuasa utama.
5. Persediaan
5.1 Penempatan
Place the Arcam SA10 on a stable, level surface away from direct sunlight, heat sources, and excessive moisture. Ensure adequate ventilation around the unit to prevent overheating. Do not place other components directly on top of the amplebih hidup.
5.2 Pembesar Suara Penyambung
Connect your passive speakers to the speaker terminals on the rear panel. Ensure correct polarity (+ to + and - to -) for both left and right channels. Use high-quality speaker cables for optimal sound performance.
5.3 Menyambungkan Sumber Audio

Figure 5.3: The Arcam SA10 offers convenient connections including Toslink optical, two digital coaxial inputs, and three stereo analog RCA inputs, plus a dedicated phono input.
- Analog Sources: Connect CD players, tuners, or other line-level devices to the RCA analog inputs (CD, Tuner, AV, SAT).
- Meja Putar: Connect a turntable with a moving magnet (MM) cartridge to the dedicated PHONO input.
- Digital Sources: Connect digital audio sources using either the optical (Toslink) or coaxial digital inputs.
- Portable Devices: Use the 3.5mm AUX input on the front panel for quick connection of portable media players.
5.4 Sambungan Kuasa
Once all audio connections are made, connect the supplied AC power cord to the AC power inlet on the rear panel of the amplifier and then to a suitable wall outlet.
6. Arahan Operasi
6.1 Menghidupkan/Mematikan
Tekan ke KUASA button on the front panel or the remote control to switch the amplifier on or into standby mode. The blue LED next to the power button indicates operational status.
6.2 Pemilihan Input
Use the input selection buttons on the front panel or the remote control to choose your desired audio source. The selected input will be displayed on the front panel screen.
6.3 Kawalan Kelantangan
Putarkan yang besar JILID knob on the front panel clockwise to increase volume and counter-clockwise to decrease it. Alternatively, use the volume up/down buttons on the remote control.
6.4 Penggunaan Fon Kepala
Plug your headphones into the 3.5mm TELEFON jack on the front panel. Connecting headphones will automatically mute the main speaker outputs.
6.5 Alat Kawalan Jauh & Kawalan Aplikasi

Figure 6.5: Control your SA10 with the included remote or via UPnP audio and basic functions using the FREE MusicLife App on your iPad, iPhone, or Android device.
The included remote control provides full functionality for the SA10. Ensure the supplied AAA batteries are correctly inserted. For advanced control and UPnP audio streaming, download the free Arcam MusicLife App from your device's app store (available for iOS and Android).
7. Penyelenggaraan
To maintain the appearance and performance of your Arcam SA10:
- Lap permukaan luar dengan kain lembut, kering dan tidak berbulu.
- Jangan gunakan pembersih yang melelas, lilin atau pelarut.
- Ensure the ventilation grilles are free from dust and obstructions.
- Disconnect the power cord from the wall outlet before cleaning.
8. Penyelesaian masalah
If you experience issues with your Arcam SA10, refer to the following common problems and solutions:
| Masalah | Kemungkinan Punca | Penyelesaian |
|---|---|---|
| Tiada kuasa | Kord kuasa tidak disambungkan; soket kuasa rosak. | Pastikan kord kuasa disambungkan dengan kukuh. Cuba salur kuasa yang lain. |
| Tiada bunyi | Input yang dipilih salah; kabel pembesar suara longgar; kelantangan terlalu rendah; bisu diaktifkan. | Select correct input. Check speaker cable connections. Increase volume. Deactivate mute. |
| Bunyi herot | Source signal too high; speaker impedance mismatch; faulty cables. | Reduce source output level. Ensure speakers are compatible (8 ohms recommended). Check/replace cables. |
| Alat kawalan jauh tidak berfungsi | Batteries depleted or incorrectly inserted; obstruction between remote and amplebih hidup. | Replace batteries. Ensure correct polarity. Remove obstructions. |
If the problem persists, please contact Arcam customer support or your authorized dealer.
9. Spesifikasi
Key technical specifications for the Arcam SA10 Integrated Amplebih hidup:

Figure 9.1: The Arcam SA10 delivers 50 watts per channel, features 5 analog inputs (including phono), 3 digital inputs, a 32-bit DAC, and boasts a low total harmonic distortion + noise of 0.003%.
- Output Kuasa: 50W per channel (8 ohms, 20-20,000 Hz, at 0.5% THD)
- AmpJenis Lifikasi: Kelas A/B
- Digital-to-Analog Converter (DAC): 32-bit ESS9016K2M Sabre DAC
- Input Analog: 5 (including 1 dedicated Phono input for Moving Magnet cartridges)
- Input Digital: 3 (1 Optical Toslink, 2 Coaxial)
- Penyimpangan Harmonik + Bunyi: 0.003%
- Dimensi (W x D x H): 17.05 x 12.72 x 3.43 inci (433 x 323 x 87 mm)
- Berat: 2.03 paun (0.92 kg)
- Kawalan: Full I/P control, Remote Control, MusicLife App compatibility
- Batteries for Remote: 2 AAA (termasuk)
10. Waranti dan Sokongan
Arcam products are designed and manufactured to the highest standards. For information regarding warranty coverage, technical support, or service, please refer to the warranty card included with your product or visit the official Arcam webtapak. Simpan bukti pembelian anda untuk tuntutan waranti.