Singer HD6335M
Manual Pengguna Mesin Jahit Tugas Berat SINGER 6335M
Model: HD6335M
1. Pengenalan
Thank you for choosing the SINGER Heavy Duty 6335M Sewing Machine. This machine is engineered for durability and performance, designed to handle a wide range of fabrics, including heavy materials like denim. With its robust construction and powerful motor, it provides reliable and efficient sewing for various projects. This manual provides essential information for the safe operation, setup, maintenance, and troubleshooting of your new sewing machine. Please read it thoroughly before use.
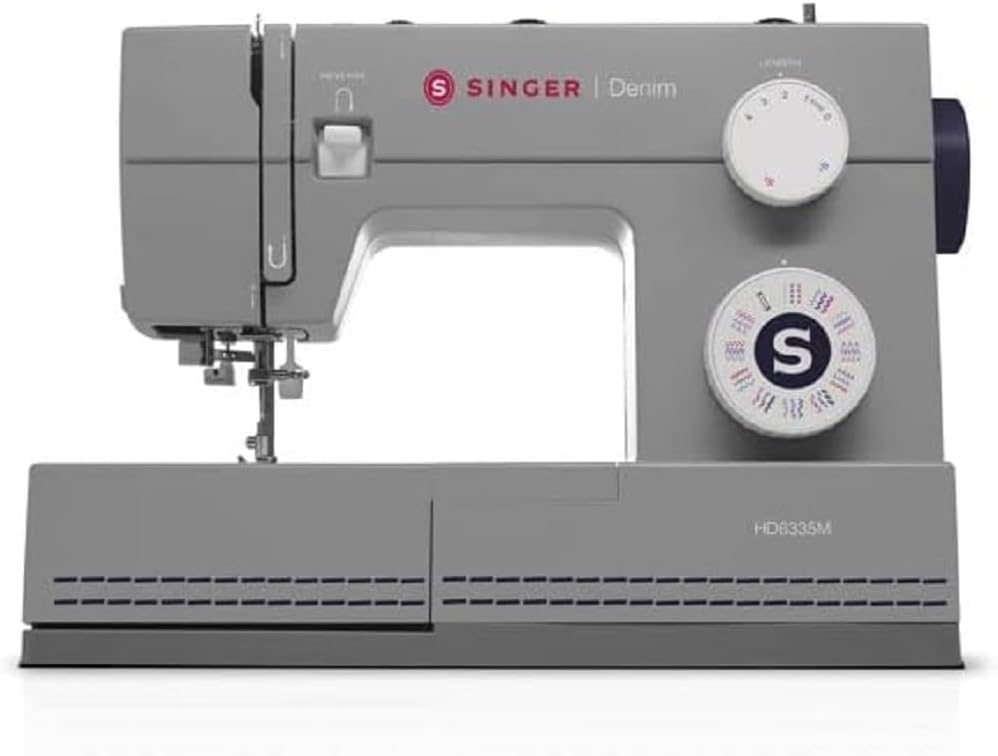
Figure 1: The SINGER Heavy Duty 6335M Sewing Machine. This image shows the overall design of the machine, highlighting its grey color and the prominent SINGER branding.
2. Arahan Keselamatan
Sentiasa ikuti langkah berjaga-jaga keselamatan asas apabila menggunakan peralatan elektrik untuk mengurangkan risiko kebakaran, renjatan elektrik atau kecederaan kepada orang.
- Baca semua arahan sebelum menggunakan mesin.
- Jauhkan jari dari semua bahagian yang bergerak. Penjagaan khas diperlukan di sekitar jarum mesin jahit.
- Sentiasa cabut plag mesin jahit daripada saluran keluar elektrik apabila menanggalkan penutup, pelincir, atau semasa membuat sebarang pelarasan servis pengguna lain yang dinyatakan dalam manual arahan.
- Never operate the sewing machine if it has a damaged cord or plug, if it is not working properly, if it has been dropped or damaged, or dropped into water.
- Jangan sekali-kali menjatuhkan atau memasukkan sebarang objek ke dalam mana-mana bukaan.
- Jangan gunakan di luar rumah.
- Jangan beroperasi di tempat produk aerosol (semburan) digunakan atau di mana oksigen diberikan.
- Untuk memutuskan sambungan, matikan semua kawalan ke kedudukan mati, kemudian tanggalkan palam dari alur keluar.
- Jangan cabut plag dengan menarik kord. Untuk mencabut palam, pegang palam, bukan kordnya.
3. Kandungan Pakej
Upon unpacking your SINGER Heavy Duty 6335M, please verify that all components are present. The standard package typically includes:
- SINGER Heavy Duty 6335M Sewing Machine
- Pengawal Kaki
- Kord Kuasa
- Standard Accessories (e.g., various presser feet, needles, bobbins, seam ripper, lint brush, screwdriver)
- Penutup Habuk Lembut
- Manual Arahan (dokumen ini)
Note: Specific accessories may vary by region or package. Refer to your product packaging list for exact contents.
4. Persediaan
4.1 Sambungan Kuasa
- Letakkan mesin pada permukaan yang stabil dan rata.
- Connect the foot controller plug to the machine's receptacle.
- Sambungkan kord kuasa ke input kuasa mesin dan kemudian ke soket elektrik yang sesuai.
- Hidupkan suis kuasa, biasanya terletak di sisi mesin.
4.2 Menggulung Bobbin
Proper bobbin winding ensures smooth stitching.
- Letakkan gelendong benang pada pin gelendong.
- Pandu benang melalui panduan benang atas dan di sekeliling cakera tegangan penggulungan gelendong.
- Letakkan gelendong kosong pada gelendong penggulung gelendong.
- Lilitkan benang di sekeliling gelendong beberapa kali, kemudian tolak gelendong penggulung gelendong ke kanan.
- Press the foot controller gently to start winding. Stop when the bobbin is full.
- Potong benang dan keluarkan gelendong.
4.3 Memasukkan Bobbin
The SINGER Heavy Duty 6335M features a top drop-in bobbin system for easy access.
- Buka plat penutup gelendong.
- Insert the full bobbin into the bobbin case, ensuring the thread unwinds in the correct direction (usually counter-clockwise).
- Guide the thread through the tension spring and into the thread guide channel.
- Pull out about 6 inches of thread and close the bobbin cover.
4.4 Menjahit Benang Atas
Correct upper threading is crucial for balanced stitches.
- Naikkan pengangkat kaki penekan.
- Letakkan gelendong benang pada pin gelendong.
- Pandu benang melalui panduan benang atas.
- Bring the thread down the right channel, around the tension discs, and up the left channel.
- Hook the thread into the take-up lever from right to left.
- Bring the thread down through the guides to the needle.
- Gunakan pemasang benang jarum terbina dalam (jika ada) atau masukkan benang jarum secara manual dari depan ke belakang.

Figure 2: Threading the needle. This image illustrates the process of threading the needle, showing the thread being guided through the needle eye.
4.5 Drawing Up the Bobbin Thread
- Pegang benang atas dengan lembut menggunakan tangan kiri anda.
- Turn the handwheel towards you to lower the needle into the needle plate and then raise it.
- The upper thread will catch the bobbin thread, forming a loop. Pull the loop up through the needle plate opening.
- Tarik kedua-dua benang (bahagian atas dan gelendong) di bawah kaki penekan dan ke arah belakang mesin.
5. Arahan Operasi
5.1 Pemilihan Jahitan
Your SINGER Heavy Duty 6335M offers 32 built-in stitches. Use the stitch selector dial to choose the desired stitch pattern. Refer to the stitch chart on the machine for visual guidance.
5.2 Pelarasan Panjang dan Lebar Jahitan
Adjust stitch length and width using the corresponding dials to suit your fabric and project needs. Longer stitches are generally for thicker fabrics, while shorter stitches are for finer details.
5.3 Sewing Speed Control
The sewing speed is controlled by the foot controller. Press gently for slower speeds and apply more pressure for higher speeds. The machine is capable of high-speed sewing for efficient work.
5.4 Sewing Heavy Fabrics
This machine is specifically designed for heavy-duty sewing, including multiple layers and denim fabrics.
- Use appropriate heavy-duty needles (e.g., denim needles) for thick materials.
- Adjust the presser foot pressure if your machine has this feature (refer to specific machine details).
- Ensure proper thread tension for heavy fabrics to prevent skipped stitches or thread breakage.
5.5 Jahitan Lengan Percuma
Remove the accessory storage compartment to reveal the free arm. This feature is ideal for sewing cylindrical items like cuffs, sleeves, and pant hems.
5.6 Buttonhole Sewing
The machine supports easy buttonhole creation.
- Attach the one-step buttonhole foot.
- Insert the button into the back of the buttonhole foot.
- Select the buttonhole stitch on the stitch selector dial.
- Turunkan tuas lubang butang.
- Begin sewing; the machine will automatically create the buttonhole to the size of your button.

Figure 3: Buttonhole foot in position. This image shows the buttonhole presser foot attached to the machine, positioned over fabric, ready for automatic buttonhole stitching.
6. Penyelenggaraan
Penyelenggaraan yang kerap memastikan jangka hayat dan prestasi optimum mesin jahit anda.
6.1 Pembersihan
- Sentiasa cabut plag mesin sebelum membersihkan.
- Tanggalkan plat jarum dan bekas gelendong.
- Use the lint brush (included with accessories) to remove lint and dust from the feed dogs and bobbin area.
- Lap bahagian luar mesin dengan kain lembut dan kering. Jangan gunakan bahan kimia yang keras atau pembersih yang kasar.
6.2 Pelinciran
Your SINGER Heavy Duty 6335M is designed to require minimal lubrication. Refer to the full instruction manual for specific oiling points if necessary. Over-oiling can attract lint and cause issues.
6.3 Penggantian Jarum
Replace needles frequently (after every 8-10 hours of sewing or when bent/dull) to prevent skipped stitches and fabric damage.
- Matikan dan cabut plag mesin.
- Longgarkan jarum clamp skru.
- Tanggalkan jarum lama.
- Masukkan jarum baharu dengan bahagian rata menghadap bahagian belakang mesin, tolak ke atas sejauh yang boleh.
- Ketatkan jarum clamp skru dengan selamat.
7. Penyelesaian masalah
Bahagian ini menangani isu biasa yang mungkin anda hadapi.
| Masalah | Kemungkinan Punca | Penyelesaian |
|---|---|---|
| Mesin tidak menjahit | Machine not plugged in; power switch off; bobbin winder engaged. | Check power connection; turn power switch on; disengage bobbin winder. |
| Jahitan yang dilangkau | Incorrect needle size/type; bent or dull needle; improper threading; incorrect tension. | Change needle to correct type/size; replace needle; re-thread machine correctly; adjust tension. |
| Thread breaking (upper) | Improper threading; tension too tight; poor quality thread; burr on needle plate or bobbin case. | Re-thread machine; loosen upper tension; use good quality thread; check for burrs and smooth them. |
| Thread breaking (bobbin) | Improperly wound bobbin; bobbin inserted incorrectly; lint in bobbin case. | Re-wind bobbin evenly; re-insert bobbin correctly; clean bobbin case area. |
| Fabrik tidak menyusu | Feed dogs lowered; lint in feed dogs; presser foot pressure too low. | Raise feed dogs; clean feed dogs; increase presser foot pressure. |
For more detailed troubleshooting, please refer to the comprehensive manual available on the SINGER webtapak atau hubungi sokongan pelanggan.
8. Spesifikasi
| Ciri | Perincian |
|---|---|
| Nombor Model | HD6335M |
| Jenama | Penyanyi |
| jahitan | 32 Jahitan terbina dalam |
| Kelajuan | High Speed Capability |
| Jenis Lengan | Lengan Percuma |
| Dimensi Produk | 22T x 45B x 34T cm |
| Dimensi Pakej | 44.8 x 34 x 21.8 cm |
| Berat Pakej | 7.9 Kilogram |
| warna | Kelabu |
9. Waranti dan Sokongan
9.1 Waranti Produk
The SINGER Heavy Duty 6335M Sewing Machine comes with a Waranti pengilang selama 2 tahun. Waranti ini melindungi kecacatan pada bahan dan mutu kerja di bawah penggunaan biasa. Sila simpan bukti pembelian anda untuk tuntutan waranti.
9.2 Sokongan Pelanggan
For technical assistance, service, or to inquire about replacement parts, please contact SINGER customer support. You can find contact information and additional resources, including a digital version of this manual and FAQs, on the official SINGER webtapak: www.singer.com.
EU replacement parts availability is guaranteed for 2 years.
Ask a question about this manual
Ask about setup, troubleshooting, compatibility, parts, safety, or missing instructions. Manuals+ will review the question and use this page’s manual context to help answer it.