
pengenalan
This user manual provides comprehensive instructions for the setup, operation, maintenance, and troubleshooting of your G-MARK X320FM Wireless Microphones System. Please read this manual thoroughly before using the product to ensure optimal performance and longevity.
Produk Selesaiview
Ciri-ciri Utama
- Unique LED Light Design: Microphones feature an LED halo for visual feedback.
- Adjustable Frequency: Dual UHF technology with a selectable frequency range of 520 MHz to 560 MHz, allowing for frequency changes if interference occurs.
- Plug and Play, Auto Pairing: Automatic frequency synchronization between receiver and microphones upon power-on.
- Pembinaan lasak: Microphones are constructed from metal for durability and impact resistance.
- Paparan LCD: Professional receiver features an LCD screen displaying channels and frequencies.
- Aplikasi luas: Serasi dengan amplifiers, speakers, audio mixers, and other PA systems, suitable for karaoke, DJ events, parties, church, weddings, speeches, conferences, and outdoor events.
Kandungan Pakej
The G-MARK X320FM Wireless Microphones System package includes the following items:
- 1 x Kotak Penerima
- 2 x UHF Wireless Handheld Microphones
- Kabel Audio 1 x 6.35 mm
- 1 x Penyesuai Kuasa
- 2 x Antena
- 2 x Anti-skid Rings
- 1 x Manual Pengguna

Figure 1: Contents of the G-MARK X320FM package, including the receiver, two handheld microphones, power adapter, audio cable, antennas, and anti-skid rings.
Pengenalan Komponen
Receiver Front and Rear Panels

Rajah 2: Depan view of the G-MARK X320FM receiver, showing the display, volume controls, and power switch. Rear view details XLR outputs, MIX OUT, power input, and antenna connections.
- Panel Depan: Features UP/VOL and DW/VOL buttons for channel A and B, CHA/CHB frequency displays, RF/AF indicators, and a central power switch.
- Panel belakang: Includes ANT-A and ANT-B antenna connectors, BALANCED OUT-A and BALANCED OUT-B XLR outputs, a MIX OUT (AF A+B) 6.35mm audio output, and a DC9-12V power input.
Handheld Microphone Details
Rajah 3: Terperinci view of the G-MARK X320FM handheld microphone, showing the microphone head, internal components, battery compartment, and AFH switch for frequency selection.
- Ketua Mikrofon: Metal mesh grille for protection and clear sound quality.
- Badan: Pembinaan logam tahan lama.
- paparan: Shows battery level and current frequency.
- Butang Kuasa: For turning the microphone on/off.
- Petak Bateri: Located at the bottom of the microphone for battery insertion.
- AFH Switch: Allows for channel selection (A, B, C, D) on the microphone.
Arahan Persediaan
1. Pemasangan Bateri
To install batteries in the handheld microphones:
- Buka skru bahagian bawah mikrofon untuk mendedahkan petak bateri.
- Insert two AA batteries, ensuring correct polarity.
- Skru bahagian bawah kembali dengan selamat.
Video 1: Demonstrates battery installation in the handheld microphone (0:54 - 1:02).
2. Menyambungkan Penerima
Connect the receiver to your audio system using the provided 6.35mm audio cable or XLR cables (not included for XLR). Ensure you connect to the Jack MIC pada anda amplifier, speaker, or audio mixer, not the AUX jack.

Figure 4: Diagram illustrating how to connect the G-MARK X320FM receiver to various audio devices like a professional music mixer, amplifier, or karaoke machine. Note that connection to laptops, iPads, phones, or TVs is generally not compatible.
3. Sambungan Antena
Screw the two antennas onto the ANT-A and ANT-B connectors on the rear panel of the receiver. Position them vertically for optimal signal reception.
4. Menghidupkan
Connect the power adapter to the DC9-12V input on the receiver and plug it into a power outlet. Press the central POWER button on the receiver to turn it on. Then, press the POWER button on each handheld microphone to turn them on.
Video 2: Shows the receiver powering on (0:19 - 0:23) and a microphone powering on (1:02 - 1:07).
Arahan Operasi
1. Automatic Pairing (Flash Match)
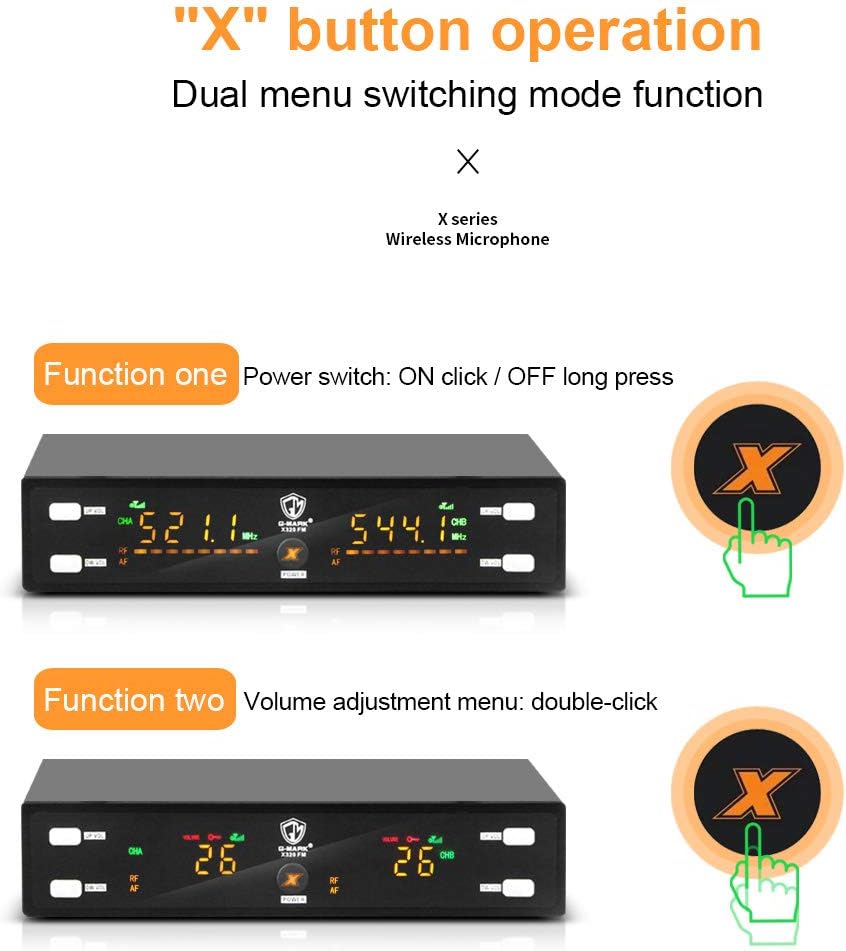
The G-MARK X320FM system features automatic frequency synchronization. Once the receiver and microphones are powered on, they will automatically pair and lock to an available frequency. The receiver's display will show the synchronized frequency.

Figure 5: Illustrates the 'Flash Match' feature where the microphone and receiver automatically lock frequency immediately after power on.
2. Pelarasan Kekerapan
If you experience interference, you can manually adjust the frequency on the handheld microphone. The receiver's frequency for that channel will automatically change to match the microphone's new frequency.
- Locate the AFH switch inside the microphone's battery compartment.
- Use the switch to select a different channel (A, B, C, or D).
- Observe the receiver's display; the frequency for the corresponding channel will update.
Video 3: Demonstrates frequency adjustment on the handheld microphone and how the receiver's frequency changes accordingly (1:24 - 1:46).
3. Pelarasan Kelantangan
Adjust the volume for each microphone channel directly on the receiver:
- For Channel A, use the 'UP/VOL' and 'DW/VOL' buttons on the left side of the receiver.
- For Channel B, use the 'UP/VOL' and 'DW/VOL' buttons on the right side of the receiver.
- The volume level will be displayed on the receiver's LCD screen.
Video 4: Shows how to adjust the volume using the UP/VOL and DW/VOL buttons on the receiver (1:47 - 1:58).
4. Frequency Lock/Unlock
To prevent accidental frequency changes, you can lock the receiver's frequency. To unlock, double-click the UP/VOL and DW/VOL buttons simultaneously on the desired channel.
Video 5: Demonstrates how to lock and unlock the receiver's frequency by double-clicking two keys simultaneously (1:15 - 1:23).
Penyelenggaraan
- Pembersihan: Use a soft, dry cloth to clean the receiver and microphones. Avoid using liquid cleaners or solvents.
- Penjagaan Bateri: Tanggalkan bateri daripada mikrofon jika ia tidak akan digunakan untuk tempoh yang lama bagi mengelakkan kebocoran.
- Storan: Simpan sistem di tempat yang sejuk dan kering jauh dari cahaya matahari langsung dan suhu yang melampau.
- Pengendalian: Handle microphones and receiver with care to avoid physical damage.
Menyelesaikan masalah
| Masalah | Kemungkinan Punca | Penyelesaian |
|---|---|---|
| Tiada suara dari mikrofon | Microphone or receiver not powered on; low batteries; incorrect connection; mismatched frequency; receiver connected to AUX jack. | Ensure all devices are powered on. Check microphone batteries. Verify receiver is connected to the MIC input of your audio system. Check that microphone and receiver frequencies match. |
| Interference or poor sound quality | Other wireless devices operating on the same frequency; too far from receiver; obstacles blocking signal. | Adjust microphone frequency to an unused channel. Reduce distance between microphone and receiver. Ensure a clear line of sight between devices. |
| Kelantangan rendah | Microphone volume too low; receiver volume too low; audio system volume too low. | Increase volume on the microphone, receiver, and your connected audio system. |
| Receiver display is locked | Frequency lock feature is active. | Double-click the UP/VOL and DW/VOL buttons simultaneously on the respective channel to unlock the frequency. |
Spesifikasi
| Ciri | Perincian |
|---|---|
| Nombor Model | G320FMus |
| Jenama | G-MARK |
| Faktor Bentuk Mikrofon | pegang tangan |
| bahan | logam |
| Kekerapan Mikrofon Tanpa Wayar | 520 MHz - 560 MHz (Adjustable UHF) |
| Respons Kekerapan | 18 KHz |
| Kepekaan Audio | 60 Desibel |
| Corak Kutub | Satu arah |
| Sumber Kuasa | Dikuasakan oleh Bateri (Mikrofon) |
| Berat Barang | 3.08 paun (Sistem) |
| Dimensi Produk (L x W x H) | 15.74 x 12.99 x 2.75 inci |
| Teknologi Ketersambungan | XLR, Bicu 6.35mm |
| Peranti Serasi | Amplifier, Audio Mixer, Karaoke Machine |
Waranti dan Sokongan
For warranty information, technical support, or any inquiries regarding your G-MARK X320FM Wireless Microphones System, please contact G-MARK customer service through the official channels provided at the point of purchase or on the G-MARK webtapak. Sila simpan bukti pembelian anda untuk tuntutan waranti.