
1. Pengenalan
The EPEVER Tracer 3215BN is a 30A Maximum Power Point Tracking (MPPT) solar charge controller designed for 12V/24V battery systems. It efficiently converts solar energy to charge various battery types, including Sealed, Gel, and Flooded lead-acid batteries. This controller features an integrated LCD display for system monitoring and configuration, along with advanced protection functions to ensure system reliability.
2. Ciri-ciri Produk
- Teknologi MPPT Lanjutan: Ensures maximum power point tracking with an efficiency of no less than 99.5%, optimizing solar energy harvesting.
- Kecekapan Penukaran Tinggi: Achieves a maximum conversion efficiency of 98%.
- Fast Tracking Speed: Ultra-fast tracking and accurate recognition of multiple power points.
- Reka Bentuk Teguh: Features a common negative design and die-cast aluminum construction for effective heat dissipation.
- Perlindungan Komprehensif: Includes all-round electronic fault self-test and enhanced electronic protection functions to prevent system damage.
- Antara Muka Komunikasi: Equipped with an RS-485 communication bus interface and Modbus communication protocol for expanded applications and monitoring via PC or external display units like MT52.
- Software Upgrade Support: Allows for future software enhancements.
- User-Friendly Indicators: LED indicators provide clear system status.
- Flexible Load Control: Offers multiple load control modes including manual control, light ON/OFF, light On+Timer, and time control.
- Keserasian Bateri: Supports Sealed, Gel, Flooded, and User-defined battery types.
- Pampasan Suhu: Includes a battery temperature compensation function.
- Energy Statistics: Provides real-time energy statistics.
3. Persediaan dan Pemasangan
Proper installation is crucial for the safe and efficient operation of your EPEVER Tracer 3215BN controller. Follow these steps carefully.
3.1 Pengenalan Komponen

This image illustrates the various components and ports of the Tracer 3215BN controller, including the Heat Sink, RTS Port, Charging LED indicator, Solar Terminal, Battery LED indicator, Button, RS-485 Port, Battery Terminal, and Load Terminal.
3.2 Gambarajah Pendawaian
Connect the components in the specified order to prevent damage to the controller and other system components.

This diagram shows the connection sequence: Solar Panel (PV) to the controller, controller to Battery, and controller to Load (e.g., lights, fan, TV, computer via inverter). Ensure correct polarity for all connections.
- Sambungkan Bateri: First, connect the battery to the controller's battery terminals. Ensure correct polarity (+ to + and - to -). The controller requires battery power to operate.
- Connect the Solar Panels: Next, connect the solar panels to the controller's PV terminals. Verify correct polarity.
- Sambungkan Beban: Finally, connect your DC loads to the controller's load terminals. If using AC loads, connect them through an inverter, which is then connected to the battery.
Nota Keselamatan Penting: Always disconnect power from solar panels and battery before making or breaking any connections to the controller. Ensure all connections are tight to prevent loose contacts and overheating.
3.3 Pelabuhan Komunikasi

This image highlights the RTS (Remote Temperature Sensor) Port and the RS-485 Port, used for external temperature sensing and communication respectively.
- RTS Port: Connect the optional Remote Temperature Sensor (RTS) here for accurate battery temperature compensation.
- Pelabuhan RS-485: Use this port for connecting to a PC, MT52 remote meter, or other monitoring devices via Modbus protocol.
4. Arahan Operasi
Once installed, the controller will automatically begin charging the battery from the solar panels. The LCD display provides real-time information about the system status.
4.1 Paparan LCD dan Butang
The integrated LCD display shows various parameters such as battery voltage, charging current, load status, and error codes. Use the buttons adjacent to the display to navigate through menus and adjust settings.
4.2 Mod Kawalan Beban
The controller offers several load control modes:
- Kawalan manual: Turn the load ON or OFF manually.
- Lampu HIDUP/MATI: Load turns ON at dusk and OFF at dawn.
- Light On+Timer: Load turns ON at dusk and stays ON for a set duration.
- Kawalan Masa: Load operates during specific programmed times.
4.3 Remote Monitoring and Settings
The Tracer 3215BN supports remote monitoring and parameter adjustment through various accessories.
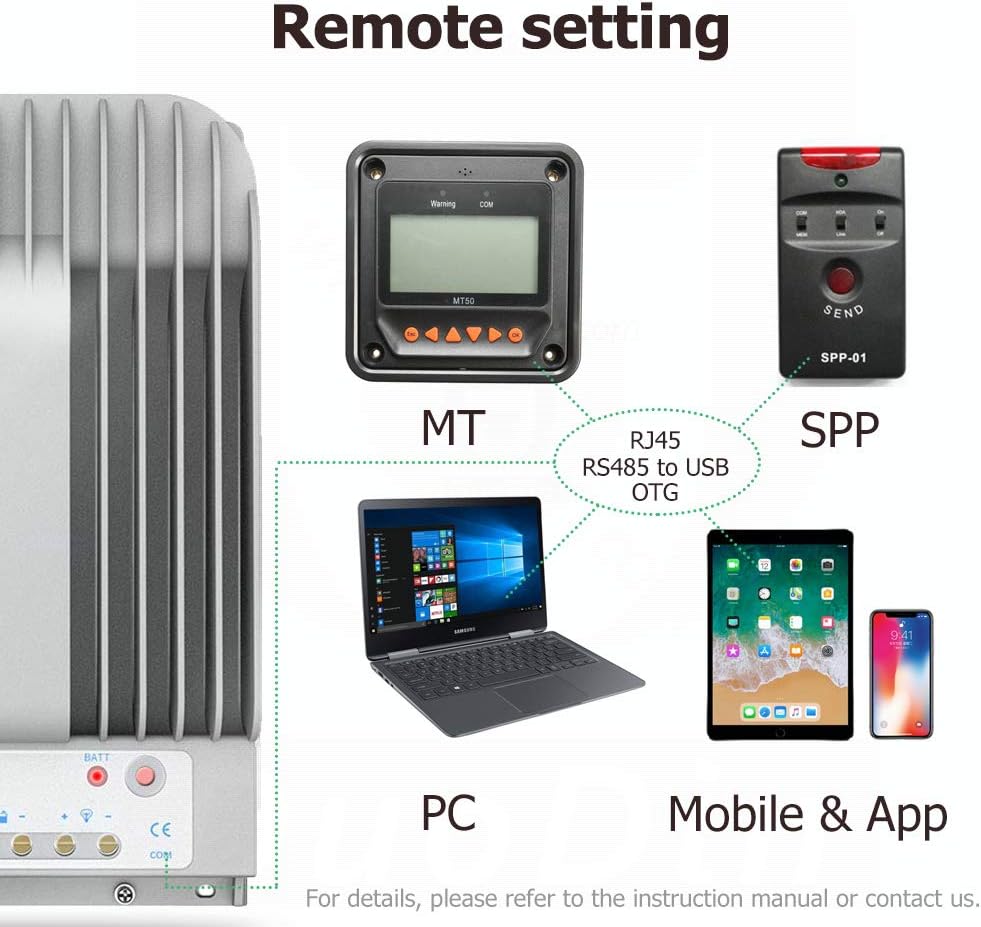
This image illustrates how the controller can be connected to an MT (remote meter), SPP (wireless module), PC, or mobile application for remote monitoring and configuration.
- MT Remote Meter: Connect an EPEVER MT series remote meter (e.g., MT52) to view real-time data and modify parameters from a distance.
- Perisian PC: Use EPEVER PC software by connecting the controller via an RS-485 to USB adapter for detailed monitoring, data logging, and advanced settings.
- Apl Mudah Alih: Connect a compatible wireless module (e.g., Bluetooth or WiFi) to use the EPEVER mobile application for convenient monitoring and control via smartphone or tablet.
5. Penyelenggaraan
Penyelenggaraan berkala memastikan jangka hayat dan prestasi optimum pengawal cas solar anda.
- Periksa Sambungan: Periodically check all wiring connections for tightness and corrosion. Loose connections can cause voltage jatuh dan terlalu panas.
- Bersihkan Pengawal: Keep the controller clean and free from dust and debris. Ensure the heat sink fins are not obstructed to allow for proper heat dissipation.
- Semak Status Bateri: Pantau bateri voltage and health regularly. Ensure the battery type setting in the controller matches your installed battery.
- Keadaan Persekitaran: Ensure the controller is installed in a dry, well-ventilated area, away from direct sunlight and extreme temperatures.
6. Penyelesaian masalah
This section addresses common issues you might encounter with your Tracer 3215BN controller.
6.1 Controller Not Powering On
- Semak Sambungan Bateri: The controller requires a minimum battery voltage to power on. Ensure the battery is properly connected and has sufficient charge. If the battery is completely discharged, the controller may not power on until an external 12V source or sufficient solar input is provided to raise the battery voltage.
- Sahkan Polariti: Confirm that the battery connections are made with correct polarity.
- Inspect Fuses/Breakers: Check any inline fuses or circuit breakers between the battery and the controller.
6.2 No Charging Indication
- Check Solar Panel Connection: Ensure solar panels are correctly connected to the PV terminals with proper polarity.
- Verify Solar Input Voltage: Ukur vol litar terbukatage of your solar panels to ensure it is within the controller's acceptable range (Max 150V).
- Sunlight Conditions: Ensure there is adequate sunlight reaching the solar panels.
6.3 Load Not Working
- Check Load Connection: Verify that the load is correctly connected to the load terminals.
- Mod Kawalan Beban: Ensure the load control mode is set appropriately (e.g., manual ON, or correct timer settings).
- Bateri Voltage: Jika bateri voltage is too low, the controller may disconnect the load to protect the battery.
- Perlindungan Lebihan: Check if the load current exceeds the controller's rated load current, triggering overload protection.
7. Spesifikasi
Key technical specifications for the EPEVER Tracer 3215BN MPPT Solar Charge Controller:
| Parameter | Nilai |
|---|---|
| Model | Tracer3215BN |
| Sistem Nominal Voltage | 12V / 24V Auto Work |
| Kadar Caj Semasa | 30A |
| Arus Beban Dinilai | 30A |
| Maks. Litar Terbuka PV Voltage | 150V (pada suhu persekitaran operasi minimum) 138V (pada suhu persekitaran 25°C) |
| Maks. Kuasa Input PV | 390W (12V) / 780W (24V) |
| MPP Jldtage Julat | Bateri voltage +2V ~ 108V |
| Jenis Bateri | Sealed, Gel, Flooded, User |
| Kecekapan Penukaran | ≤98% |
| Kecekapan Penjejakan | ≥99.5% |
| Komunikasi | RS-485 (RJ45 interface) |
| Julat Suhu Operasi | -35°C hingga +55°C |
| Julat Suhu Penyimpanan | -35°C hingga +80°C |
| Dimensi (L x W x H) | 281mm x 160mm x 60mm |

This table provides a comparison of key specifications between the Tracer-AN and Tracer-BN series, highlighting the superior heat dissipation and voltage ranges of the BN series.

This image details the physical dimensions of the Tracer 3215BN controller.
8. Maklumat Waranti
Warranty terms and conditions for EPEVER products can vary. It is recommended to confirm the specific warranty period and coverage directly with your seller (SolaMr) or the manufacturer (EPEVER) at the time of purchase. Keep your proof of purchase for any warranty claims.
9. Sokongan
For technical assistance, troubleshooting beyond this manual, or inquiries regarding product functionality, please contact the following:
- Sokongan Penjual: Contact SolaMr for assistance related to your purchase.
- Sokongan Pengeluar: Visit the official EPEVER website for product documentation, FAQs, and contact information for direct manufacturer support.