
Insize 9501-1200
Insize Coating Thickness Gauge 9501-1200
Manual Pengguna
1. Produk Lebihview
The Insize Coating Thickness Gauge 9501-1200 is a precision instrument designed for non-destructive measurement of coating thickness. It is capable of measuring both non-magnetic coatings on magnetic substrates (ferrous, Fe) and non-conductive coatings on non-magnetic substrates (non-ferrous, NFe). This gauge is widely used in manufacturing, quality control, and inspection processes to ensure proper coating application.
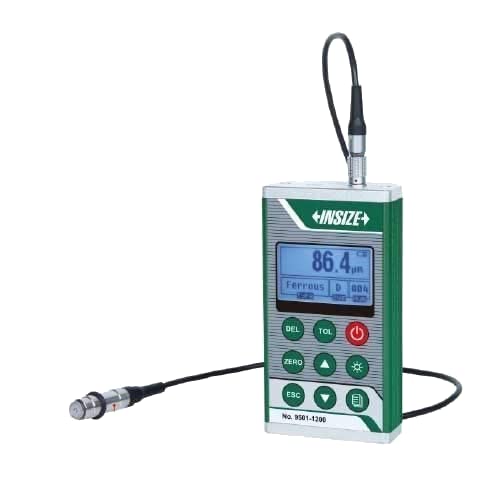
Figure 1: Insize Coating Thickness Gauge 9501-1200. The image shows the compact, handheld device with a digital display, control buttons, and a connected measurement probe.
2. Maklumat Keselamatan
- Always handle the gauge and probes with care to prevent damage.
- Jangan dedahkan peranti kepada suhu, kelembapan atau persekitaran yang menghakis.
- Elakkan daripada menjatuhkan instrumen atau mendedahkannya kepada hentaman yang kuat.
- Keep the device away from strong magnetic fields, which can affect measurement accuracy.
- Ensure batteries are inserted correctly and dispose of used batteries responsibly.
- Jangan cuba membuka atau membaiki unit sendiri. Rujuk kepada kakitangan perkhidmatan yang berkelayakan.
3. Product Components and Standard Delivery
The Insize Coating Thickness Gauge 9501-1200 comes with the following standard components:
- Main unit (1 pc)
- Magnetic induction probe (Fe) (1 pc)
- Eddy current probe (NFe) (1 pc)
- Zero calibration block for Fe (1 pc)
- Calibration foils (50μm, 100μm, 250μm, 500μm, 1000μm) (1 set)
- 1.5V AA battery (2 pcs)
- USB cable and software (1 set)
Optional accessories are also available for specialized applications, such as different types of probes for specific measurement needs.
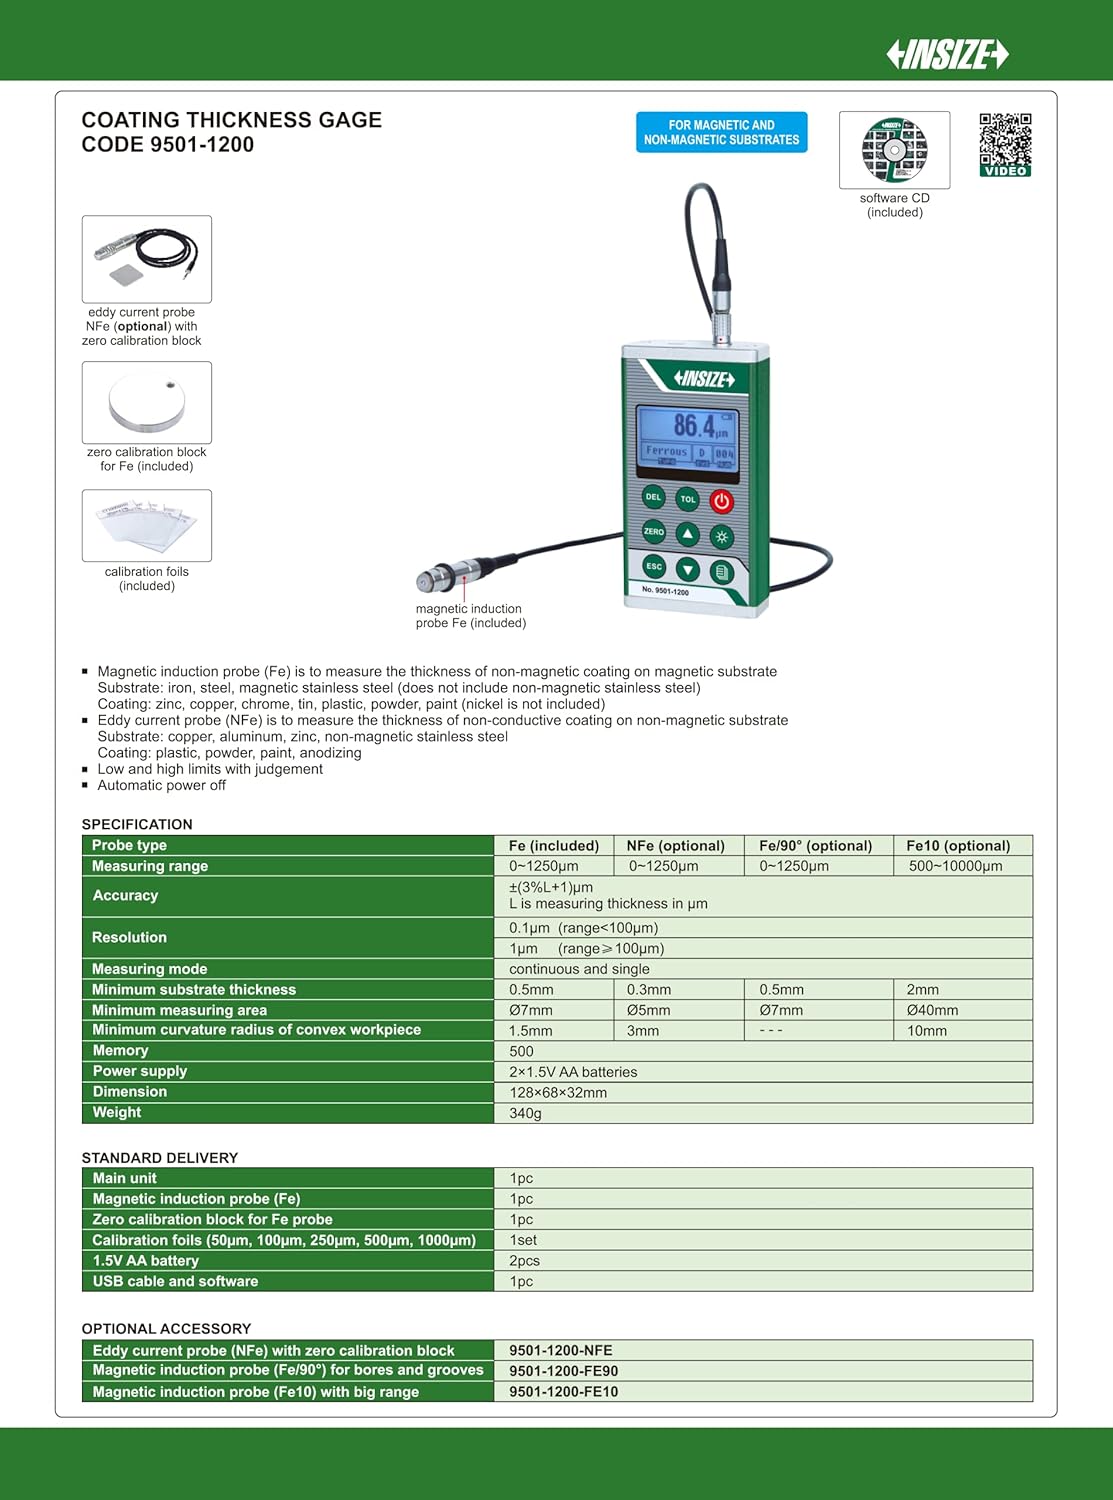
Figure 2: Diagram showing the main unit, various probes (magnetic induction and eddy current), zero calibration block, and calibration foils. This image also details the standard delivery items and optional accessories.
4. Persediaan
4.1 Pemasangan Bateri
- Locate the battery compartment on the back of the gauge.
- Buka penutup bateri.
- Insert two 1.5V AA batteries, ensuring correct polarity (+/-).
- Tutup penutup bateri dengan selamat.
4.2 Sambungan Probe
Connect the desired measurement probe (Fe or NFe) to the probe port on the top of the main unit. Ensure the connector is firmly seated.
4.3 Hidupkan/Mati Kuasa
Tekan ke kuasa button (red button) to turn the gauge on. Press and hold the kuasa butang sekali lagi untuk mematikannya.
4.4 Initial Calibration (Zero Calibration)
Before first use or after changing probes, perform a zero calibration:
- Ensure the probe is clean.
- Place the probe firmly and flatly on the corresponding zero calibration block (e.g., Fe probe on Fe zero block).
- Tekan ke SIFAR button. The display should show "0.0" or a value very close to zero.
- Repeat for the NFe probe and its respective zero block if applicable.
4.5 Calibration with Foils
For accurate measurements, especially when measuring different materials or ranges, calibrate using the provided calibration foils:
- Place a calibration foil (e.g., 100μm) on the zero calibration block.
- Place the probe firmly on the foil.
- Adjust the reading to match the foil's thickness using the up/down arrow buttons.
- Repeat with other foils as needed to cover the expected measurement range.
5. Arahan Operasi
5.1 Pengukuran Asas
- Pastikan tolok dihidupkan dan dikalibrasi.
- Select the appropriate probe (Fe for magnetic substrates, NFe for non-magnetic substrates). The gauge typically auto-detects the substrate type.
- Place the probe gently and perpendicularly onto the coated surface to be measured.
- The measurement reading will appear on the display. Hold the probe steady until the reading stabilizes.
- Lift the probe from the surface to take another measurement.
5.2 Mod Pengukuran
The gauge supports different measurement modes:
- Mod Pengukuran Tunggal: Takes one reading each time the probe is applied.
- Mod Pengukuran Berterusan: Allows for continuous readings as the probe is moved across the surface. This is useful for scanning larger areas. Refer to the specific button on your device (often indicated by an icon) to switch between modes.
5.3 Penyimpanan dan Pengingatan Data
The gauge has internal memory to store measurement data. Use the designated buttons (e.g., MEM or similar icon) to save readings and recall them later. Consult the on-screen icons for navigation.
5.4 Tolerance Setting
The gauge allows setting upper and lower tolerance limits. If a measurement falls outside these limits, the gauge may provide an audible or visual alert. Use the TOL button to access and adjust tolerance settings.
5.5 Lampu Latar
Tekan ke Cahaya button (often with a lightbulb icon) to turn the display backlight on or off for improved visibility in low-light conditions.
6. Penyelenggaraan
6.1 Pembersihan
- Lap unit utama dengan kain lembut dan kering. Jangan gunakan pembersih atau pelarut yang kasar.
- Keep the probe tip clean and free of debris. Use a soft cloth or cotton swab. Do not scratch the probe surface.
6.2 Penggantian Bateri
When the low battery indicator appears on the display, replace the batteries promptly to ensure accurate readings and prevent data loss. Refer to section 4.1 for battery installation instructions.
6.3 Penyimpanan
Store the gauge and its accessories in the provided carrying case in a dry, dust-free environment, away from direct sunlight and extreme temperatures.
6.4 Kekerapan Penentukuran
Regular calibration is crucial for maintaining accuracy. It is recommended to perform zero calibration before each use or when changing measurement conditions. Full calibration with foils should be done periodically, or if you suspect inaccurate readings.
7. Penyelesaian masalah
| Masalah | Kemungkinan Punca | Penyelesaian |
|---|---|---|
| Gauge does not power on. | Bateri mati atau tidak dipasang dengan betul. | Gantikan bateri atau semak polariti. |
| Bacaan yang tidak tepat. | Probe tip dirty; improper calibration; incorrect substrate type selected; strong magnetic interference. | Clean probe tip; perform zero and foil calibration; ensure correct probe/mode for substrate; move away from magnetic sources. |
| Paparan menunjukkan "Err" atau "OL". | Measurement out of range; probe not properly seated; sensor error. | Ensure measurement is within specified range; re-seat probe; re-calibrate. If error persists, contact support. |
| No response from buttons. | Device frozen; low battery. | Turn off and on again; replace batteries. |
8. Spesifikasi
| Parameter | Fe (Magnetic) | NFe (Non-Magnetic) |
|---|---|---|
| Julat Pengukuran | 0-1250μm | 0-1250μm |
| Ketepatan | ±(3% + 1μm) | |
| Resolusi | 0.1μm (range < 100μm), 1μm (range ≥ 100μm) | |
| Mod Mengukur | Continuous and single | |
| Ketebalan Substrat Minimum | 0.5mm | 0.3mm |
| Luas Pengukuran Minimum | Ø7mm | Ø5mm |
| Minimum Curvature Radius of Convex Workpiece | 1.5mm | 3mm |
| Ingatan | 500 bacaan | |
| Bekalan Kuasa | Bateri AA 2 x 1.5V | |
| Dimensi | 128×60×32mm | |
| Berat badan | 340g | |
Note: Specifications are subject to change without notice. Refer to the product packaging or manufacturer's weblaman web untuk maklumat terkini.
9. Waranti dan Sokongan
Warranty information for the Insize Coating Thickness Gauge 9501-1200 is typically provided with your purchase documentation or can be found on the official Insize webtapak. Sila simpan bukti pembelian anda untuk tuntutan waranti.
For technical support, service, or inquiries regarding optional accessories, please contact your local Insize distributor or visit the official Insize webtapak untuk maklumat hubungan.
Manufacturer: INSIZE
Date First Available: 4 September 2019
Ask a question about this manual
Ask about setup, troubleshooting, compatibility, parts, safety, or missing instructions. Manuals+ will review the question and use this page’s manual context to help answer it.