
OUKANING Retro Industriad Cage 1
OUKANING 52-Inch Retro Industrial Ceiling Fan Light - Instruction Manual
Model: Retro Industriad Cage 1
pengenalan
This manual provides detailed instructions for the safe installation, operation, and maintenance of your OUKANING 52-Inch Retro Industrial Ceiling Fan Light. Please read all instructions carefully before beginning installation and retain this manual for future reference.
Maklumat Keselamatan Penting
- Sentiasa putuskan sambungan kuasa pada pemutus litar utama sebelum pemasangan atau penyelenggaraan.
- Pastikan semua sambungan elektrik mematuhi kod dan ordinan tempatan.
- Rujuk juruelektrik bertauliah jika anda tidak pasti tentang prosedur pendawaian.
- Mount the fan to a ceiling joist or a securely anchored support structure capable of supporting the fan's weight.
- Jangan bengkokkan pemegang bilah semasa pemasangan atau pembersihan.
- Pastikan terdapat ruang yang mencukupi antara bilah kipas dan sebarang halangan.
Apa yang ada dalam Kotak
Your OUKANING 52-Inch Retro Industrial Ceiling Fan Light package includes the following components:
- Ceiling Fan Light Unit
- Motor Kipas
- Cage Fixtures
- Pendakap Pemasangan
- Penutup Siling
- Down Rod (two sizes: 3.93 inch and 7.87 inch)
- Penutup Motor
- Skru pengembangan
- Skru Bilah Kipas
- Remote Control Set (remote and receiver)
- Bilah Kipas (5 keping)
- Manual Pemasangan

Imej: Semua komponen disertakan dalam pakej.
Persediaan dan Pemasangan
Video: Detailed steps for the installation of the OUKANING 52-Inch Industrial Vintage Cage Ceiling Fan. Refer to the timestamps below for specific steps.
1. Fan Blade Installation
Refer to video segment 1:02 - 1:30.
- First, assemble each fan blade with its corresponding fan blade bracket. Each set requires 3 screws and screw pads.
- Loosen the screws on the motor safety buckle and remove the motor safety buckle from the fan motor.
- Install the fan blade bracket onto the main body of the fan using the loosened screws. Ensure all 5 blades are securely attached.

Image: Close-up of a fan blade securely attached to the motor housing.
2. Connecting Cage Fixtures with Fan Motor
Refer to video segment 1:38 - 2:30.
- Unscrew the 3 screws at the connection point of the lampshade (cage fixture).
- Connect the white wire to the white wire, and the blue wire to the black wire.
- Align the cage fixture with the screw holes on the main unit and install it using the screws.

Image: Detail of the cage fixture and light sockets.
3. Down Rod, Ceiling Cover, and Motor Cover Installation
Refer to video segment 2:37 - 3:55.
- Choose a down rod of appropriate length according to your height requirements. Two sizes are provided: 3.93 inches (default) and 7.87 inches. You can switch the size by loosening the screws on the bracket.
- Cross the down rod through the ceiling cover and the motor cover in the correct direction.
- First, remove the R-shaped safety pin on the connector and the connecting bolt.
- Pass the wires through the down rod.
- Insert the down rod into the connector, then insert the connection bolt and R-shaped safety pin. Tighten the screw.
4. Remote Control Wiring
Refer to video segment 4:01 - 4:12.
- Connect the 3 wires from the remote control receiver to the motor wires, matching colors one by one.
5. Mounting Bracket - Install Ceiling Fans
Refer to video segment 4:35 - 4:43.
- Put the down rod into the bracket and rotate to ensure the groove on the hanger snaps onto the bulge of the bracket.
6. Sambungkan Bekalan Kuasa
Refer to video segment 4:48 - 5:19.
- The input power of the remote control is divided into 2 wires. The black wire is connected to the power wire, and the white wire is connected to the neutral wire.
- The yellow wire on the host must be connected to the earth wire.
- Install the ceiling cover after finishing the wires and tighten the screws.
7. Pemasangan Cahaya
Refer to video segment 4:13 - 4:30.
Install 5 E27 bulbs into the sockets within the cage fixture. The lighting part requires 3 E27 round bulbs or other suitable shape to match in the lampteduh.
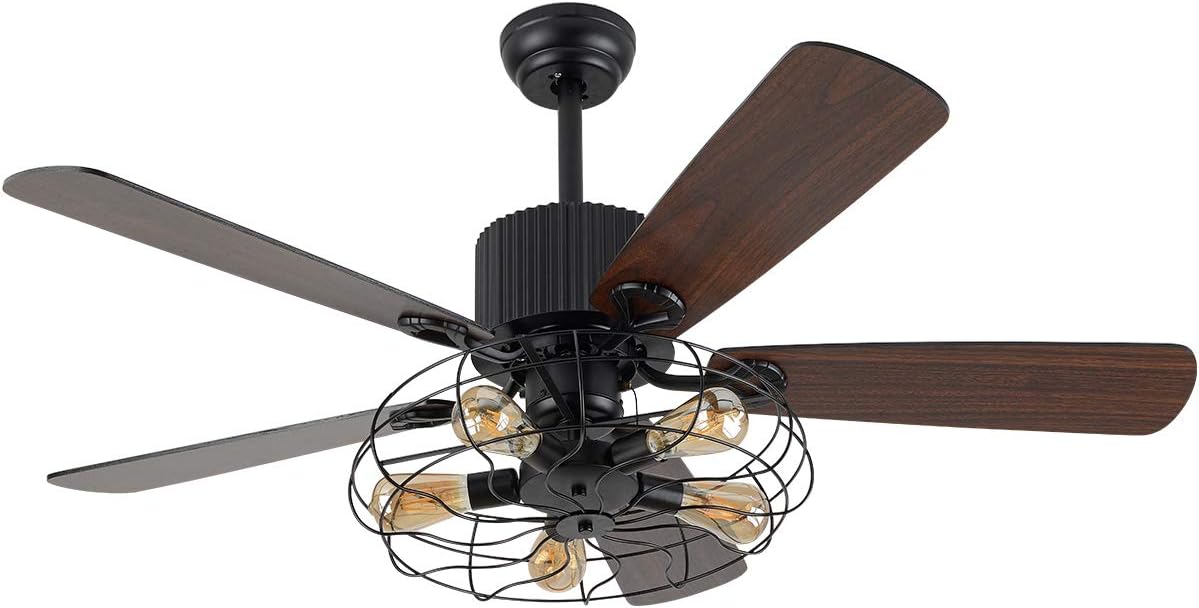
Image: The ceiling fan light with five E27 bulbs installed.
Operasi
Video: Demonstration of the OUKANING 52-Inch Retro Ceiling Fan Light, highlighting its reversible blade function and overall design.
Fungsi Kawalan Jauh
The ceiling fan is operated via the included remote control. It provides the following functions:
- 3 Kelajuan Kipas: Pilih antara kelajuan kipas tinggi, sederhana dan rendah.
- Kawalan Cahaya: Turn the fan light on or off.
- Fungsi Masa: Set a timer for the fan to operate.
Reversible Blade Function
This fan features 5 reversible wood blades. This allows for two modes of operation:
- Mod Musim Panas: Bilah berputar lawan arah jam untuk menghasilkan aliran udara ke bawah, memberikan kesan penyejukan.
- Mod Musim Sejuk: Blades rotate clockwise to create an upward airflow, circulating warm air near the ceiling throughout the room.
Penyelenggaraan
- Pembersihan: Untuk membersihkan kipas, lap dengan lembut, damp kain. Jangan gunakan pembersih atau pelarut yang melelas.
- Imbangan Bilah: If you notice the fan rotating unevenly after installation, you can adjust the fan blade balance by pasting a patch on the blade.
- Motor: The motor is designed for powerful air movement and quiet performance. It features a heat sink hole to reduce internal temperature and extend motor life. No special maintenance is typically required for the motor.
- Penggantian mentol: Ensure power is off before replacing E27 bulbs.
Menyelesaikan masalah
- Fan Light Not Turning On with Remote:
- Check the battery in the remote control first.
- If the issue persists after changing the battery, connect the ceiling fan directly to the power supply to check if it can be turned on.
- If the fan light turns on when directly connected, the remote control's driver might be damaged. If it still doesn't turn on, the main unit might be damaged.
- Kipas Tidak Beroperasi: Ensure all electrical connections are secure and the circuit breaker is on.
- Bergoyang berlebihan: Check that all fan blade screws are tightened and the down rod is securely seated in the mounting bracket. Refer to the fan blade balance adjustment in the Maintenance section.
Spesifikasi
| Jenama | OUKANING |
| Model | Retro Industriad Cage 1 |
| warna | Retro Industriad Cage 1 (Black) |
| bahan | Wood, Crystal, Iron, Metal |
| Gaya | Retro Industrial Cage |
| Jenis Bilik | Bilik tidur, ruang tamu |
| Penggunaan Dalaman/Luar | Dalaman |
| Sumber Kuasa | AC |
| Kaedah Kawalan | Alat Kawalan Jauh |
| Sumber Cahaya | E27 (E26 compatible) |
| Bilangan Sumber Cahaya | 5 |
| Voltage | 110 Volt |
| Wattage | 60 watts (per bulb, recommended) |
| Dimensi Item (L x W x H) | 52"L x 19.6"W x 52"H |
| Berat Barang | 20.2 paun |
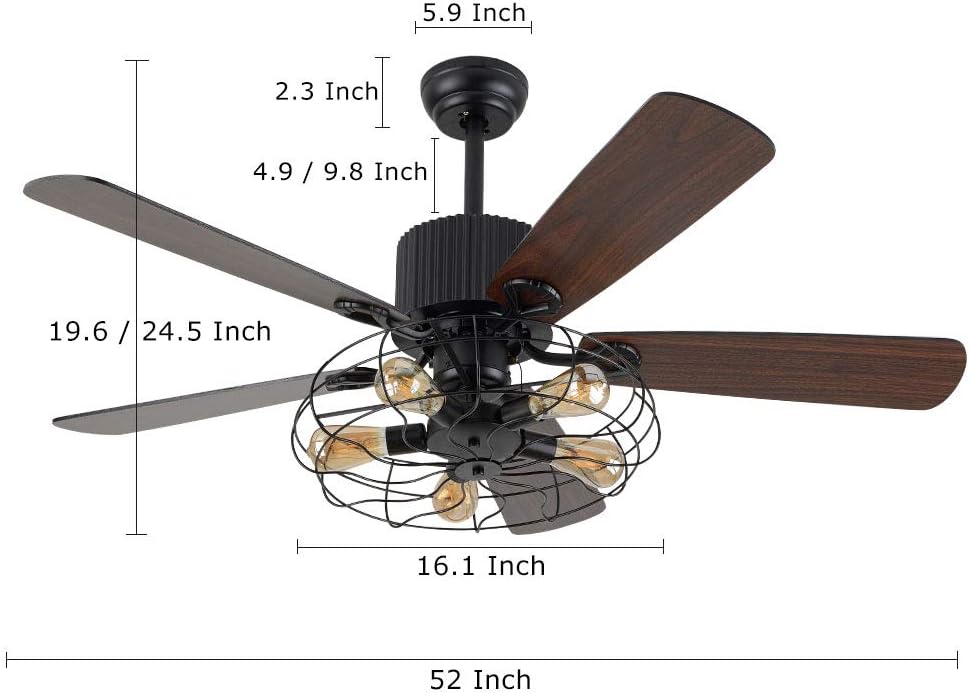
Image: Dimensional diagram of the ceiling fan.
Waranti dan Sokongan
The OUKANING 52-Inch Retro Industrial Ceiling Fan Light comes with a Waranti terhad 1 tahun dan a Jaminan wang dikembalikan 30 hari.
For any issues or inquiries, please feel free to contact OUKANING customer support. We have a professional after-sales team dedicated to assisting you and providing the most satisfactory service.
Contact information can typically be found on the product packaging or the official OUKANING webtapak.
Ask a question about this manual
Ask about setup, troubleshooting, compatibility, parts, safety, or missing instructions. Manuals+ will review the question and use this page’s manual context to help answer it.