
PUTORSEN GSMT-262P
PUTORSEN Dual Monitor Arm GSMT-262P Instruction Manual
Model: GSMT-262P
pengenalan
Thank you for choosing the PUTORSEN Dual Monitor Arm GSMT-262P. This premium aluminum articulated gas spring arm is designed to enhance your workspace ergonomics by providing flexible positioning for two monitors. This manual provides essential information for safe installation, operation, and maintenance of your monitor arm.
Maklumat Keselamatan
- Baca semua arahan dengan teliti sebelum pemasangan dan penggunaan.
- Ensure your desk surface is strong enough to support the combined weight of the monitor arm and two monitors.
- Do not exceed the maximum weight capacity of 8 kg (17.6 lbs) per arm.
- Gunakan hanya perkakasan yang disediakan. Jika mana-mana bahagian hilang atau rosak, hubungi khidmat pelanggan.
- Jauhkan kanak-kanak dan haiwan peliharaan semasa pemasangan.
- Pemasangan yang tidak betul boleh mengakibatkan kerosakan harta benda atau kecederaan diri.
Kandungan Pakej
Sila sahkan bahawa semua komponen hadir sebelum memulakan pemasangan.
- Pemasangan Lengan Dwi Monitor
- Meja Clamp (C-clamp)
- Grommet Mount Hardware
- VESA Mounting Screws (various sizes)
- Kekunci Hex untuk Pelarasan
- Aksesori Pengurusan Kabel
- Manual Arahan
Spesifikasi
| Nombor Model | GSMT-262P |
| bahan | Aluminium Premium |
| warna | Perak / Kelabu |
| Keserasian Saiz Skrin | 17 - 32 inci |
| Kapasiti Berat setiap Lengan | 3.3 - 17.6 paun (1.5 - 8 kg) |
| Keserasian VESA | 75x75mm, 100x100mm |
| Julat Kecondongan | +45° hingga -45° |
| Julat Putar | ±90° |
| Putaran | 360° |
| Ketebalan Meja (C-clamp) | 10mm - 85mm |
| Ketebalan Meja (Grommet) | 10mm - 85mm |

Figure 1: Universal Display Compatibility. This image illustrates the compatible screen sizes (17-32 inches), VESA mounting patterns (75x75mm and 100x100mm), and the weight capacity per arm (3.3-17.6 lbs).

Figure 2: Product Dimensions. This diagram provides detailed measurements of the monitor arm, including arm length, height adjustment range, and mounting base dimensions. Please review these dimensions carefully before purchase to ensure compatibility with your setup.
Persediaan (Pemasangan)
The PUTORSEN Dual Monitor Arm offers two installation methods: C-clamp and Grommet Hole. Choose the method best suited for your desk.
1. Choose Your Mounting Method

Figure 3: Installation Flexibility. This image illustrates the two available mounting options: Grommet Hole and C-clamp, along with their respective compatible desk thickness ranges (10mm-85mm).
- C-clamp Pemasangan: Ideal for desks without a pre-drilled grommet hole. Securely attach the C-clamp to the edge of your desk. Ensure the desk thickness is between 10mm and 85mm.
- Grommet Hole Installation: Use this method if your desk has a grommet hole (or if you can drill one). Ensure the hole diameter and desk thickness are compatible (10mm-85mm).
2. Assemble the Monitor Arm Base
Follow the specific instructions provided in the package for assembling the main pole and base according to your chosen mounting method.
3. Attach VESA Plates to Monitors
- Carefully place your monitor face down on a soft, clean surface.
- Attach the VESA plate to the back of your monitor using the appropriate screws from the hardware kit. Ensure a secure fit.
4. Pasangkan Monitor ke Lengan
- Slide the monitor (with VESA plate attached) onto the end of each arm.
- Secure the monitor to the arm using the provided locking mechanism or screw.
Operating (Adjustments)
The PUTORSEN Dual Monitor Arm allows for extensive adjustments to achieve an optimal ergonomic viewpengalaman dalam.
Pemantauan Kedudukan
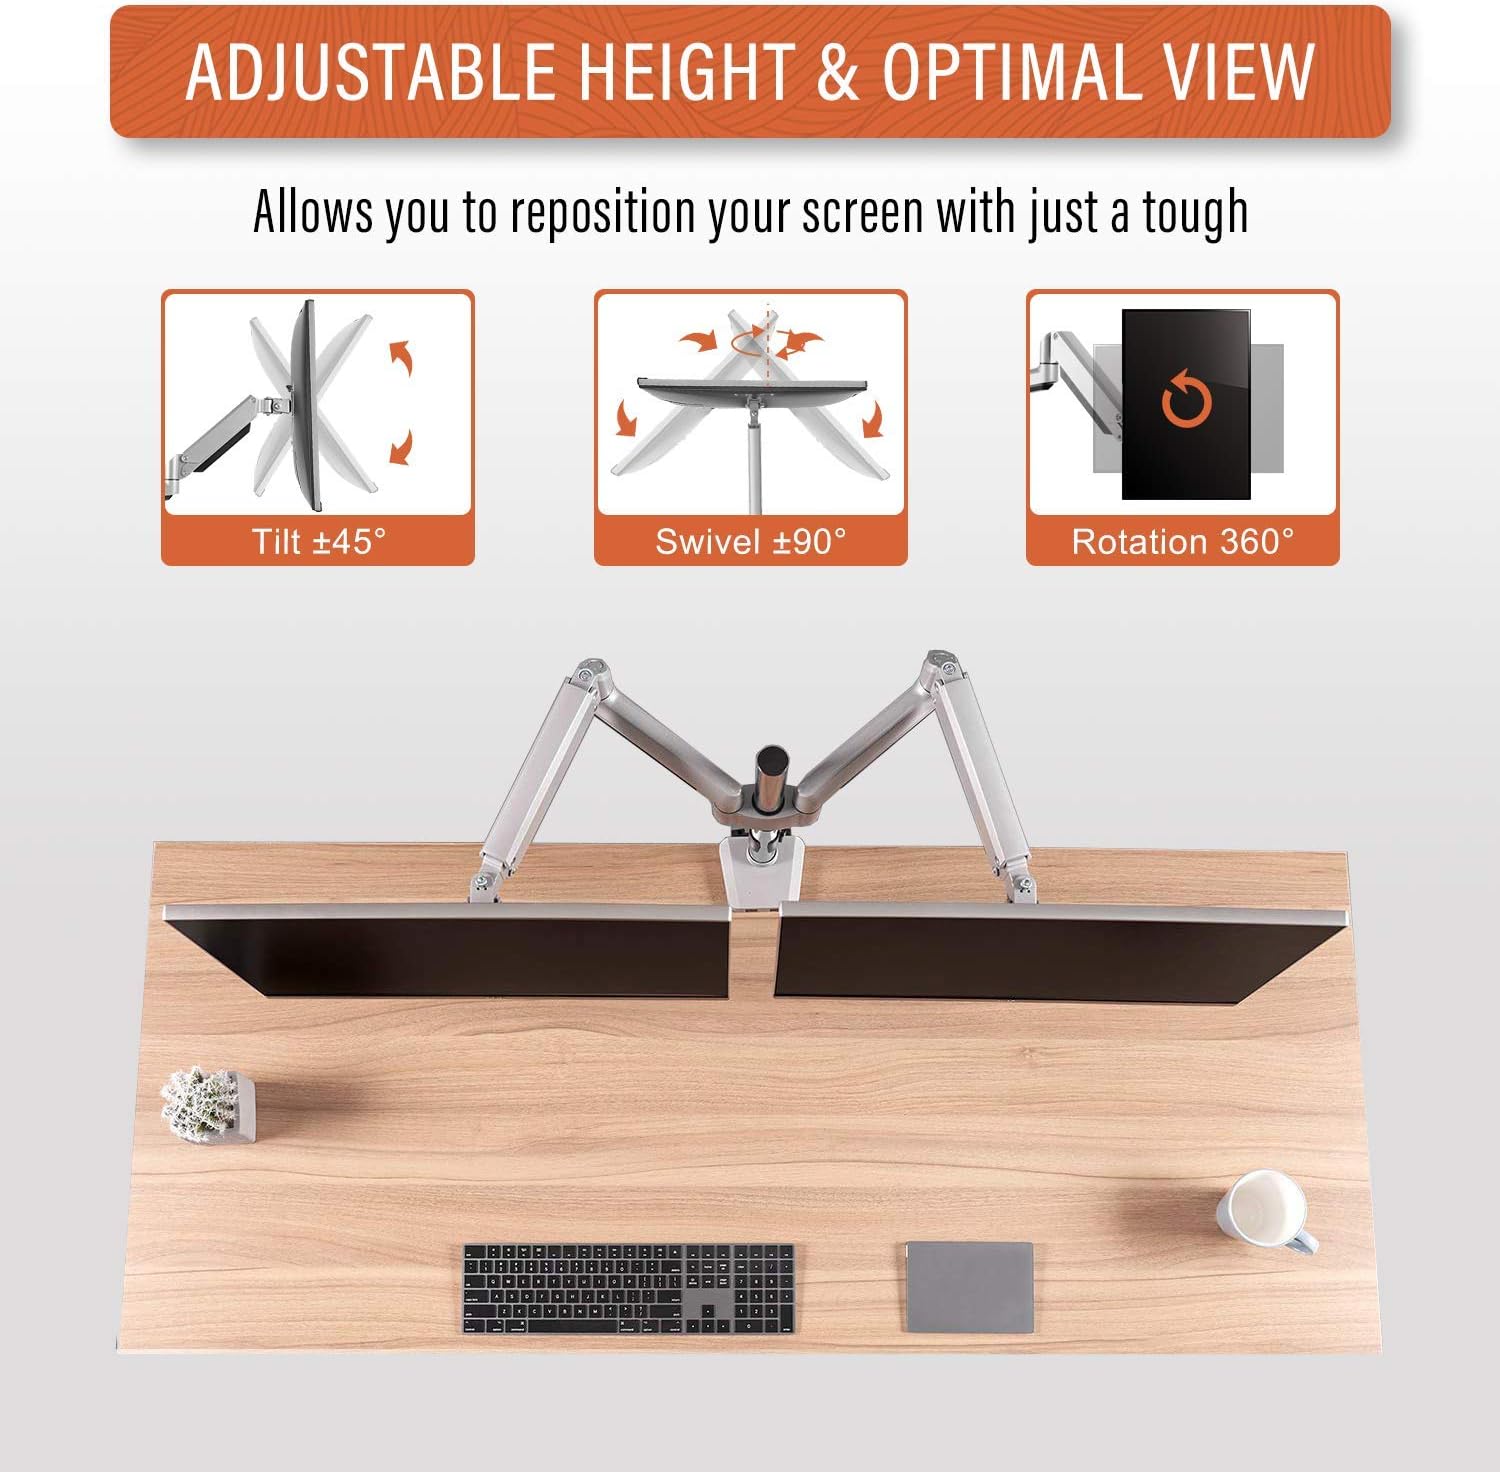
Figure 4: Adjustable Height & Optimal View. This image demonstrates the arm's flexibility, allowing for ±45° tilt, ±90° swivel, and 360° rotation to achieve your preferred viewsudut ing.
- Pelarasan Ketinggian: The gas spring mechanism allows for smooth vertical movement. Gently push or pull the monitor to the desired height.
- Condong: Adjust the monitor screen vertically from +45° to -45° to reduce glare and optimize viewsudut-sudut.
- Pusing: Pivot the monitor horizontally up to ±90° to share your screen or change viewarah dalam.
- Putaran: Putar monitor 360° untuk bertukar antara orientasi landskap dan potret.
Penyesuaian Ketegangan Spring Gas

Figure 5: Tension Adjustment for Up & Down Arm. This image highlights the adjustment screw for the gas spring tension. Turn clockwise to reduce tension for lighter monitors, and counter-clockwise to increase tension for heavier monitors, ensuring the arm holds its position.
If your monitor does not stay at the desired height or drifts, you may need to adjust the gas spring tension:
- Locate the tension adjustment screw on the arm (refer to Figure 5).
- Use the provided hex key to turn:
- mengikut arah jam: To reduce tension for lighter monitors.
- Berlawanan arah jam: To increase tension for heavier monitors.
- Adjust gradually and test the arm's movement until the monitor holds its position securely.
Pengurusan Kabel
Utilize the integrated cable management clips or channels on the arm to route and organize your monitor cables, maintaining a tidy workspace.
Penyelenggaraan
- Regularly check all screws and connections to ensure they are tight and secure.
- Bersihkan lengan monitor dengan kain lembut,amp kain. Elakkan pembersih atau pelarut yang melelas.
- Periodically re-adjust the gas spring tension if you change monitors or notice the arm not holding its position correctly.
Menyelesaikan masalah
- Monitor sags or does not stay at desired height:
- Penyelesaian: Increase the gas spring tension by turning the adjustment screw counter-clockwise (refer to Figure 5).
- Monitor is too stiff to move up/down:
- Penyelesaian: Decrease the gas spring tension by turning the adjustment screw clockwise (refer to Figure 5).
- Monitor wobbles or feels unstable:
- Penyelesaian: Ensure all mounting screws (VESA plate, desk clamp/grommet) are securely tightened. Check that the desk surface is stable.
- Monitor does not fit VESA plate:
- Penyelesaian: Verify your monitor's VESA pattern (75x75mm or 100x100mm) matches the arm's compatibility. Ensure you are using the correct VESA screws.
Waranti dan Sokongan
The PUTORSEN Dual Monitor Arm GSMT-262P comes with a Waranti Seumur Hidup.
For technical support, warranty claims, or any questions regarding your product, please contact PUTORSEN customer service through the retailer where you purchased the product or visit the official PUTORSEN webtapak untuk maklumat hubungan.
Dokumen Berkaitan - GSMT-262P
 |
PUTORSEN LDT69-C024P Heavy-Duty Monitor Arm Assembly Instructions Comprehensive assembly instructions and parts list for the PUTORSEN LDT69-C024P Heavy-Duty Counterbalance Monitor Arm, designed for 17-49 inch monitors. |
 |
PUTORSEN PT61-C012 Counterbalance Monitor Arm - Manual & Panduan Pemasangan Manual arahan rasmi untuk PUTORSEN PT61-C012 Counterbalance Monitor Arm. Ketahui cara memasang dan melaraskan pemasangan meja tugas berat dan boleh laras sepenuhnya ini dengan selamat untuk skrin ultralebar. |
 |
Counterbalance Monitor Arm Instruction Manual - 50116-LDT71-C012N-01-NT Comprehensive instruction manual for the PUTORSEN 50116-LDT71-C012N-01-NT counterbalance monitor arm. Includes detailed steps for clamp and grommet mounting, safety warnings, and maintenance tips. Supports VESA 75x75 and 100x100, with a weight capacity of 2-8kg. |
 |
Heavy-Duty Monitor Arm Instruction Manual Instruction manual for the PUTORSEN Heavy-Duty Monitor Arm, detailing clamp and grommet installation, VESA mounting, and adjustment procedures for monitors up to 57 inches. Includes parts list and assembly steps. |
 |
PUTORSEN Pivot TV Wall Mount - Manual Pemasangan Manual pemasangan rasmi untuk PUTORSEN Pivot TV Wall Mount. Mempunyai keserasian VESA (75x75 hingga 200x200mm), menyokong TV 13-43 inci sehingga 44 lbs, dengan arahan pemasangan langkah demi langkah terperinci untuk RV, campers, dan rumah motor. |
 |
PUTORSEN LDT66-KP01 Monitor Pole Mount Assembly Instructions Step-by-step guide to assemble and install the PUTORSEN LDT66-KP01 monitor pole mount. Includes parts list and mounting instructions for clamp and grommet setups. |
Ask a question about this manual
Ask about setup, troubleshooting, compatibility, parts, safety, or missing instructions. Manuals+ will review the question and use this page’s manual context to help answer it.