
1. Pengenalan
This manual provides essential instructions for the safe and efficient operation of your Areyourshop 12/24V 50A MPPT Solar Charge Controller. Please read this manual thoroughly before installation and use to ensure proper functionality and longevity of the device. This controller is designed to manage power flow from solar panels to batteries and loads, optimizing charging efficiency.
2. Produk Lebihview
The Areyourshop MPPT Solar Charge Controller is a robust device designed for solar power systems. It features an LCD display for monitoring, dual USB outputs for charging external devices, and comprehensive protection mechanisms.
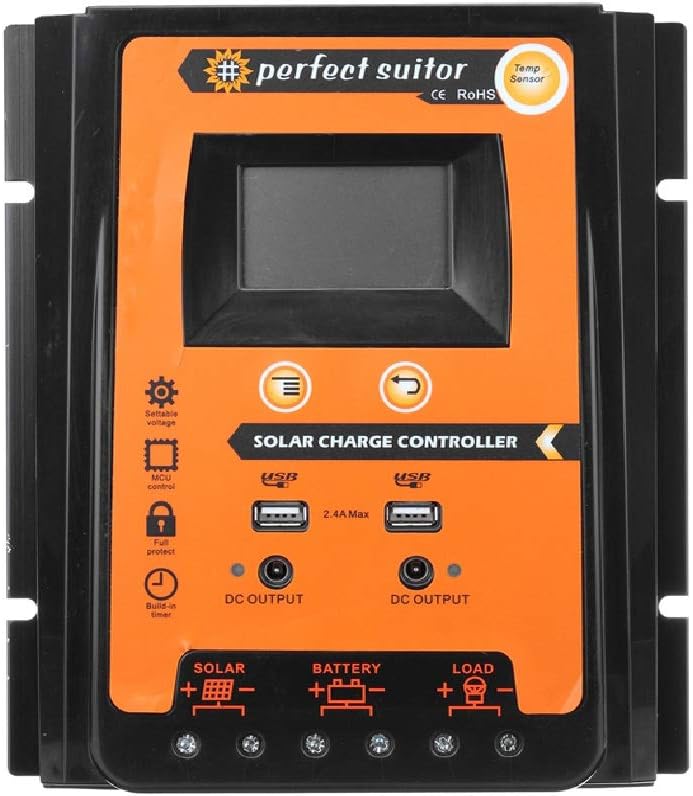
Imej: Depan view of the Areyourshop 50A MPPT Solar Charge Controller, showing the LCD screen, control buttons, USB ports, and connection terminals.
Ciri-ciri Utama:
- MPPT Charging: Utilizes Maximum Power Point Tracking technology for efficient solar energy conversion.
- Vol. Automatiktage Adaptation: Automatically detects 12V or 24V system voltage.
- Paparan LCD: Provides real-time monitoring of system status and parameters.
- Output USB Dwi: Two 2.4A USB ports for charging mobile devices.
- Perlindungan Komprehensif: Includes overcharge, over-discharge, overcurrent, and short-circuit protection.
- Parameter Boleh Laras: Control parameters can be adjusted to suit various battery types.
- Pampasan Suhu: Automatic temperature compensation for accurate charging and discharging voltage.

Image: Diagram highlighting features such as high conversion efficiency MPPT, intelligent LCD display, battery charge voltage/current/power, PV voltage/current power generation, perfect protection, and load power consumption work mode.
3. Spesifikasi
| Parameter | Nilai |
|---|---|
| Model | E401-A002 (PVSC50A) |
| Jenis Pengecasan | MPPT |
| Sistem Voltage | 12V / 24V (Pengenalan Automatik) |
| Kadar Caj/Arus Nyahcas | 50A |
| Maks. PV Voltage | 50V |
| Output USB | Dual USB, 2.4A each (5V total) |
| Lebih Caj Voltage | 13.7V (for 12V system) / 27.4V (for 24V system) |
| Lebih Pelepasan Voltage | 10.5-11V (for 12V system) / 21-22V (for 24V system) |
| Recovery Discharge Voltage | 12.6V (for 12V system) / 25.2V (for 24V system) |
| Pampasan Suhu | -3mv/℃/cell |
| Empty Load Wastage | <45mA |
| Vol. Gelungtage Penurunan | <200mv |
| Paparan | Paparan LCD |
| Dimensions (50A) | 21 x 19.2 x 4 cm (lebih kurang 8.27 x 7.56 x 1.57 inci) |
| Berat Barang | lebih kurang 1.98 paun |
| bahan | plastik |
| Ciri Khas | Kalis air |

Image: The 50A solar charge controller with its physical dimensions (21cm, 19.2cm, 4cm) indicated.
4. Persediaan dan Pemasangan
Pemasangan yang betul adalah penting untuk operasi pengawal cas solar anda yang selamat dan cekap. Sila ikuti langkah-langkah ini dengan teliti.
Nota Keselamatan Penting:
- This controller is designed exclusively for LEAD-ACID batteries. Do not use with other battery types (e.g., Lithium-ion, NiMH) as this may cause damage to the controller or battery.
- Ensure all connections are secure and correct polarity is observed to prevent damage.
- Install the controller in a well-ventilated area, away from direct sunlight and moisture.
Kaedah Sambungan:
Sambungkan komponen dalam susunan berikut:
- Sambungkan Bateri: First, connect the battery to the controller's battery terminals (marked with a battery symbol). Ensure correct polarity (+ to + and - to -). The controller will automatically detect 12V or 24V system voltage.
- Sambungkan Panel Suria: Next, connect the solar panel to the controller's solar terminals (marked with a solar panel symbol). Ensure correct polarity.
- Sambungkan Beban: Finally, connect your DC load to the controller's load terminals (marked with a light bulb symbol). Ensure correct polarity.

Image: A clear diagram illustrating the correct connection sequence: Solar Panel to Controller, Battery to Controller, and Load to Controller.
5. Arahan Operasi
The controller features an intuitive LCD display and control buttons for monitoring and adjusting settings.
LCD Display and Buttons:

Imej: Terperinci view of the controller's LCD display and control buttons. Labels indicate: 1. Solar panel, 2. Battery, 3. Load, 4. Warming, 5. Digital display, 6. Voltage, 7. Timer setting, 8. Unit symbol value. The 'Menu' button switches display or function, and 'Return' button is also shown.
- Digital Display (5): Shows various parameters like voltage, current, and charge status.
- Butang Menu: Press to cycle through different display screens or functions. Long press to enter setting mode for adjustable parameters.
- Butang Kembali: Used to exit setting mode or confirm selections.
Pelarasan Parameter:
The controller allows adjustment of certain parameters to optimize performance for your specific lead-acid battery. Refer to the LCD display and use the Menu/Return buttons to navigate and modify settings such as overcharge voltage, vol pelepasan berlebihantage, and load control mode. Consult your battery's specifications for recommended voltage tetapan.
Output USB:
The dual 2.4A USB ports provide 5V output for charging small electronic devices. These outputs are active when the controller is powered.
6. Penyelenggaraan
Penyelenggaraan berkala memastikan jangka hayat dan prestasi optimum pengawal cas solar anda.
- Kebersihan: Pastikan pengawal bersih dan bebas daripada habuk dan serpihan. Gunakan kain kering untuk pembersihan.
- Sambungan: Periodically check all wiring connections to ensure they are tight and free from corrosion. Loose connections can lead to power loss or overheating.
- Pengudaraan: Pastikan kawasan pemasangan mempunyai pengudaraan yang baik untuk mengelakkan alat kawalan terlalu panas.
- Kesihatan Bateri: Monitor your battery's health and electrolyte levels (for flooded lead-acid batteries) as per the battery manufacturer's recommendations.
7. Penyelesaian masalah
Bahagian ini membincangkan isu biasa yang mungkin anda hadapi dengan pengawal cas solar anda.
- Tiada Paparan/Tiada Kuasa: Check battery connections and ensure the battery has sufficient charge. Verify solar panel connections.
- Controller Stops Output to Load: The controller is designed to protect the battery from over-discharge. If the battery voltage drops below the set over-discharge voltage (e.g., 10.5-11V for 12V systems), the load output will be disconnected. The output will automatically recover once the solar panel charges the battery back to the recovery discharge voltage (e.g., 12.6V for 12V systems).
- Bateri Tidak Dicas: Verify solar panel connections and ensure the panel is receiving adequate sunlight. Check for any shading or damage to the solar panel. Ensure the battery is properly connected and not severely discharged.
- Perlindungan Lebihan: The controller will stop charging the battery once it reaches the overcharge voltage (e.g., 13.7V for 12V systems) to prevent damage.
- Vol yang tidak betultage Bacaan: Ensure all connections are secure. Temperature compensation is automatic, but extreme temperatures can affect readings.
8. Important Notes and Warnings
- Lead-Acid Batteries Only: This controller is specifically designed for use with LEAD-ACID batteries. Using it with other battery chemistries may result in damage to the battery or the controller, and poses a safety risk.
- Simple MPPT Controller: This product is a simple MPPT controller. While it offers efficient charging, it does not include advanced features such as communication interfaces found in higher-end multifunctional MPPT controllers.
- Senario Aplikasi: This controller is suitable for various applications including farm solar power systems, solar street lights, solar patio lights, solar billboards, outdoor camping solar systems, and ship solar systems.

Imej: Visual examples of suitable application scenarios for the solar charge controller, including residential solar, water pumping, street lighting, and recreational use.
9. Waranti dan Sokongan
For any technical assistance or warranty inquiries, please contact Areyourshop customer support. Keep your purchase receipt as proof of purchase.
Manufacturer: Areyourshop