
Produk Selesaiview
The Sunbuck AV-MP326BT is a versatile 2-channel stereo amplifier designed for home audio systems. It features multiple input options, including 4-way microphone inputs, USB disk, and SD card support, along with Bluetooth connectivity for wireless audio streaming. The amplifier also includes an integrated EQ for sound customization and an LED display for easy operation.
Ciri-ciri utama termasuk:
- Support for 4-way microphone input
- Paparan LED yang jelas
- 2-track output with integrated EQ
- Reverberation, fine-tuning, and balance controls
- SD card and USB interface for media playback
- Kesambungan Bluetooth

Rajah 1: Depan view of the Sunbuck AV-MP326BT amppenguat, pertunjukancasing its control panel and inputs.
Arahan Keselamatan
Sila baca dan fahami semua arahan keselamatan sebelum mengendalikan peranti ini. Kegagalan mematuhi arahan ini boleh mengakibatkan renjatan elektrik, kebakaran atau kerosakan pada unit.
- Bekalan Kuasa: ini amplifier operates on 220V-240V AC, 50/60Hz. Ensure your power source matches these requirements. Do not connect to a different voltage.
- Pengudaraan: Ensure adequate ventilation around the unit. Do not block ventilation openings. Avoid placing the amplifier in enclosed spaces or on soft surfaces that may impede airflow.
- Kelembapan: Do not expose the unit to rain, moisture, dripping, or splashing. Do not place objects filled with liquids, such as vases, on the apparatus.
- haba: Jauhkan unit daripada sumber haba seperti radiator, daftar haba, dapur, atau radas lain (termasuk amppenghidup) yang menghasilkan haba.
- Servis: Jangan cuba menservis produk ini sendiri. Rujuk semua servis kepada kakitangan servis yang berkelayakan. Membuka casing boleh mendedahkan anda kepada voltage atau bahaya lain.
- Pembersihan: Cabut palam unit daripada salur keluar kuasa sebelum membersihkan. Gunakan kain kering untuk pembersihan. Jangan gunakan pembersih cecair atau pembersih aerosol.
- penempatan: Letakkan unit pada permukaan yang stabil dan rata untuk mengelakkannya daripada jatuh.

Figure 2: Detail of the power switch and handle, showing the "POWER ON/OFF" label. Always ensure the unit is off before connecting or disconnecting cables.
Persediaan
Follow these steps to set up your Sunbuck AV-MP326BT amplebih hidup:
- penempatan: Letakkan amplifier on a stable, flat surface with adequate ventilation space around it.
- Sambungan Pembesar Suara: Connect your speakers to the "SPEAKER SYSTEM" terminals on the rear panel. Ensure correct polarity (+ to + and - to -). This amplifier supports speakers with an impedance of 4 to 16 ohms.
- Sambungan Input Audio: Connect your audio sources (e.g., CD player, DVD player, TV) to the "AUDIO INPUT" RCA jacks (L/R) on the rear panel. There are two sets of inputs labeled A and B.
- Sambungan Mikrofon: If using microphones, connect them to the MIC1, MIC2, MIC3, or MIC4 inputs on the front panel.
- Antena FM: Connect the FM antenna to the "FM ANT" terminal on the rear panel for radio reception.
- Sambungan Kuasa: Memastikan amplifier's power switch is in the OFF position. Connect the power cord to the "POWER SOURCE 220V-240V 50Hz" input on the rear panel, then plug the other end into a suitable wall outlet.
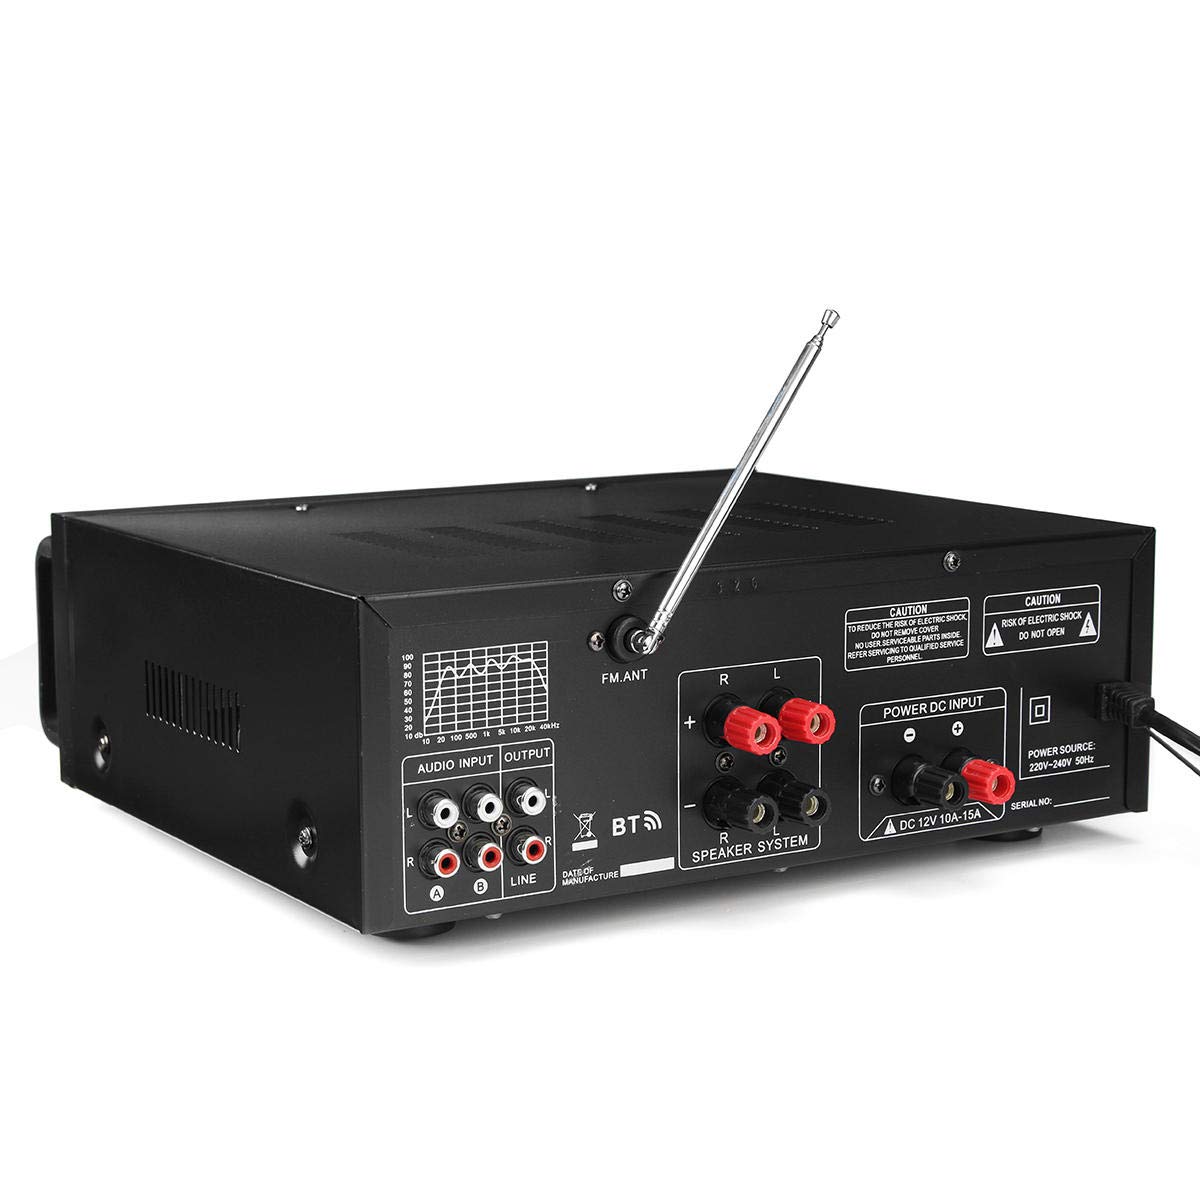
Figure 3: Rear panel connections, including speaker terminals, audio inputs, and power input.

Rajah 4: Terperinci view of the "AUDIO INPUT" (A, B) and "OUTPUT" (LINE) RCA jacks.
Arahan Operasi
This section details the operation of your amplifier's various functions.
Hidupkan/Mati Kuasa
- Untuk menghidupkan amplifier, press the "POWER" switch on the front panel to the ON position. The LED display will illuminate.
- Untuk mematikan amplifier, press the "POWER" switch to the OFF position.
Kawalan Mikrofon
- VOL MIC: Adjusts the overall volume of the microphones.
- MIC1/MIC2 VOL, MIC3/MIC4 VOL: Individual volume controls for microphone pairs.
- TREBLE, MID, BASS (Microphone): Adjusts the tone of the microphone input.
- ECHO: Controls the echo effect applied to microphone vocals.
- KELEWATAN: Adjusts the delay time for the echo effect.
Kawalan Muzik
- VOL MUZIK: Adjusts the overall volume of the music input.
- TREBLE, BASS (Music): Adjusts the tone of the music input.
- BAKI: Adjusts the balance between the left and right audio channels.
- EQ: Use the equalizer sliders to fine-tune specific frequency ranges of the music.
Media Playback (USB Disk / SD Card)
- Insert a USB disk or SD card (up to 64GB, not included) into the respective slot on the front panel.
- The amplifier will automatically detect and begin playing compatible audio files.
- Use the playback controls (Play/Pause, Next, Previous) on the front panel to manage media.
Kesambungan Bluetooth
- Press the "MODE" button on the front panel until "BT" (Bluetooth) is displayed.
- Pada peranti anda yang didayakan Bluetooth (telefon pintar, tablet, dsb.), cari peranti Bluetooth yang tersedia.
- Select "Sunbuck AV-MP326BT" (or similar name) from the list to pair.
- Setelah dipasangkan, anda boleh menstrim audio secara wayarles dari peranti anda ke amplebih hidup.

Rajah 5: Terperinci view of the microphone and music control knobs, including Treble, Mid, Bass, Echo, Delay, and Balance.

Rajah 6: Depan bersudut view, showing the LED display, USB port, and SD card slot for media playback.
Spesifikasi
| Ciri | Spesifikasi |
|---|---|
| Voltage | 220V-240V AC, 50/60Hz |
| Kuasa Dinilai (RMS) | 200W + 200W |
| Kuasa Maks | 400W + 400W |
| Standard Impedance | 4 hingga 16 ohm |
| Respons Kekerapan | 20Hz - 20KHz (+3dB) |
| Nisbah Isyarat-kepada-Bunyi (S/N) | ≥ 90dB |
| herotan | ≤ 0.5% |
| Signal Input Sensitivity | 200mV (+30mV) |
| Sensitiviti Input Mikrofon | 9mV (+2mV) |
| Recording Output Level | 1V |
| Auxiliary Output Level | 1V |
| Jenis Kuasa Amplebih hidup | Kuasa AV Amplebih hidup |
| Saluran Vokal | 2 Vocal Tract |
| USB Disk / SD Card Support | Max 64GB (Not included) |
Menyelesaikan masalah
Jika anda menghadapi masalah dengan anda amplifier, rujuk kepada masalah dan penyelesaian biasa berikut:
- Tiada Kuasa:
- Ensure the power cord is securely plugged into both the amplifier and a working wall outlet.
- Check if the power switch on the front panel is in the ON position.
- Verify that the wall outlet is supplying power (test with another device).
- Tiada Keluaran Bunyi:
- Periksa semua sambungan pembesar suara untuk kekutuban yang betul dan kesesuaian yang selamat.
- Ensure the "MUSIC VOL" and "MIC VOL" knobs are turned up.
- Verify that the audio input source (e.g., CD player, phone) is connected correctly and playing audio.
- Confirm the correct input source is selected (if applicable, though this model seems to auto-detect or use mode button for BT/USB/SD).
- Bunyi Herot:
- Reduce the "MUSIC VOL" or "MIC VOL" to prevent clipping.
- Check speaker impedance. Ensure it is within the 4-16 ohm range.
- Adjust the EQ settings.
- Ensure audio cables are not damaged and are securely connected.
- Isu Sambungan Bluetooth:
- Memastikan amplifier is in Bluetooth mode ("BT" displayed).
- Pastikan Bluetooth didayakan pada peranti sumber anda.
- Move your source device closer to the amplifier to ensure it's within range.
- Cuba nyahgandingkan dan pasangkan semula peranti.
- USB Disk / SD Card Not Reading:
- Ensure the USB disk or SD card is inserted correctly and fully.
- Check if the media format is compatible (e.g., FAT32 for USB/SD).
- Sahkan bahawa audio files on the media are in a supported format.
- Try a different USB disk or SD card to rule out media issues.
Penyelenggaraan
Penyelenggaraan yang betul memastikan ketahanan dan prestasi optimum peranti anda amplebih hidup.
- Pembersihan: Lap bahagian luar secara berkala amplifier with a soft, dry, lint-free cloth. Do not use abrasive cleaners, waxes, or solvents.
- Pengudaraan: Periksa secara berkala bahawa bukaan pengudaraan bebas daripada habuk dan serpihan. Gunakan berus lembut atau udara termampat untuk membersihkannya dengan lembut jika perlu.
- Storan: Jika menyimpan amplifier for an extended period, unplug it from the power outlet and store it in a cool, dry place, away from direct sunlight and extreme temperatures.
- Pengurusan Kabel: Ensure all cables are neatly organized and not kinked or pinched, which can cause damage over time.
Waranti dan Sokongan
For information regarding warranty coverage and terms, please refer to the warranty policy provided at the time of purchase or contact your retailer. Keep your purchase receipt as proof of purchase for any warranty claims.
For technical support or service inquiries, please contact the vendor or retailer from whom you purchased the product. They can provide assistance with troubleshooting or guide you through the service process.