
1. Pengenalan
The Thsinde 18Z-III is a 20000-count, 4 1/2 digit automatic digital multimeter designed for high precision, stable performance, and reliability. This battery-driven instrument features a 21mm high LCD display for clear readings and includes a peak value retention function. It is capable of measuring DC/AC voltage, DC/AC current, resistance, capacitance, diode, temperature, continuity, electric field induction (NCV), and frequency. Utilizing a double integral A/D conversion core, the 18Z-III is an ideal tool for laboratories, factories, and electronics enthusiasts.
2. Maklumat Keselamatan
To ensure safe operation and avoid damage to the meter, please observe the following safety precautions:
- Sentiasa gunakan fungsi dan julat yang betul untuk pengukuran.
- Jangan melebihi nilai input maksimum yang dinyatakan untuk setiap julat.
- Periksa wayar ujian untuk kerosakan sebelum setiap penggunaan. Jangan gunakan jika penebat terjejas.
- Ensure the meter is switched off before connecting or disconnecting test leads to a circuit.
- Berhati-hati semasa bekerja dengan litar aktif. Elakkan sentuhan dengan wayar atau terminal yang terdedah.
- Do not operate the meter if it appears damaged or if the battery cover is not properly closed.
- Replace the battery promptly when the low battery indicator appears to ensure accurate readings.
- Patuhi kod keselamatan tempatan dan kebangsaan.
3. Kandungan Pakej
Sahkan bahawa semua item terdapat dalam pakej:
- Thsinde 18Z-III Digital Multimeter
- 9V Battery (pre-installed or included separately)
- Test Leads (1 pair)
- Alligator Clips (2 pieces)
- English User's Manual (this document)
4. Ciri-ciri Produk
- paparan: 20000 Counts, 4 1/2 digit LCD with LED backlight.
- Fungsi Pengukuran: Vol. DC/ACtage, DC/AC Current, Resistance, Capacitance, Diode, Temperature, Continuity, NCV (Non-Contact Voltage), Frequency, Duty Cycle.
- Pengukuran RMS Sebenar: Menyediakan bacaan yang tepat untuk bentuk gelombang bukan sinusoidal.
- Auto-Julat: Secara automatik memilih julat ukuran yang sesuai.
- Pegangan Data: Membekukan bacaan yang dipaparkan.
- Pegangan Puncak: Captures and displays the maximum peak value.
- Petunjuk Bateri Rendah: Makluman apabila penggantian bateri diperlukan.
- Auto Matikan: Menjimatkan hayat bateri dengan menutup secara automatik selepas tempoh tidak aktif.
- Perlindungan Lebihan: Protects the meter from damage due to excessive input.
- Penggera Tekanan Tinggi: Provides an alert under certain high voltage syarat.

Gambar 1: Lebihview of Thsinde 18Z-III Multimeter's capabilities and display features.
5. Produk Lebihview
Familiarize yourself with the components and controls of your Thsinde 18Z-III Digital Multimeter.
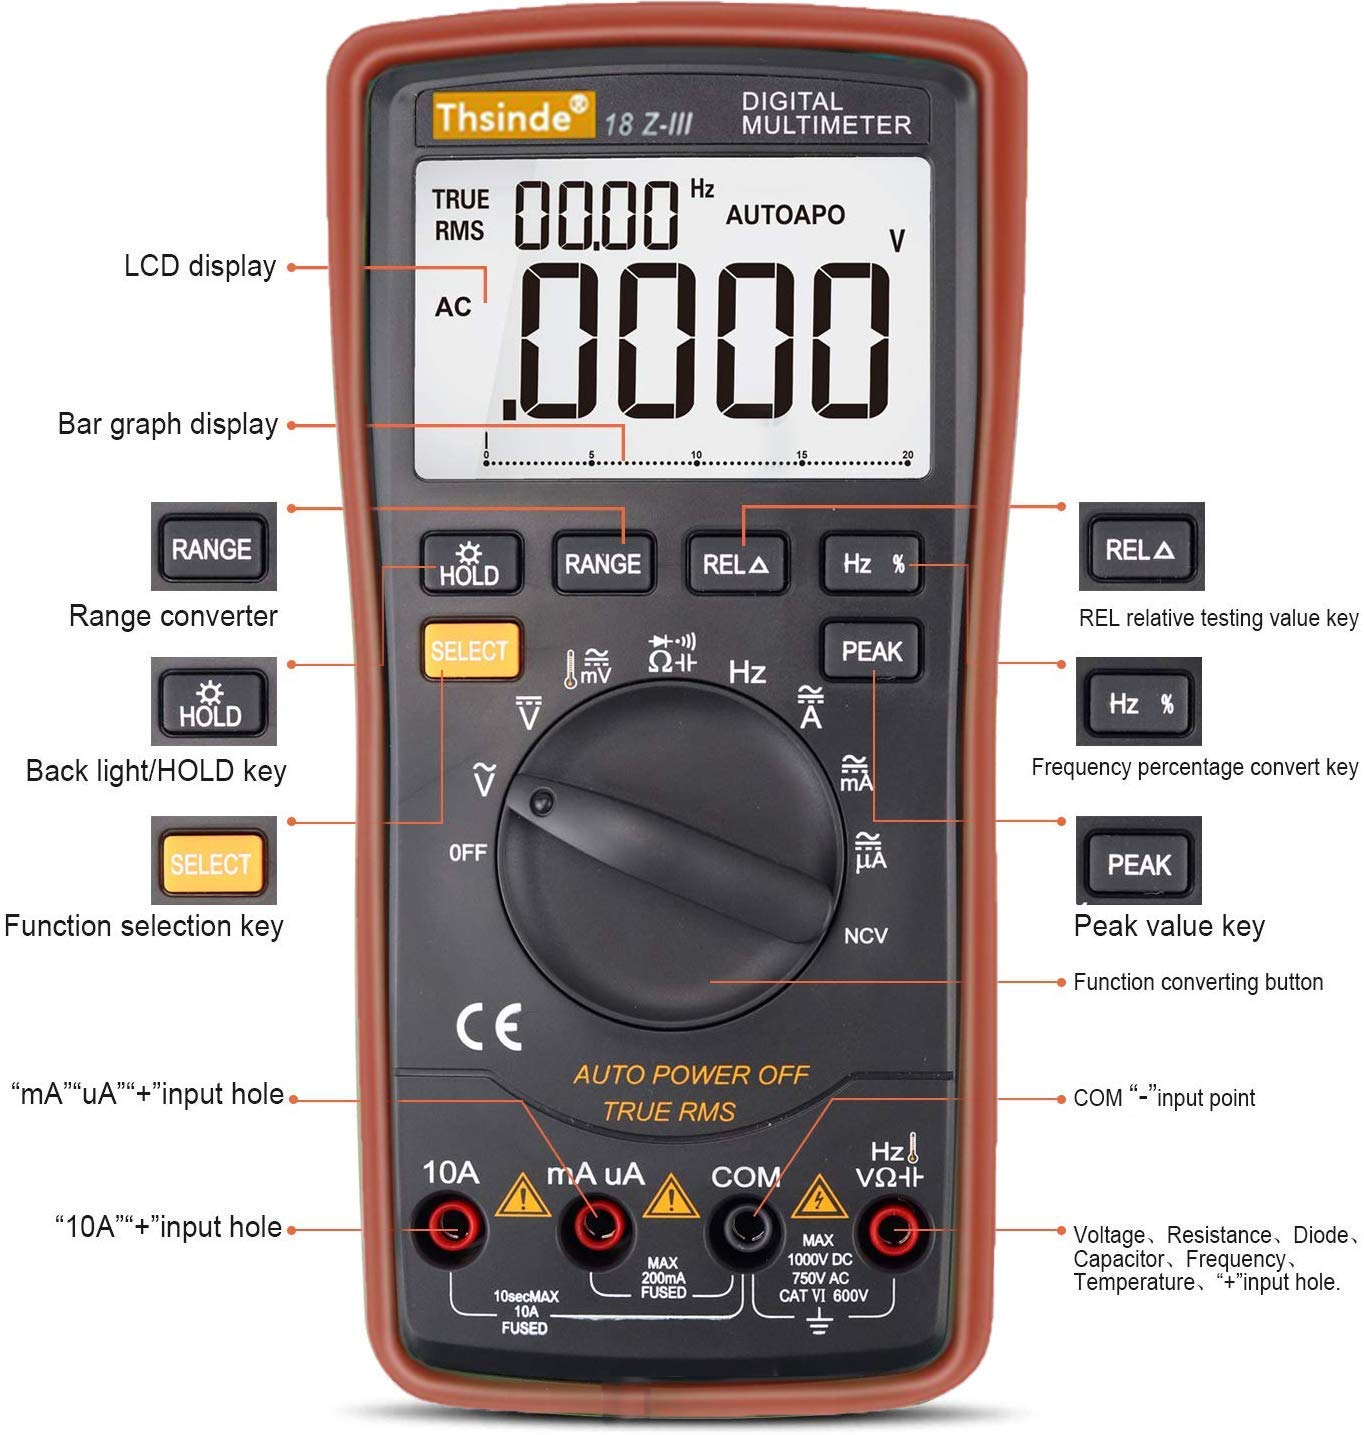
Figure 2: Front panel layout and controls of the Thsinde 18Z-III Digital Multimeter.
- Paparan LCD: Menunjukkan bacaan ukuran, unit dan penunjuk fungsi.
- Paparan Graf Bar: Provides an analog representation of the measured value.
- Butang RANGE: Manually selects measurement range (disables auto-ranging).
- HOLD / Backlight Button: Short press to activate Data Hold; long press to toggle backlight.
- Butang PILIH: Toggles between different measurement modes within a single rotary switch position (e.g., AC/DC, Diode/Continuity).
- REL A Button: Mengaktifkan mod pengukuran relatif.
- Butang % Hz: Toggles between frequency and duty cycle measurement.
- Butang PUNCAK: Activates peak hold function.
- Suis Fungsi Putar: Selects the primary measurement function (OFF, V, mV, A, mA, uA, Ohm, Capacitance, Diode/Continuity, NCV, Temperature, Frequency).
- Bicu Input:
- Input 10A: For measuring currents up to 10A.
- mA uA Input: Untuk menyukat milliampere dan mikroampere currents.
- Input COM: Terminal biasa (negatif) untuk semua ukuran.
- VΩHz Input: Positive terminal for Voltage, Resistance, Capacitance, Frequency, Diode, and Temperature measurements.
6. Persediaan
6.1 Pemasangan Bateri
The Thsinde 18Z-III Multimeter operates on a single 9V battery, which is included. The battery compartment is located on the back of the unit.
- Ensure the multimeter is turned DIMATIKAN.
- Locate the screw on the battery compartment cover on the back of the meter.
- Use a screwdriver to loosen the screw and remove the battery cover.
- Connect the 9V battery to the battery clips, observing correct polarity (+ and -).
- Place the battery into the compartment and replace the cover, securing it with the screw.
6.2 Menghubungkan Petunjuk Ujian
Sentiasa sambungkan petunjuk ujian hitam ke COM jack. Connect the red test lead to the appropriate input jack based on the measurement type:
- Untuk Voltage, Resistance, Capacitance, Frequency, Diode, and Temperature measurements: Connect the red test lead to the VΩHz jek.
- For mA/uA Current measurements: Connect the red test lead to the mA uA jek.
- For 10A Current measurements: Connect the red test lead to the 10A jek.
Ensure test leads are fully inserted into the jacks.
7. Arahan Operasi
Turn the rotary function switch to the desired measurement function. The meter will automatically select the appropriate range unless the JULAT butang ditekan.
7.1 DC / AC Voltage Measurement (V, mV)
- Sambungkan plumbum ujian hitam ke COM dan ujian merah membawa kepada VΩHz.
- Putar suis putar ke V (for volts) or mV (for millivolts).
- Tekan PILIH to toggle between DC and AC voltage jika perlu.
- Sambungkan kuar ujian merentasi litar atau komponen yang hendak diukur.
7.2 DC/AC Current Measurement (A, mA, uA)
PERHATIAN: Jangan sekali-kali sambungkan meter secara selari dengan voltantage sumber semasa mengukur arus. Ini boleh meniup fius atau merosakkan meter.
- Sambungkan plumbum ujian hitam ke COM.
- For currents up to 200mA, connect the red test lead to mA uA. Untuk arus sehingga 10A, sambungkan petunjuk ujian merah ke 10A.
- Turn the rotary switch to the appropriate current range (A, mA, atau uA).
- Tekan PILIH to toggle between DC and AC current if necessary.
- Open the circuit and connect the test probes in series with the circuit to be measured.
7.3 Pengukuran Rintangan (Ω)
PERHATIAN: Pastikan litar dinyahtenagakan dan semua kapasitor dinyahcas sebelum mengukur rintangan.
- Sambungkan plumbum ujian hitam ke COM dan ujian merah membawa kepada VΩHz.
- Putar suis putar ke Ω.
- Sambungkan kuar ujian merentasi komponen yang hendak diukur.
7.4 Pengukuran Kapasitans (F)
PERHATIAN: Ensure capacitors are fully discharged before measurement to prevent damage to the meter.
- Sambungkan plumbum ujian hitam ke COM dan ujian merah membawa kepada VΩHz.
- Putar suis putar ke Kapasitansi simbol.
- Sambungkan kuar ujian merentasi kapasitor.
7.5 Diode Test and Continuity
- Sambungkan plumbum ujian hitam ke COM dan ujian merah membawa kepada VΩHz.
- Putar suis putar ke Diod/Kesinambungan simbol.
- Tekan PILIH to toggle between Diode Test and Continuity Test.
- For Diode Test: Connect the red probe to the anode and the black probe to the cathode. The display shows the forward voltage drop. Reverse the probes; the display should show OL (Open Loop).
- For Continuity Test: Connect the probes across the circuit. A continuous beep indicates continuity (low resistance).
7.6 Bukan Kenalan Voltage (NCV) Pengesanan
- Putar suis putar ke NCV.
- Move the top front part of the meter close to the conductor being tested.
- The meter will beep and the NCV indicator will light up if AC voltage is detected. The intensity of the beeping and light indicates the strength of the electric field.
7.7 Pengukuran Suhu
- Sambungkan plumbum ujian hitam ke COM dan ujian merah membawa kepada VΩHz.
- Putar suis putar ke Suhu symbol (usually °C/°F).
- Insert the temperature probe (thermocouple, if included) into the VΩHz dan COM bicu, memerhati kekutuban.
- Letakkan hujung probe suhu pada atau berhampiran objek yang suhunya hendak diukur.
- Tekan PILIH to switch between Celsius (°C) and Fahrenheit (°F).

Figure 3: Thsinde 18Z-III Multimeter performing a temperature measurement.
7.8 Frequency and Duty Cycle Measurement (Hz, %)
- Sambungkan plumbum ujian hitam ke COM dan ujian merah membawa kepada VΩHz.
- Putar suis putar ke Hz.
- Sambungkan prob ujian merentasi sumber isyarat.
- Tekan % Hz to toggle between frequency (Hz) and duty cycle (%).
7.9 Pegangan Data (HOLD)
Tekan ke TAHAN button briefly to freeze the current reading on the display. Press it again to release the hold function.
7.10 Peak Hold (PEAK)
Tekan ke PUNCAK button to capture and display the maximum peak value of a measurement. Press it again to exit peak hold mode.
7.11 Lampu Latar
Tekan dan tahan butang TAHAN button for approximately 2 seconds to turn the LCD backlight on or off. The backlight will automatically turn off after about 15 seconds to conserve battery.
7.12 Auto Mati
The meter will automatically power off after approximately 15 minutes of inactivity to save battery life. To disable this feature, hold down the PILIH button while turning the rotary switch from DIMATIKAN to any function. To re-enable, simply power off and on normally.
8. Spesifikasi
| Parameter | Spesifikasi |
|---|---|
| Paparan | 19999/20000 Counts, 4 1/2 Digit LCD |
| DC Voltage | 200mV/2V/20V/200V/1000V |
| Vol. ACtage | 200mV/2V/20V/200V/750V |
| Arus DC | 200uA/2000uA/20mA/200mA/10A |
| AC Semasa | 200uA/2000uA/20mA/200mA/10A |
| Rintangan | 200Ω/2kΩ/20kΩ/200kΩ/2MΩ/20MΩ |
| Kapasitansi | 20nF/200nF/2uF/20uF/200uF/2000uF |
| Suhu | -20°C hingga 1000°C / -4°F hingga 1832°F |
| Kekerapan | 10Hz-20MHz |
| Kitaran Tugas | 0.1%-99% |
| Sumber Kuasa | Bateri 9V (termasuk) |
| Persekitaran Kerja | 0°C to 40°C, relative humidity <75% |
| Berat Barang | 454 g |
| Dimensi | 22.5 x 16.5 x 6 cm |
| bahan | ABS |
9. Penyelenggaraan
9.1 Penggantian Bateri
When the low battery indicator appears on the display, replace the 9V battery immediately to ensure accurate measurements. Follow the steps in Section 6.1 for battery installation.
9.2 Pembersihan
Lap meter casing dengan iklanamp kain dan detergen lembut. Jangan gunakan bahan pelelas atau pelarut. Pastikan meter kering sepenuhnya sebelum digunakan.
9.3 Penggantian Fius
If the current measurement function fails, the fuse may need replacement. This meter uses HRC fuses. Refer to a qualified technician for fuse replacement to ensure proper type and rating are used.
10. Penyelesaian masalah
| Masalah | Kemungkinan Punca | Penyelesaian |
|---|---|---|
| Tiada paparan atau paparan malap | Low battery; Meter off; Poor battery connection. | Replace battery; Turn rotary switch to a function; Check battery connection. |
| "OL" (Lebihan) dipaparkan | Input value exceeds selected range; Open circuit (for resistance/continuity). | Switch to a higher range (if not auto-ranging); Check circuit connection. |
| Bacaan tidak tepat | Low battery; Incorrect function/range selected; Damaged test leads. | Replace battery; Select correct function/range; Inspect and replace test leads if damaged. |
| Pengukuran arus tidak berfungsi | Blown fuse; Incorrect input jack used. | Replace fuse (refer to 9.3); Ensure red lead is in 10A or mA uA jack. |
| Tiada bip kesinambungan | Open circuit; Meter not in continuity mode. | Check circuit for breaks; Press SELECT to ensure continuity mode is active. |
11. Waranti dan Sokongan
For warranty information or technical support, please refer to the documentation provided at the time of purchase or contact Thsinde customer service directly. Keep your purchase receipt as proof of purchase.
For further assistance, you may visit the manufacturer's webtapak atau hubungi saluran sokongan mereka.