
1. Pengenalan
The Fydun MPPT Solar Charge Controller is designed to efficiently manage power flow from your solar panels to your battery bank and connected loads. It features Maximum Power Point Tracking (MPPT) technology to optimize solar energy harvesting, automatic 12V/24V system voltage identification, and comprehensive safety protections. This controller is suitable for various applications, including home, industrial, commercial, car, and motorcycle battery systems.

Image 1.1: Fydun MPPT Solar Charge Controller shown in diverse application environments, including residential, portable, and large-scale solar installations.
2. Maklumat Keselamatan
Please read all instructions carefully before installation and operation. Failure to follow these instructions may result in damage to the unit, battery, or other components, and may cause personal injury.
- Ensure all connections are tight and correct to prevent excessive voltage drop and potential overheating.
- Sentiasa sambungkan bateri ke pengawal dahulu, kemudian panel solar, dan akhirnya beban. Putuskan sambungan dalam susunan terbalik.
- Do not attempt to repair or modify the controller. Refer to qualified personnel for service.
- Pasang pengawal di kawasan yang mempunyai pengudaraan yang baik, jauh daripada bahan mudah terbakar dan cahaya matahari langsung.
- The controller is rated IP32, meaning it is protected from tools and wires greater than 2.5 millimeters and from spraying water. It is not waterproof and should not be exposed to heavy rain or submerged.
3. Produk Lebihview
The Fydun MPPT Solar Charge Controller features a clear LCD display for monitoring system status, dual USB outputs for charging devices, and robust terminals for secure connections.

Imej 3.1: Bersudut view of the Fydun Solar Charge Controller, highlighting its compact design and terminal block.
3.1. Komponen
- Paparan LCD: Shows real-time system parameters such as voltage, current, battery status, and load status.
- Butang Kawalan: For navigating menus and adjusting settings.
- Output USB Dwi: Provides 2.4A max output for charging external devices.
- Terminal Panel Suria: Connects to your solar array.
- Terminal Bateri: Bersambung ke bank bateri anda.
- Terminal Beban: Connects to your DC loads.
- Penderia Suhu: For accurate temperature compensation of charging parameters.

Imej 3.2: Depan view of the Fydun Solar Charge Controller, showing the LCD screen, control buttons, and USB ports.

Image 3.3: Diagram illustrating the physical dimensions of the Fydun Solar Charge Controller (17.5cm x 14cm x 4cm).
4. Spesifikasi
| Ciri | Spesifikasi |
|---|---|
| semasa | 30A |
| Dinilai Voltage | 12V / 24V (Auto-identification) |
| Output USB | 2.4A * 2 |
| Lebih-pelepasan Voltage | 10.5V - 11V (for 12V system, adjustable) |
| Pampasan Suhu | -3mv/℃/cell |
| Kehilangan tanpa beban | <45mA |
| Vol. Gelungtage Penurunan | <200mv |
| Jenis Paparan | LCD |
| Jenis Caj | MPPT |
| Gred Perlindungan | IP32 |
| bahan | plastik |
| Dimensi | 17.5 x 14 x 4 cm |
| Berat badan | 454 g |
5. Persediaan
Follow these steps for proper installation of your solar charge controller. Incorrect wiring can damage the controller and other components.
5.1. Kaedah Sambungan
- Sambungkan Bateri: Connect the battery to the controller's battery terminals (marked with a battery symbol). Ensure correct polarity (+ to + and - to -). The controller will automatically detect the battery voltage (12V atau 24V).
- Sambungkan Panel Suria: Connect the solar panel to the controller's solar panel terminals (marked with a solar panel symbol). Ensure correct polarity.
- Sambungkan Beban: Connect your DC loads to the controller's load terminals (marked with a light bulb symbol). Ensure correct polarity.
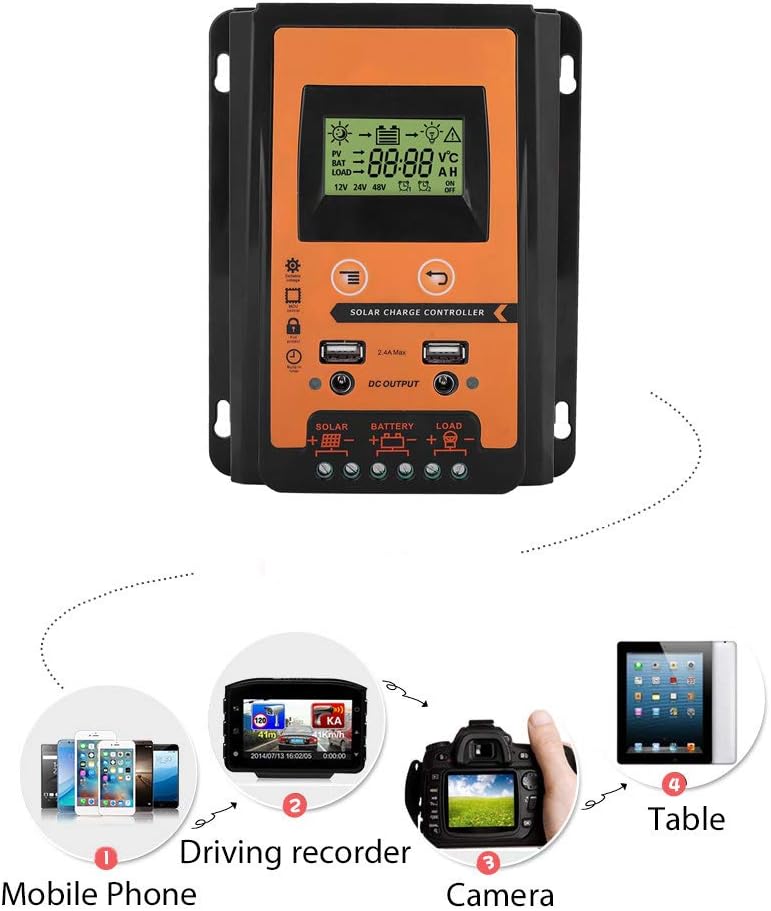
Image 5.1: Diagram illustrating the correct connection order for the solar panel, battery, and load to the Fydun Solar Charge Controller.
Important: Always connect the battery first and disconnect the load first, then the solar panel, and finally the battery when disassembling the system.
6. Arahan Operasi
The controller features an LCD display and control buttons for monitoring and adjusting settings.
6.1. Paparan LCD
The LCD display provides real-time information about your solar system, including:
- Panel solar voltage dan status pengecasan.
- Bateri voltage dan tahap cas.
- Load status (on/off) and current.
- Sistem voltage (12V atau 24V).
6.2. Melaraskan Voltage Tetapan
The controller allows for manual adjustment of certain voltage parameters, such as the over-discharge recovery voltage. If you encounter issues or need to fine-tune your system, you can adjust the voltage:
- Press and hold the MCU control button (usually the 'Menu' or 'Set' button) for approximately 3-4 seconds. This will bring up a management interface on the display.
- Use the 'Add' button (or 'Up' arrow) to navigate through the settings and increase the voltage value until it reaches your desired setting, for example, 13.7V for battery recovery.
- Press the MCU control button again to save the new setting. The display will stop flashing, indicating the data has been saved.
6.3. USB Output Usage
The dual USB ports can be used to charge various 5V devices, such as mobile phones, driving recorders, and cameras.

Image 6.1: Illustration of various portable electronic devices, such as mobile phones, driving recorders, and cameras, being charged via the controller's USB output.
7. Penyelenggaraan
Penyelenggaraan berkala memastikan prestasi optimum dan jangka hayat pengawal cas solar anda.
- Pembersihan: Periodically clean the controller's exterior with a dry cloth to remove dust and dirt. Ensure the display remains clear.
- Semakan Sambungan: Annually inspect all wiring connections to ensure they are secure and free from corrosion. Loose connections can cause overheating and damage.
- Pengudaraan: Pastikan kawasan pemasangan mempunyai pengudaraan yang baik untuk mengelakkan alat kawalan terlalu panas.
8. Penyelesaian masalah
Bahagian ini menangani isu biasa dan penyelesaiannya.
8.1. No Output from Load Terminals
- Gejala: The load connected to the controller is not receiving power.
- Kemungkinan Punca: Bateri voltage is too low. The controller automatically stops output when battery voltage drops below a certain threshold (e.g., 10.5V-11V for a 12V system) to protect the battery from over-discharge.
- Penyelesaian: Allow the solar panel to charge the battery. The controller will resume load output once the battery voltage recovers to 12.6V (for a 12V system).
8.2. Vol. Salahtage Readings or Charging Behavior
- Gejala: The display shows unexpected voltage values, or charging seems inefficient.
- Kemungkinan Punca: Voltage settings may be misconfigured or require adjustment. The normal operating voltage range for the controller is typically 10.7V to 13.7V (for a 12V system).
- Penyelesaian: Refer to Section 6.2 "Adjusting Voltage Settings" to manually adjust the voltage parameters, such as setting the recovery voltage to 13.7V if needed.
9. Sokongan
Fydun is committed to providing reliable products and customer satisfaction. If you have any questions regarding the installation, operation, or troubleshooting of your MPPT Solar Charge Controller, please contact our customer support. We are available to assist you with any inquiries.