
1. Pengenalan
Terima kasih kerana membeliasing the Myra TouYinGer X20 LED Projector. This manual provides essential information for setting up, operating, and maintaining your projector. Please read it thoroughly before use to ensure proper operation and to extend the lifespan of your device.
2. Maklumat Keselamatan
- Use the projector in a dark and cool environment for optimal performance and extended product life.
- Avoid using the projector in dusty or humid conditions.
- Jangan sekat bukaan pengudaraan projektor.
- Jangan lihat terus ke dalam kanta projektor apabila lamp sedang aktif.
- This projector is not recommended for office presentations or educational use.
- Ensure the power supply matches the projector's requirements (AC110V~240V 50Hz/60Hz).
3. Kandungan Pakej
Buka kotak dengan berhati-hati dan pastikan semua barang yang disenaraikan di bawah ada dan dalam keadaan baik. Jika terdapat barang yang hilang atau rosak, sila hubungi khidmat pelanggan.
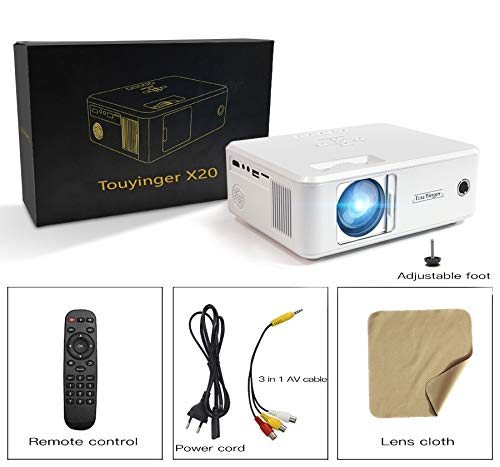
Image: The Myra TouYinGer X20 Projector shown with its packaging box and included accessories: remote control, power cord, 3-in-1 AV cable, and a lens cleaning cloth.
- Myra TouYinGer X20 LED Projector
- Alat Kawalan Jauh
- Kord Kuasa
- Kabel AV 3-dalam-1
- Kain Pembersih Lensa
- Manual Pengguna (dokumen ini)
4. Produk Lebihview
4.1 Dimensi dan Komponen
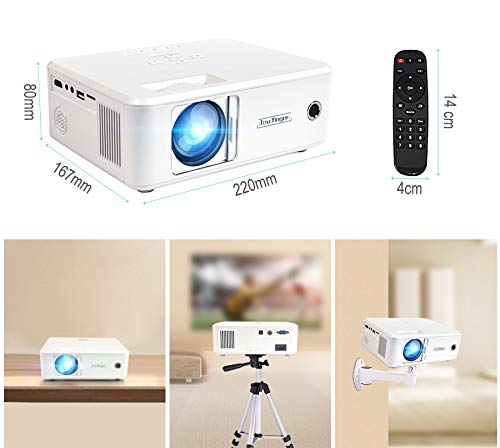
Imej: Atas view of the Myra TouYinGer X20 Projector showing its dimensions (220mm length, 167mm width, 80mm height). Also shown are the remote control dimensions (14cm length, 4cm width) and examples of projector placement: tabletop, tripod mount, and wall mount.
The projector features a compact design with various ports for connectivity. Key components include the lens, focus ring, keystone correction, input ports (HDMI, USB, VGA, AV, SD card slot), and power input.
4.2 Antara muka
- HDMI: For connecting to devices like laptops, gaming consoles, and Blu-ray players.
- USB: Untuk menyambungkan pemacu kilat USB untuk memainkan media files. (Note: Supports Pendrive only, not hard disks or phones).
- VGA: Untuk menyambung ke komputer.
- DARI: For connecting to older devices using the included 3-in-1 AV cable.
- Slot Kad SD: Untuk bermain media files directly from an SD card.
- Port Audio 3.5mm: Untuk menyambungkan pembesar suara luaran atau fon kepala.
5. Persediaan
5.1 Penempatan
Position the projector on a stable, flat surface or mount it using a compatible tripod or ceiling mount. Ensure there is adequate ventilation around the projector. The projection distance ranges from 1.2 to 3.8 meters, yielding a screen size of 37 to 130 inches. For best results, use in a dark environment.
5.2 Sambungan Kuasa
- Sambungkan kord kuasa ke input kuasa projektor.
- Plug the other end of the power cord into a suitable electrical outlet (AC110V~240V, 50Hz/60Hz).
- Lampu penunjuk kuasa pada projektor akan menyala.
5.3 Menyambungkan Sumber Input
Connect your desired media source (e.g., laptop, USB drive, DVD player) to the corresponding port on the projector.
- HDMI: Connect an HDMI cable from your device to the projector's HDMI port.
- USB/SD: Insert a USB flash drive or SD card into the respective slot.
- VGA: Sambungkan kabel VGA dari komputer anda ke port VGA projektor.
- DARI: Use the provided 3-in-1 AV cable to connect to devices with RCA outputs.
5.4 Pelarasan Fokus dan Keystone
- Fokus: Putar gelang fokus pada kanta projektor sehingga imej yang diunjurkan jelas dan tajam.
- Pembetulan Keystone: Use the keystone adjustment dial (±12 vertical) to correct trapezoidal distortion if the projector is not perfectly perpendicular to the screen.
6. Arahan Operasi
6.1 Hidupkan/Mati Kuasa
- Hidupkan kuasa: Press the power button on the projector or the remote control. The LED lamp akan dihidupkan.
- Matikan: Press the power button again. Allow the projector to cool down before unplugging it.
6.2 Pemilihan Sumber
Use the 'Source' button on the remote control or projector to cycle through available input sources (HDMI, USB, VGA, AV, SD).
6.3 Main Semula Media (USB/SD)
When a USB drive or SD card is inserted, navigate the on-screen menu using the remote control to select the desired media type (Video, Music, Photo, Text) and then browse for your files.
- Format Audio yang Disokong: MP3, WMA, AAC
- Format Video yang Disokong: MPEG1, MPEG2, MPEG4, H264, RM, RMVB, MOV, MJPEG, VC1, DIVX, FLV (Note: AC3 audio is not supported).
- Format Gambar yang Disokong: JPEG, BMP, PNG
6.4 Fungsi 3D
The projector supports Red & Blue 3D format. To view 3D content, you will need compatible Red & Blue 3D glasses (not included).
7. Penyelenggaraan
7.1 Pembersihan Kanta
Use the provided lens cleaning cloth or a soft, lint-free cloth to gently wipe the projector lens. Avoid using abrasive cleaners or excessive force.
7.2 Perlindungan Habuk
The projector features an embedded lens cover for better lens and dust protection. Always replace the lens cover when the projector is not in use. Regularly clean the projector's exterior with a soft, dry cloth.
7.3 Lamp kehidupan
LED lamp has an estimated lifespan of 20,000 hours. Proper ventilation and operating conditions will help maximize lamp kehidupan.
8. Penyelesaian masalah
Jika anda menghadapi masalah dengan projektor anda, sila rujuk masalah dan penyelesaian biasa berikut:
| Masalah | Kemungkinan Punca | Penyelesaian |
|---|---|---|
| Tiada gambar di skrin | Incorrect input source selected; Loose cable connection; Power issue | Select the correct input source; Check all cable connections; Ensure projector is powered on. |
| Imej kabur | Focus not adjusted; Projector too far/close to screen | Laraskan gelang fokus; Laraskan jarak unjuran. |
| Imej adalah trapezoid | Projektor tidak berserenjang dengan skrin | Adjust keystone correction dial. |
| Tiada bunyi | Volume too low; Audio format not supported; External speakers not connected | Increase volume; Check if audio format is supported (AC3 not supported); Connect external speakers if needed. |
| Pemacu USB tidak dikenali | Unsupported device; Corrupted files | Ensure it's a USB Pendrive (hard disks/phones not supported); Check file system and integrity. |
9. Spesifikasi
| Ciri | Spesifikasi |
|---|---|
| Model | X20 |
| Teknologi Paparan | TFT-Panel LCD Tunggal + Teknologi LED |
| Resolusi Asli | 800 x 600 dpi (Supports 720p, 1080p) |
| Kecerahan | 2200 Lumen |
| Nisbah Kontras | 1500:1 |
| Lamp taip | LED Lamp |
| Lamp kehidupan | 20,000 jam |
| Warna Boleh Dipamerkan | 16.7K |
| Lensa | F=126 mm (Manual focusing) |
| Pembetulan Batu Kunci | ±12° Vertical (Manual) |
| Saiz Skrin Tayangan | 37-130 inci |
| Jarak Unjuran | 1.2-3.8 meter |
| Nisbah Aspek | 16:9 Asli, Serasi 4:3 |
| Antara Muka Multimedia | 1*VGA, 1*USB, 1*SD, 1*HDMI, 1*3.5mm Audio port, 1*AV, 1*TV |
| Bekalan Kuasa | AC110V~240V 50Hz/60Hz |
| Dimensi | 212mm x 150mm x 78mm |
| Berat badan | 1.5 kg |
| Ciri Khas | Portable, Red & Blue 3D Support |
10. Waranti dan Sokongan
The Myra TouYinGer X20 LED Projector comes with a Waranti 1 Tahun dari tarikh pembelian.
For warranty claims, technical support, or any inquiries, please contact Myra customer service:
- telefon: 8955589977
- e-mel: myrakhmshop@gmail.com
Please have your product model (X20) and purchase details ready when contacting support.