1. Pengenalan
This manual provides detailed instructions for the installation, operation, and maintenance of your ASRock B365 PRO4 ATX Motherboard. Please read this manual thoroughly before proceeding with installation to ensure correct setup and to prevent damage to the components.
The ASRock B365 PRO4 motherboard supports 9th and 8th Generation Intel Core Processors, offering a robust platform for personal computing. It features a Digi Power Design with an 8 Power Phase Design, ensuring stable power delivery to the CPU.
2. Maklumat Keselamatan
- Sentiasa putuskan sambungan bekalan kuasa sebelum memasang atau mengeluarkan sebarang komponen.
- Pakai tali pergelangan tangan anti-statik untuk mengelakkan kerosakan nyahcas elektrostatik (ESD) pada komponen sensitif.
- Kendalikan papan induk di tepinya untuk mengelak daripada menyentuh komponen sensitif.
- Pastikan pengudaraan yang betul dalam bekas PC anda untuk mengelakkan terlalu panas.
- Jauhkan papan induk daripada kelembapan dan suhu yang melampau.
3. Persediaan dan Pemasangan
3.1 Kandungan Pakej
Sahkan bahawa semua item terdapat dalam pakej:
- ASRock B365 PRO4 Motherboard
- Panduan Pemasangan Pantas
- CD sokongan
- I / O Shield
- 2 x Kabel Data SATA
- 3 x Skru untuk Soket M.2
- 1 x Standoff untuk Soket M.2

Image: ASRock B365 PRO4 Motherboard and its included accessories, including the quick installation guide, support CD, I/O shield, SATA cables, and M.2 screws/standoff.
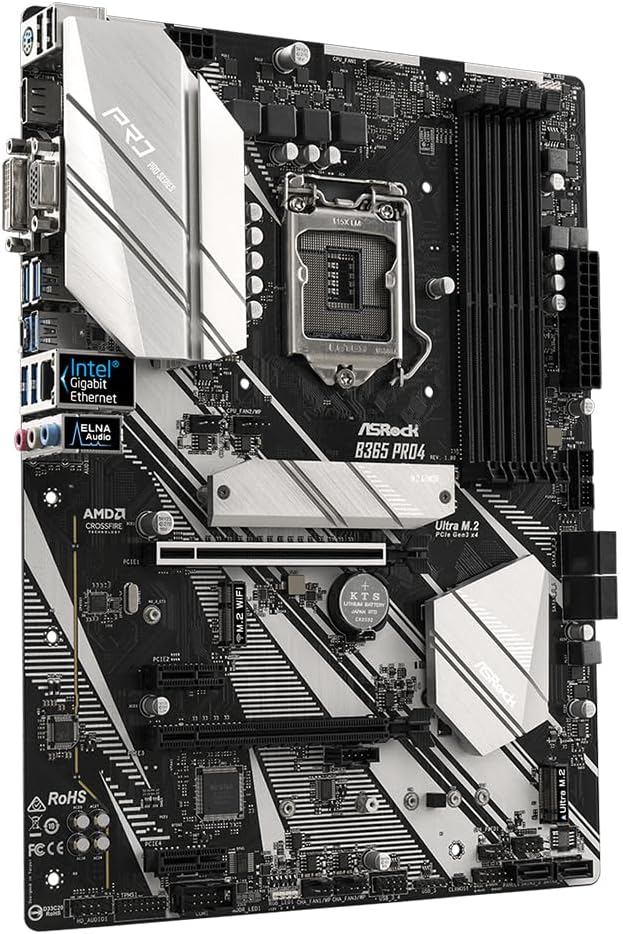
3.2 Susun atur Motherboard
Biasakan diri anda dengan komponen dan penyambung utama pada papan induk.

Imej: Atas ke bawah view of the ASRock B365 PRO4 Motherboard, highlighting the CPU socket, RAM slots, PCIe slots, and M.2 slots.

Imej: Bersudut view of the ASRock B365 PRO4 Motherboard, showing the heatsinks and various connectors.
3.3 Pemasangan CPU (LGA1151)
- Buka tuil soket CPU dan angkat plat beban.
- Carefully align the CPU with the socket, ensuring the golden triangle on the CPU matches the triangle on the socket.
- Perlahan-lahan letakkan CPU ke dalam soket tanpa memaksanya.
- Tutup plat beban dan selamatkannya dengan tuil.
3.4 Pemasangan Memori (RAM).
The motherboard features 4 DDR4 DIMM slots, supporting dual-channel memory up to 64GB.
- Buka klip di kedua-dua hujung slot DIMM.
- Jajarkan takuk pada modul RAM dengan kunci dalam slot DIMM.
- Insert the RAM module firmly until the clips snap into place.
3.5 Pemasangan Peranti Storan
The motherboard supports 6 SATA3 ports and 2 Ultra M.2 ports.
- Pemacu SATA: Connect SATA data cables to the SATA ports on the motherboard and to your storage devices (HDDs/SSDs). Connect power cables from your power supply to the devices.
- M.2 SSD: Locate the M.2 slots. Insert the M.2 SSD into the slot at an angle, then gently push it down and secure it with the provided screw and standoff.
3.6 Pemasangan Kad Pengembangan (PCIe)
The motherboard has 2 PCI-Express 3.0 x16 slots and 2 PCI-Express 3.0 x1 slots.
- Select an appropriate PCIe slot for your expansion card (e.g., graphics card).
- Remove the corresponding metal bracket from your PC case.
- Align the card with the slot and press firmly until it is seated correctly.
- Pasangkan kad dengan skru pada bekas PC.
3.7 Connecting Peripherals to the I/O Panel
Panel I/O belakang menyediakan pelbagai port untuk menyambungkan peranti luaran.
Imej: Jarak dekat view of the ASRock B365 PRO4 Motherboard's rear I/O panel, showing ports for PS/2, USB 2.0, USB 3.1 Gen 1, VGA, DVI-D, HDMI, LAN, and audio jacks.
- Port USB: Connect USB devices (keyboard, mouse, external drives) to the available USB 2.0 (5 ports) and USB 3.1 Gen 1 (8 ports, including 1 Type-C rear) ports.
- Output Video: Connect your monitor to the VGA, DVI-D, or HDMI port.
- Port LAN: Sambungkan kabel Ethernet untuk akses rangkaian.
- Bicu Audio: Connect speakers, headphones, or microphones to the audio jacks.
- Pelabuhan PS/2: Connect a PS/2 keyboard or mouse.
4. Arahan Operasi
4.1 But Pertama dan Persediaan BIOS
- After assembling all components, connect the power supply and monitor.
- Hidupkan sistem anda. Tekan Del or F2 semasa permulaan untuk memasuki utiliti persediaan BIOS/UEFI.
- Konfigurasikan susunan but, masa sistem dan tetapan lain yang diperlukan. Simpan perubahan dan keluar.
- Install your operating system from a bootable USB drive or optical media.
4.2 Pemasangan Pemandu
After installing the operating system, install the necessary drivers from the provided Support CD or download the latest versions from the ASRock webtapak. Pemacu utama termasuk:
- Pemacu Chipset
- Audio Drivers (Realtek ALC892)
- LAN Drivers (Intel I219V Gigabit Ethernet)
- Pemacu Grafik (untuk grafik bersepadu atau GPU diskret)
5. Penyelenggaraan
- Penyingkiran habuk: Regularly clean dust from the motherboard and case fans using compressed air. Ensure the system is powered off and unplugged before cleaning.
- Kemas Kini BIOS: Semak ASRock website periodically for BIOS updates. Updates can improve system stability and compatibility. Follow the instructions carefully when updating the BIOS.
- Pengurusan Kabel: Pastikan kabel disalurkan dengan kemas untuk meningkatkan aliran udara dan mengelakkan gangguan.
6. Penyelesaian masalah
- Tiada Kuasa:
- Check all power connections, including the 24-pin ATX and 8-pin 12V CPU power connectors.
- Pastikan suis bekalan kuasa berada dalam kedudukan ON.
- Tiada Paparan:
- Verify that the monitor is connected to the correct video output (either integrated graphics or discrete GPU).
- Pasang semula kad grafik dan modul RAM.
- Ketidakstabilan/Ranap Sistem:
- Check RAM modules for proper seating.
- Pastikan penyejuk CPU dipasang dengan betul dan bersentuhan dengan baik.
- Update drivers and BIOS to the latest versions.
- M.2 SSD Tidak Dikesan:
- Ensure the M.2 SSD is correctly seated and secured.
- Check BIOS settings to ensure M.2 slots are enabled and configured correctly (SATA vs. PCIe mode).
7. Spesifikasi
| Ciri | Perincian |
|---|---|
| Soket CPU | LGA 1151 |
| Pemproses yang Serasi | 9th/8th Generation Intel Core Processors (up to 95W) |
| Chipset | Intel B365 |
| Ingatan | 4 x DDR4 DIMM slots, Dual Channel, Non-ECC, Buffered, Max 64GB (2666/2400/2133 MHz) |
| Slot Pengembangan | 2 x PCIe 3.0 x16, 2 x PCIe 3.0 x1 |
| Sokongan Berbilang Grafik | AMD Quad CrossFireX and CrossFire Technology |
| Penyimpanan | 6 x SATA3 ports (RAID 0, 1, 5, 10), 2 x Ultra M.2 ports (PCIe Gen3 x4 & SATA3) |
| Audio | Realtek ALC892 7.1-Channel HD Audio |
| LAN | Intel I219V Gigabit Ethernet |
| Port USB | 8 x USB 3.1 Gen1 (1 Type-C rear, 5 rear, 2 via header), 5 x USB 2.0 (2 rear, 3 via header) |
| Output Video | 1 x VGA, 1 x DVI-D, 1 x HDMI |
| Faktor Bentuk | ATX (12.0 x 9.0 inch / 30.5 x 22.9 cm) |
8. Waranti dan Sokongan
8.1 Maklumat Waranti
The ASRock B365 PRO4 Motherboard comes with a Waranti terhad 1 tahun. This warranty covers defects in materials and workmanship under normal use. For specific terms and conditions, please refer to the warranty card included with your product or visit the official ASRock webtapak.
Note: Damage caused by improper installation, misuse, unauthorized modifications, or natural disasters is not covered under warranty.
8.2 Sokongan Teknikal
For technical assistance, driver downloads, BIOS updates, or further troubleshooting, please visit the official ASRock support webtapak:
You may also contact ASRock customer service directly through their website for personalized support.