1. Pengenalan
Terima kasih kerana membeliasing the Mr. Coffee BVMC-DVX41 12-Cup Programmable Coffeemaker. This manual provides important information for the safe and efficient operation of your new appliance. Please read these instructions thoroughly before first use and retain them for future reference.
2. Perlindungan Penting
Apabila menggunakan peralatan elektrik, langkah berjaga-jaga keselamatan asas hendaklah sentiasa diikuti untuk mengurangkan risiko kebakaran, kejutan elektrik dan/atau kecederaan kepada orang, termasuk yang berikut:
- Baca semua arahan sebelum menggunakan perkakas ini.
- Jangan sentuh permukaan panas. Gunakan pemegang atau tombol.
- Untuk melindungi daripada kejutan elektrik, jangan letakkan kord, palam atau pembuat kopi di dalam air atau cecair lain.
- Pengawasan rapi diperlukan apabila sebarang perkakas digunakan oleh atau berhampiran kanak-kanak.
- Cabut plag dari soket apabila tidak digunakan dan sebelum membersihkan. Biarkan sejuk sebelum memakai atau menanggalkan bahagian, dan sebelum membersihkan perkakas.
- Do not operate any appliance with a damaged cord or plug, or after the appliance malfunctions or has been damaged in any manner. Return appliance to an authorized service facility for examination, repair, or adjustment.
- Penggunaan lampiran aksesori yang tidak disyorkan oleh pengilang perkakas boleh mengakibatkan kebakaran, renjatan elektrik atau kecederaan kepada orang.
- Jangan gunakan di luar rumah.
- Jangan biarkan kord tergantung di tepi meja atau kaunter, atau menyentuh permukaan panas.
- Jangan letakkan pada atau berhampiran gas panas atau penunu elektrik, atau dalam ketuhar yang dipanaskan.
- Untuk memutuskan sambungan, matikan mana-mana kawalan kepada "mati", kemudian tanggalkan palam daripada alur keluar dinding.
- Jangan gunakan perkakas untuk kegunaan selain daripada yang dimaksudkan.
- Karaf direka untuk digunakan dengan perkakas ini sahaja. Ia tidak boleh digunakan di bahagian atas.
- Jangan letakkan botol panas di atas permukaan yang basah atau sejuk.
- Jangan gunakan bekas retak atau bekas yang mempunyai pemegang longgar atau lemah.
- Jangan bersihkan botol dengan pembersih, pad bulu keluli atau bahan pelelas lain.
- Melecur mungkin berlaku jika penutup ditanggalkan semasa kitaran membancuh.
3. Parts of Your Coffeemaker
Familiarize yourself with the components of your Mr. Coffee BVMC-DVX41 coffeemaker before operation.

Rajah 1: Depan view of the Mr. Coffee BVMC-DVX41 coffeemaker. This image shows the control panel with digital display, buttons for programming and brewing, the brew basket area, and the glass carafe on the warming plate.
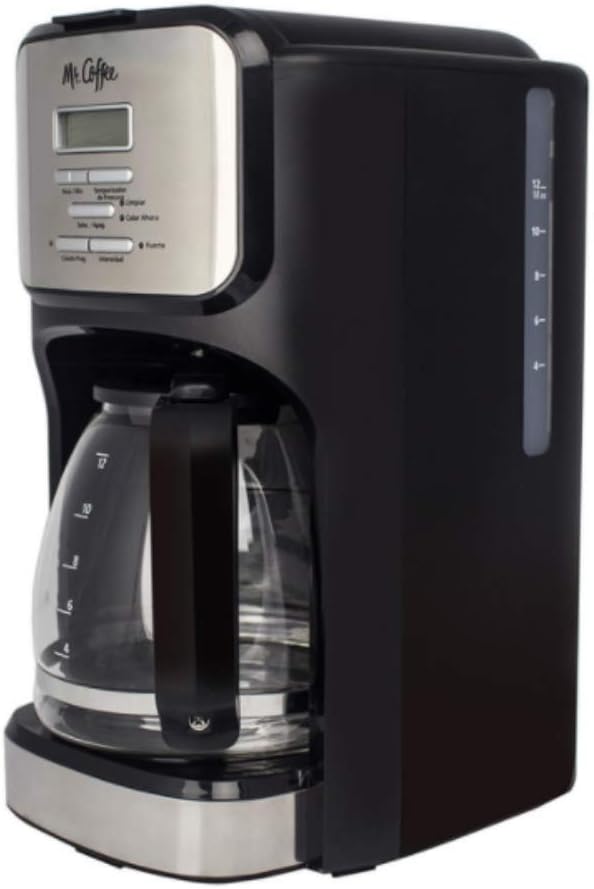
Rajah 2: sebelah view of the Mr. Coffee BVMC-DVX41 coffeemaker. This image highlights the water reservoir with its clear water level indicator, allowing users to easily see how much water is added.
- Tudung: Covers the water reservoir and brew basket.
- Takungan Air: Holds water for brewing. Features a clear level indicator.
- Bakul Brew: Holds the coffee filter and ground coffee. Removable for easy cleaning.
- Panel Kawalan: Includes a digital clock/timer display and various function buttons.
- Teko Kaca: 12-cup capacity carafe with handle and lid.
- Plat Pemanasan: Keeps brewed coffee hot.
- Kord Kuasa: Untuk menyambung ke salur keluar elektrik.
4. Persediaan dan Penggunaan Pertama
4.1 Sebelum Penggunaan Pertama
Before brewing your first pot of coffee, it is recommended to clean the coffeemaker to remove any dust or manufacturing residues.
- Wash the carafe and brew basket in warm, soapy water. Rinse thoroughly and dry.
- Isi takungan air hingga tanda 12 cawan dengan air segar dan sejuk.
- Place an empty paper filter (basket-style) into the brew basket.
- Place the brew basket into its housing and close the lid.
- Letakkan bekas kosong di atas pinggan pemanasan.
- Pasangkan pembancuh kopi ke salur keluar elektrik.
- Run a full brewing cycle with only water and the paper filter. Discard the water from the carafe and the used filter.
- Repeat this process once more for optimal cleaning.
4.2 Menetapkan Jam
The coffeemaker features a programmable clock. Set the current time for accurate programming.
- Plug in the coffeemaker. The display will flash "12:00".
- Press the "HOUR" button repeatedly until the correct hour is displayed. Pay attention to the AM/PM indicator.
- Press the "MINUTE" button repeatedly until the correct minute is displayed.
- The clock is now set. If you do not press any button for 5 seconds, the time will be set automatically.
5. Arahan Operasi
5.1 Membancuh Kopi
- Pastikan pembuat kopi dipasang dan jam ditetapkan.
- Fill the water reservoir with fresh, cold water to your desired number of cups, using the water level indicator on the side. Do not exceed the 12-cup maximum fill line.
- Place a basket-style paper filter into the brew basket.
- Masukkan jumlah kopi yang dikisar ke dalam penapis. Garis panduan umum ialah satu sudu kopi tanah setiap cawan, tetapi laraskan dengan citarasa anda.
- Slide the brew basket into its housing and close the lid securely.
- Place the empty carafe with its lid on the warming plate. Ensure it is seated correctly to activate the "Pause 'n Serve" feature.
- Press the "ON/OFF" button to start the brewing cycle. The indicator light will illuminate.
- Once brewing is complete, the coffeemaker will automatically switch to the "Keep Warm" mode. The warming plate will keep the coffee hot for approximately 2 hours before automatically shutting off.
5.2 Programmable Brewing (Delay Brew)
Set your coffeemaker to brew automatically at a later time.
- Follow steps 1-6 from "5.1 Brewing Coffee".
- Press the "PROGRAM" button. The display will show "PROGRAM" and flash "12:00".
- Press the "HOUR" and "MINUTE" buttons to set the desired brew time. Remember to observe the AM/PM indicator.
- Once the desired time is set, press the "PROGRAM" button again to confirm. The "PROGRAM" indicator light will illuminate.
- The coffeemaker will now start brewing automatically at the programmed time.
- To cancel the programmed brew, press the "ON/OFF" button.
5.3 Pause 'n Serve Feature
This feature allows you to pour a cup of coffee before the entire brewing cycle is complete.
- During the brewing cycle, you can temporarily remove the carafe from the warming plate. The flow of coffee will automatically stop.
- Tuangkan secawan kopi anda.
- Immediately return the carafe to the warming plate. If the carafe is not returned within 30 seconds, the brew basket may overflow.
6. Penjagaan dan Penyelenggaraan
6.1 Pembersihan Harian
Regular cleaning helps maintain the performance and longevity of your coffeemaker.
- Always unplug the coffeemaker and allow it to cool completely before cleaning.
- Remove the brew basket and discard the used coffee filter and grounds.
- Wash the carafe and brew basket in warm, soapy water. These parts are not dishwasher safe. Rinse thoroughly.
- Wipe the exterior of the coffeemaker with a soft, damp kain. Jangan gunakan pembersih yang melelas atau pad penyental.
- Do not immerse the coffeemaker in water or any other liquid.
6.2 Penyahkerak (Penyingkiran Mendapan Mineral)
Mineral deposits (calcium and lime) can build up in your coffeemaker over time, affecting its performance. Descale your coffeemaker every 80 brew cycles or every 2-3 months, depending on water hardness.
- Pour 4 cups of undiluted white household vinegar into the water reservoir.
- Letakkan penapis kertas kosong ke dalam bakul minuman.
- Letakkan bekas kosong di atas pinggan pemanasan.
- Press the "ON/OFF" button to start a brewing cycle. Allow half of the vinegar solution to brew into the carafe, then press "ON/OFF" to turn off the coffeemaker.
- Let the coffeemaker soak for at least 15 minutes to allow the vinegar to clean the internal components.
- After soaking, press "ON/OFF" again to complete the brewing cycle with the remaining vinegar solution.
- Discard the vinegar solution from the carafe and the used filter.
- Fill the water reservoir with fresh, cold water (12 cups) and run two full brewing cycles with only water to rinse out any remaining vinegar taste.
7. Panduan Penyelesaian Masalah
Review isu biasa berikut dan penyelesaiannya sebelum menghubungi perkhidmatan pelanggan.
| Masalah | Kemungkinan Punca | Penyelesaian |
|---|---|---|
| Pembuat kopi tidak dihidupkan. | Tidak dipasang; kuasa outage; outlet rosak. | Ensure the coffeemaker is securely plugged into a working electrical outlet. Check your circuit breaker. |
| Kopi tidak dibancuh. | Water reservoir empty; brew cycle not started; carafe not on warming plate. | Fill water reservoir. Press "ON/OFF" button. Ensure carafe is properly seated on the warming plate. |
| Kopi terasa lemah atau terlalu kuat. | Nisbah kopi kepada air tidak betul; kisar kopi terlalu kasar/halus. | Adjust the amount of ground coffee. Use a medium grind for drip coffeemakers. |
| Bakul brew melimpah. | Too much coffee grounds; filter not seated correctly; carafe removed too long during Pause 'n Serve; coffeemaker needs descaling. | Reduce coffee grounds. Ensure filter is properly seated. Return carafe quickly. Descale the coffeemaker. |
| Kopi tidak cukup panas. | Warming plate not functioning; coffeemaker needs descaling. | Ensure the warming plate is on. Descale the coffeemaker to improve heating efficiency. |
8. Spesifikasi Produk
- Nombor Model: BVMC-DVX41
- Jenama: Encik Kopi
- kapasiti: 12 Cawan
- Jenis pembuat kopi: Mesin Kopi Titis
- Ciri Khas: Boleh diprogramkan
- Voltage: 120 Volt
- Mod Operasi: Automatik Sepenuhnya
- Komponen yang Disertakan: Karafe, Penapis
- Dimensi Produk: 15 x 14 x 9 inci (anggaran)
- Berat Barang: 5.06 paun (anggaran)
- Kemasan Luaran: metalik
- Input Antara Muka Manusia: Butang
- Adakah Mesin Cuci Pinggan Selamat: No (for main unit, carafe and brew basket are hand-wash only)
9. Waranti dan Sokongan Pelanggan
For detailed warranty information, please refer to the warranty card included with your product packaging or visit the official Mr. Coffee website. If you experience any issues not covered in this manual, or require further assistance, please contact Mr. Coffee customer support.
Sokongan dalam talian: Visit the official Mr. Coffee webtapak untuk Soalan Lazim dan sumber sokongan.
Sokongan Telefon: Rujuk kepada pembungkusan produk anda atau pegawai rasmi webtapak untuk nombor hubungan semasa.