1. Arahan Keselamatan Penting
Sila baca dan simpan arahan ini sebelum menggunakan pelembap udara anda. Kegagalan mematuhi arahan ini boleh mengakibatkan kejutan elektrik, kebakaran atau kecederaan serius.
- Sentiasa letakkan pelembap udara pada permukaan yang keras, rata dan kalis air, sekurang-kurangnya 12 inci (30 cm) dari dinding dan peralatan.
- Jangan rendam pelembap ke dalam air atau cecair lain.
- Cabut plag pelembap udara sebelum mengisi, membersihkan atau mengalihkannya.
- Jangan kendalikan pelembap dengan kord atau palam yang rosak.
- Jauhkan daripada kanak-kanak dan haiwan peliharaan.
- Gunakan hanya air paip yang bersih dan sejuk atau air suling. Jangan gunakan air panas.
- Jangan masukkan minyak pati terus ke dalam tangki air. Gunakan kotak aroma yang ditetapkan.
2. Produk Lebihview
Familiarize yourself with the components of your TTLIFE Humidifier.

Figure 2.1: Humidifier Components. This image illustrates the various parts of the humidifier, including the portable handle for easy transport, the large 5.5-liter water tank, the low water protection sensor, a child safety lock mechanism, the built-in water filter, and the included cleaning brush.
- Tangki Air: Kapasiti 6 liter untuk operasi yang berpanjangan.
- Muncung Kabus: 360° rotatable for directing mist.
- Panel Kawalan: LED touch display for settings and information.
- Kotak Aroma: Untuk menambah minyak pati.
- Sensor Kelembapan: Detects ambient humidity for automatic mode.
- Kawalan Jauh: Untuk memudahkan operasi dari jauh.
- Built-in Filter: Helps purify water.
3. Persediaan
3.1 Membongkar
- Remove all packaging materials from the humidifier and its accessories.
- Letakkan pelembap pada permukaan yang rata dan stabil.
- Periksa unit untuk sebarang kerosakan. Jika rosak, jangan kendalikan dan hubungi khidmat pelanggan.
3.2 Mengisi Tangki Air
- Pastikan pelembap udara dicabut dari soketnya.
- Keluarkan tangki air dari dasar.
- Buka penutup tangki di bahagian bawah tangki.
- Isi tangki dengan air paip yang bersih dan sejuk atau air suling. Jangan isi melebihi garisan MAX.
- Skrukan semula penutup tangki dengan kemas.
- Letakkan tangki air yang telah diisi semula ke atas tapak pelembap udara, pastikan ia diletakkan dengan betul.
4. Operasi
Plug the humidifier into a standard 120V AC outlet. The LED display will illuminate.
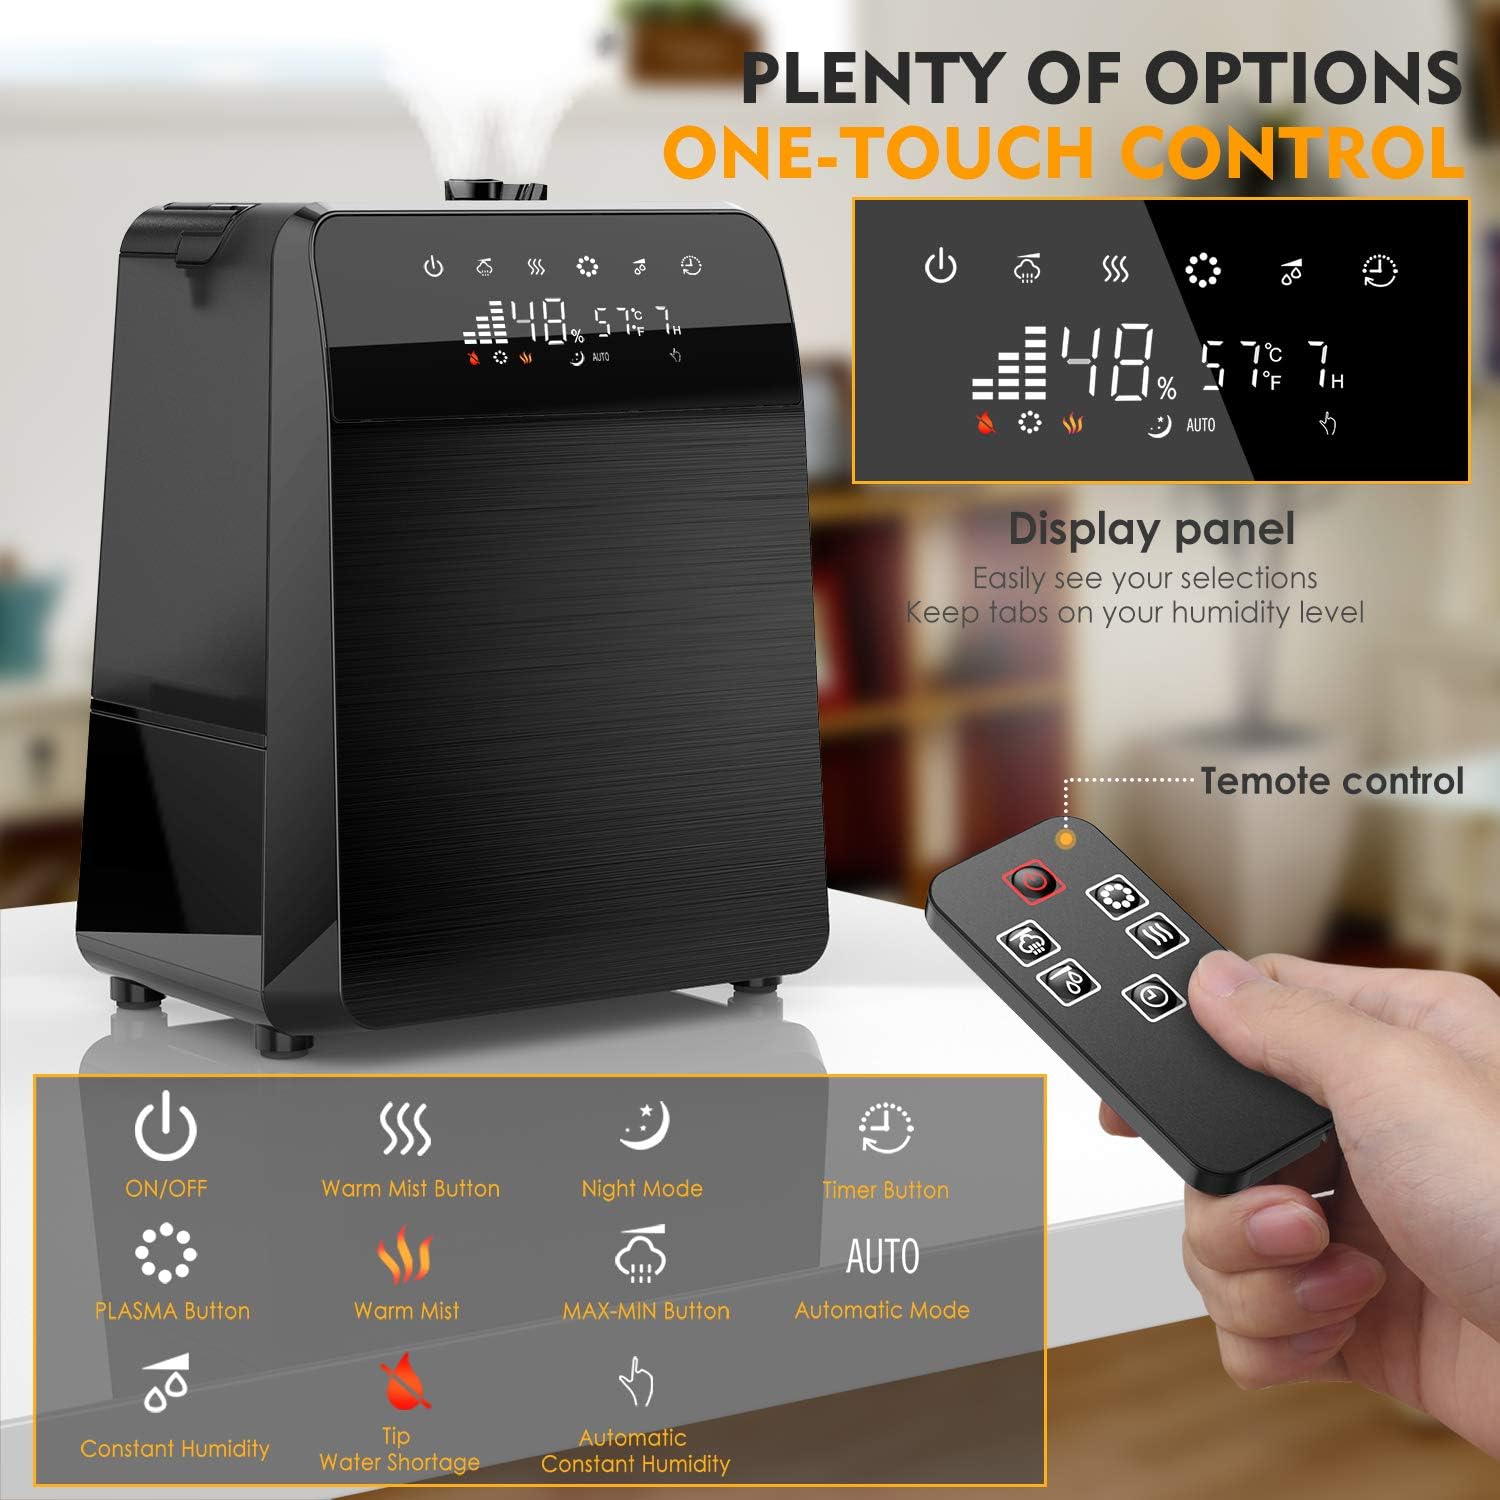
Figure 4.1: Control Panel and Remote Control. This image displays the humidifier's LED touch control panel and the accompanying remote control, highlighting buttons for power, mist settings, warm mist, night mode, timer, and automatic humidity control.
4.1 Hidupkan/Mati Kuasa
- Tekan ke Butang kuasa (
 ) pada panel kawalan atau alat kawalan jauh untuk menghidupkan atau mematikan unit.
4.2 Mist Control

Figure 4.2: Warm and Cool Mist Functionality. This image highlights the humidifier's ability to produce both warm and cool mist, with a 360-degree rotatable nozzle for optimal mist direction.
- Tahap Kabus: Tekan ke Mist Level button (
 ) to cycle through low, medium, and high mist output settings.
 - Kabus Hangat: Tekan ke Warm Mist button (
 ) to activate the warm mist function. Press again to turn off.
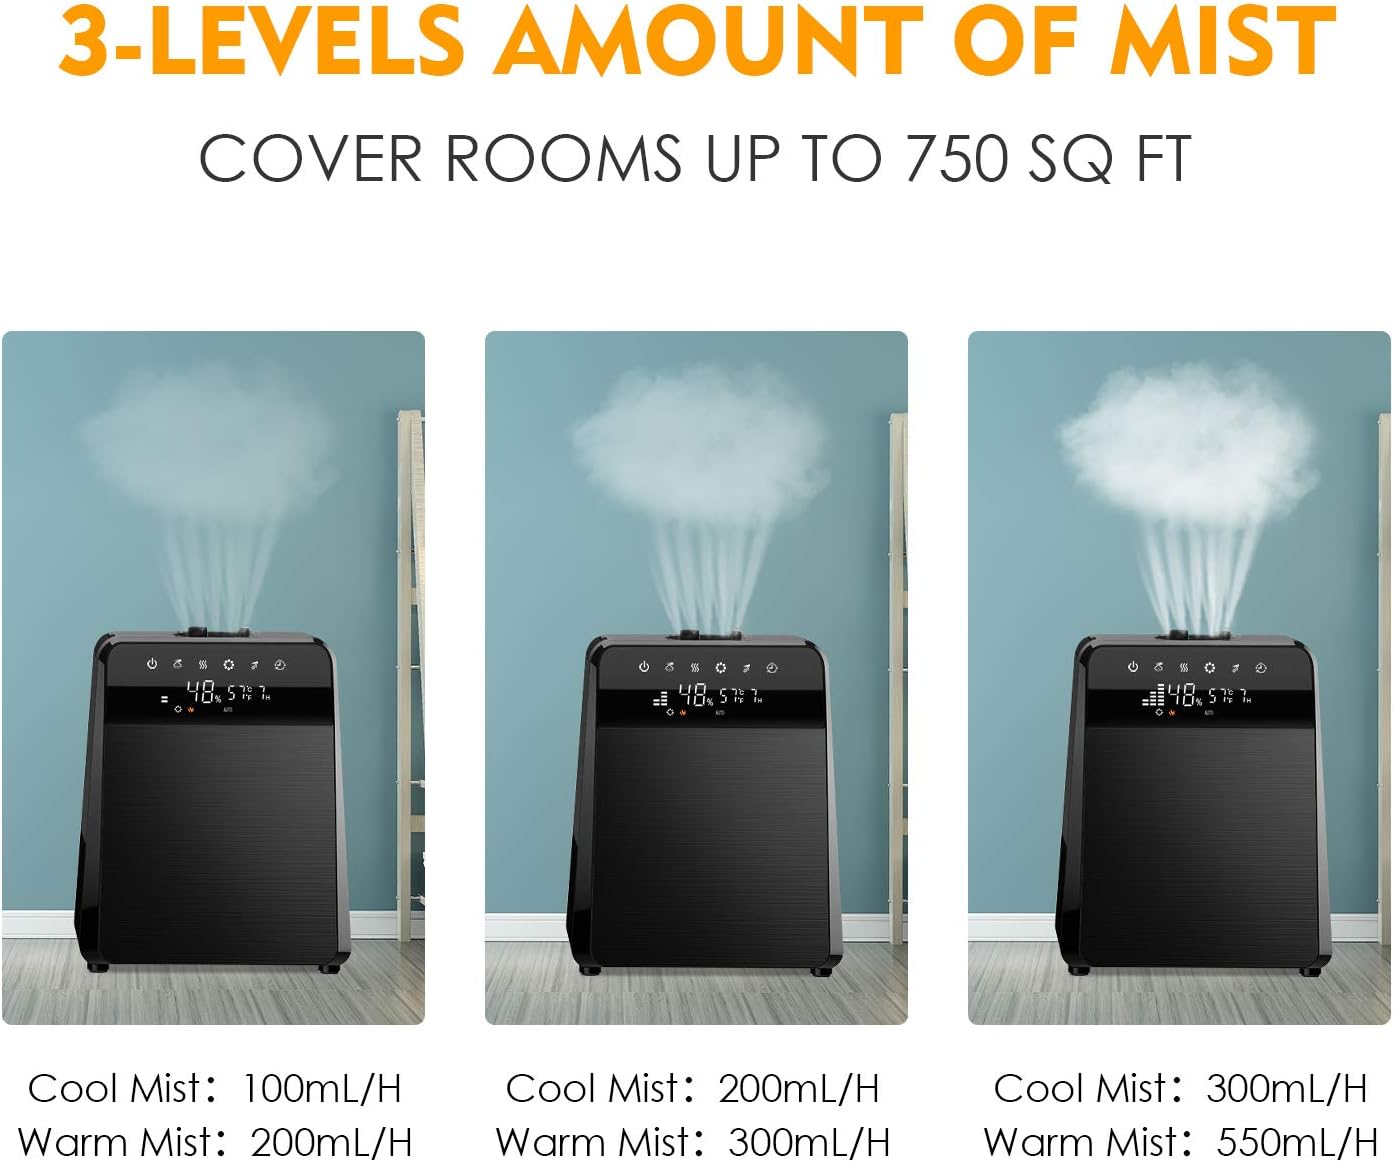
Figure 4.3: Mist Output Levels. This image shows the humidifier operating at three different mist output levels, indicating the varying rates for both cool mist (100mL/H, 200mL/H, 300mL/H) and warm mist (200mL/H, 300mL/H, 550mL/H).
4.3 Humidity Settings
- Mod Auto: Tekan ke butang AUTO (
 ) to enable automatic humidity control. The humidifier will adjust mist output to maintain a preset humidity level.
 - Customized Humidity: Dalam mod manual, tekan butang Humidity Setting button (
 ) to set your desired humidity level. The unit will operate until this level is reached.
4.4 Fungsi Pemasa
- Tekan ke Butang pemasa (
 ) to set an operating time from 1 to 12 hours. The humidifier will automatically turn off after the set time.
4.5 Mod Malam
- Tekan ke Butang Mod Malam (
 ) to dim the LED display and reduce operational noise for undisturbed sleep.
4.6 Penyebar Minyak Pati

Figure 4.4: Adding Essential Oils. This image demonstrates how to add essential oils to the humidifier by placing drops onto the pad within the designated aroma box, located at the back of the unit.
- Pull out the aroma box located at the back of the humidifier.
- Add a few drops of your preferred essential oil onto the aroma pad.
- Slide the aroma box back into the unit. The mist will carry the fragrance into the air.
5. Penyelenggaraan
Pembersihan berkala adalah penting untuk prestasi dan kebersihan yang optimum.
5.1 Penyelenggaraan Harian
- Empty the water tank and base reservoir daily.
- Rinse the tank and reservoir with clean water.
- Lap bahagian luar unit dengan kain lembutamp kain.
5.2 Weekly Cleaning and Descaling
- Cabut plag pelembap udara dan keluarkan tangki air.
- Pour 1 cup (240ml) of undiluted white vinegar into the base reservoir.
- Biarkan ia meresap selama 20 minit.
- Use the included cleaning brush to gently clean the heating element and ultrasonic nebulizer.
- Bilas bahagian bawah dengan teliti menggunakan air bersih sehingga bau cuka hilang.
- For the water tank, add 1 cup of white vinegar and fill with water. Shake well and let it sit for 20 minutes.
- Empty and rinse the tank thoroughly.
5.3 Penyelenggaraan Penapis
- The humidifier includes a built-in filter. Periodically rinse the filter under cool running water to remove any accumulated debris.
- Replace the filter every 6 months or as needed, depending on water hardness and usage.
6. Penyelesaian masalah
| Masalah | Kemungkinan Punca | Penyelesaian |
|---|---|---|
| Tiada kabus atau output kabus yang rendah | Paras air rendah Pengumpulan mineral Muncung kabus disekat | Isi semula tangki air Clean the ultrasonic nebulizer and heating element Clear any obstructions from the mist nozzle |
| Debu putih di sekeliling pelembap udara | Air keras yang digunakan | Use distilled or demineralized water. Clean the unit regularly. |
| Bau yang luar biasa | Bau unit baharu Dirty water/tank | Operate for a few days in a well-ventilated area Bersihkan tangki air dan tapaknya dengan teliti |
| Kebocoran air | Tank cap not secured Tangki tidak diletakkan dengan betul Unit rosak | Ensure tank cap is tightly closed Reposition the water tank firmly on the base Contact customer support if damage is visible |
7. Spesifikasi
| Ciri | Perincian |
|---|---|
| Jenama | TTLIFE |
| Nama Model | pelembap kabus sejuk |
| Nombor Model Item | 7544888128683 |
| Ciri Khas | Alat Kawalan Jauh |
| warna | Hitam |
| Mod Operasi | Ultrasonik, Pengewap |
| Jenis Bilik | Ruang Tamu |
| Komponen yang Disertakan | Alat Kawalan Jauh |
| Voltage | 120 Volt |
| Dimensi Produk | 24.8 x 19.69 x 14.96 inci |
| Berat Barang | 6.93 paun |
| Kapasiti | 6 Liter |
8. Waranti dan Sokongan
For warranty information or technical support, please refer to the product packaging or contact TTLIFE customer service directly. Keep your purchase receipt for warranty claims.