
1. Maklumat Keselamatan Penting
Please read this manual carefully before operating your air conditioner. Keep this manual for future reference.
- Pemasangan Profesional: Installation, maintenance, and repair must be performed by qualified service personnel. Improper installation can lead to electric shock, fire, or injury.
- Bekalan Kuasa: Pastikan bekalan kuasa sepadan dengan spesifikasi unit. Jangan gunakan kord kuasa atau palam yang rosak.
- Pengudaraan: Do not block the air inlet or outlet of the unit.
- Air dan Kelembapan: Do not expose the unit to direct water spray or excessive moisture. Do not operate with wet hands.
- Kanak-kanak dan Haiwan Kesayangan: Jauhkan kanak-kanak dan haiwan peliharaan dari unit semasa operasi.
- Pembersihan: Always disconnect power before cleaning the unit. Use a soft, dry cloth for cleaning.
- Penyejuk: This unit uses R410A refrigerant. Handle with care and ensure proper ventilation during service.
2. Produk Lebihview
The AUX ASW-H12A4/LIR1 is a 12000BTU (1 Ton) wall-mounted split air conditioning system designed for both heating and cooling. It features fine air purification, a T1 compressor, and Wi-Fi connectivity (optional).
2.1 Komponen
- Unit Dalaman: Responsible for air intake, cooling/heating, and air discharge into the room.
- Unit Luar: Contains the compressor and condenser, responsible for heat exchange with the outside air.
- Kawalan Jauh: Used to operate the air conditioner's functions.

Gambar 2.1: Lebihview of the AUX Split AC system, showing the indoor unit, outdoor unit, and remote control.
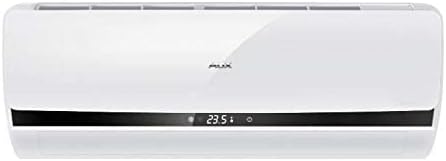
Rajah 2.2: Depan view of the AUX indoor unit, displaying its sleek design and digital display.
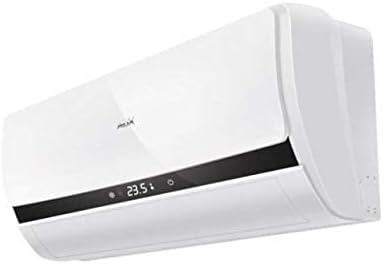
Rajah 2.3: Bersudut view of the AUX indoor unit, highlighting its compact form factor and air vents.
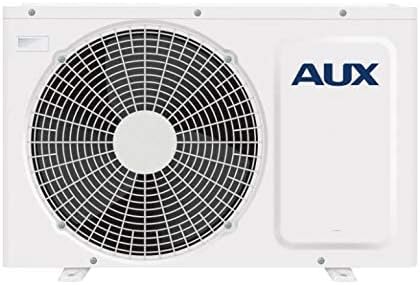
Rajah 2.4: Depan view of the AUX outdoor unit, showing the fan grille and the AUX branding.
3. Persediaan dan Pemasangan
Installation of this split air conditioning system requires specialized knowledge and tools. It is strongly recommended that you contact a certified HVAC professional for installation to ensure proper functioning, safety, and warranty validity.
3.1 Pemeriksaan Pra-Pemasangan
- Sahkan bahawa bekalan kuasa voltage and frequency match the unit's requirements.
- Ensure the installation location for both indoor and outdoor units allows for proper airflow and drainage.
- Confirm that the maximum communication length of 15 meters is not exceeded.
3.2 Professional Installation Steps (Summary for reference)
- Mounting the indoor unit securely on the wall.
- Installing the outdoor unit on a stable, level surface.
- Connecting refrigerant lines and electrical wiring between indoor and outdoor units.
- Melakukan penyedutan vakum dan pengecasan bahan pendingin.
- Checking for leaks and testing the system.
4. Arahan Operasi
The air conditioner is primarily controlled via the wireless remote control. Ensure the remote control has working batteries.
4.1 Operasi Asas
- Hidupkan/Mati Kuasa: Tekan ke HIDUP/MATI butang pada alat kawalan jauh untuk memulakan atau menghentikan unit.
- Pemilihan Mod: Tekan ke MODE butang untuk mengitar melalui mod yang tersedia:
- Mod Penyejukan: For cooling the room. Cooling power: 2700 W.
- Mod Pemanasan: For heating the room. Heating power: 2800 W. Minimum operating temperature for heating is -15°C.
- Mod Kipas: Mengedarkan udara tanpa penyejukan atau pemanasan.
- Mod Auto: The unit automatically selects the operating mode based on the room temperature.
- Mod Kering: Mengurangkan kelembapan di dalam bilik.
- Pelarasan Suhu: Gunakan TEMP ATAS/BAWAH butang untuk menetapkan suhu yang dikehendaki.
- Kelajuan Kipas: Tekan ke KELAJUAN KIPAS button to adjust the fan speed (4 speeds available).
- Fungsi Ayunan: Gunakan Swing button to adjust the direction of the airflow.
4.2 Fungsi Lanjutan
- Fungsi Pemasa: The On/Off Timer allows you to set a specific time for the unit to turn on or off. Refer to the remote control's specific instructions for setting the timer.
- Wi-Fi Control (Option): If equipped with the Wi-Fi module, the unit can be controlled via a smartphone application. Consult the separate Wi-Fi control manual for setup and operation.
- Permulaan panas: This function prevents cold air from blowing out when the unit starts in heating mode.
- Fungsi Memori: The unit can memorize your preferred settings.
5. Penyelenggaraan
Penyelenggaraan yang kerap memastikan prestasi optimum dan memanjangkan jangka hayat penghawa dingin anda. Sentiasa putuskan bekalan elektrik sebelum melakukan sebarang penyelenggaraan.
5.1 Pembersihan Penapis Udara
The air filters should be cleaned regularly, typically every two weeks, or more frequently depending on usage and air quality.
- Buka panel hadapan unit dalaman.
- Remove the air filters (Easy Clean Filter type).
- Bersihkan penapis menggunakan pembersih vakum atau basuh dengan air suam (di bawah 40°C).
- Allow the filters to dry completely in a shaded area before reinstalling them. Do not expose to direct sunlight.
- Pasang semula penapis dan tutup panel hadapan.
5.2 Other Filters
This unit features a deodorizing filter, filter with vitamin C, and an anion generator. Refer to your installer or service manual for specific maintenance or replacement instructions for these specialized filters.
5.3 Penyelenggaraan Unit Luar
The outdoor unit should be inspected periodically for obstructions (leaves, debris) around the fan and coils. This should ideally be done by a professional during annual servicing.
- Anti-ice formation system: The unit has a system to prevent ice formation on the outdoor coil during heating operation in cold weather.
6. Penyelesaian masalah
Before contacting service, please check the following common issues.
| Masalah | Kemungkinan Punca | Penyelesaian |
|---|---|---|
| Unit tidak bermula | Tiada kuasa; Bateri kawalan jauh rendah; Pemasa ditetapkan kepada MATI. | Check power supply; Replace batteries; Cancel timer setting. |
| Penyejukan/pemanasan tidak mencukupi | Dirty air filters; Blocked air intake/outlet; Room too large; Doors/windows open. | Clean air filters; Remove obstructions; Close doors/windows. |
| Bunyi yang tidak biasa | Loose parts; Unit not level; Refrigerant flow noise (normal). | Ensure unit is level; If noise persists and is unusual, contact service. |
| Kebocoran air dari unit dalaman | Hos longkang tersumbat; Pemasangan yang tidak betul. | Periksa dan bersihkan hos saliran; Hubungi profesional untuk pemeriksaan. |
| Self-diagnosis of malfunctions | Error code displayed on indoor unit. | Note the error code and refer to the service manual or contact customer support. |
If the problem persists after checking these points, please contact qualified service personnel.
7. Spesifikasi
| Ciri | Spesifikasi |
|---|---|
| Jenama | AUX |
| Nombor Model | ASW-H12A4/LIR1 |
| taip | Wall Split System |
| Kapasiti Penyejukan | 12000 BTU |
| Kuasa Penyejukan | 2700 W |
| Kuasa Pemanasan | 2800 W |
| Penggunaan Kuasa (Penyejukan) | 820 W |
| Penggunaan Kuasa (Pemanasan) | 770 W |
| Dimensi Unit Dalaman (WxHxD) | 70 × 28.5 × 18.8 cm |
| Berat Unit Dalaman | 8 kg |
| Dimensi Unit Luaran (WxHxD) | 72 × 54 × 26 cm |
| Berat Unit Luar | 27 kg |
| Tahap Bunyi (minimum/maks) | 27 dB / 36 dB |
| Jenis Penyejuk | R 410A |
| fasa | Fasa tunggal |
| Max. Communication Length | 15 m |
| Air Flow (max) | 7.5 cu m / min |
| Jenis Penapis | Easy Clean Filter, Deodorizing filter, Filter with Vitamin C |
| Ciri Khas | Inverter, Self-diagnosis, Anion generator, Anti-ice formation, Memory function, Warm start, Wi-Fi control (option) |
8. Waranti dan Sokongan
This AUX air conditioner comes with a limited warranty. Please refer to the warranty card included with your product for specific terms, conditions, and duration. Keep your purchase receipt as proof of purchase.
For technical support, service requests, or inquiries regarding your warranty, please contact your local AUX authorized service center or the retailer from whom you purchased the product. Ensure to provide your model number (ASW-H12A4/LIR1) and serial number (if applicable) when seeking support.
For the most up-to-date information and support resources, please visit the official AUX webtapak.