pengenalan
This manual provides detailed instructions for the installation, operation, and programming of your myTouchSmart In-Wall Digital Timer, Model 41431. This device is designed to automate the control of indoor and outdoor lighting, fans, and other compatible appliances, enhancing convenience and energy efficiency.

Figure 1: myTouchSmart In-Wall Digital Timer, Model 41431.
Ciri-ciri Produk
- Schedules indoor and outdoor lights, fans, or other devices for energy savings. Ideal for ceiling lights, ceiling fans, exhaust fans, and patio lights.
- Features an easy On/Off push button door panel for manual control, concealing LEDs and buttons for a clean aesthetic.
- Includes 4 programmable On/Off buttons and 2 On/Off override buttons. Blue LED indicator lights show active programs.
- Designed for screw terminal installation, offering improved space efficiency compared to flying leads. Maintains settings during power outages.
- NEUTRAL WIRE IS REQUIRED. WALL PLATE NOT INCLUDED.
- Electrical Ratings: 120VAC 60 Hz, 15A General/Resistive, 1200W Tungsten, 1200VA Ballast, ½ HP, UL Listed.
Kandungan Pakej
Your myTouchSmart In-Wall Digital Timer package includes:
- In-wall timer switch
- Manual pengguna
- Light almond replacement door (for color matching)
Maklumat Keselamatan
AMARAN: Risiko Renjatan Elektrik. Always turn off power at the circuit breaker or fuse box before installation or servicing. This device requires a neutral wire for proper operation. If you are unsure about electrical wiring, consult a qualified electrician.
Penilaian Elektrik: 120VAC 60 Hz, 15A General/Resistive, 1200W Tungsten, 1200VA Ballast, ½ HP, UL Listed.
Pemasangan
Follow these steps to safely install your myTouchSmart In-Wall Digital Timer.
1. Bersedia untuk Pemasangan
- Turn off power to the switch at the circuit breaker or fuse box.
- Tanggalkan plat dinding sedia ada dan skru pelekap.
- Carefully pull the existing switch from the wall box without disconnecting wires.
- Identify and label the Line (hot), Load, and Ground wires connected to the existing switch. A neutral wire (usually white) is required and should be present in the switch box.
- Putuskan sambungan wayar dari suis sedia ada.
2. Connect the Timer
- Connect the green or bare copper ground wire from the wall box to the green ground terminal on the timer.
- Connect the black load wire (leading to your light/fan) to the terminal marked 'LOAD' on the timer.
- Connect the black line wire (incoming power) to the terminal marked 'LINE' on the timer.
- Connect one end of the provided white jumper wire to the 'NEUTRAL' terminal on the timer. Secure the other end of the jumper to the bundle of neutral wires in the wall box using a wire nut.
- Carefully push the wired timer back into the switch box, ensuring no wires are pinched or crushed.
- Secure the timer to the wall box using the supplied screws.
- Reinstall the wall plate.
3. Kembalikan Kuasa
- Reapply power to the circuit at the breaker or fuse box.

Figure 2: Wiring diagram for the myTouchSmart In-Wall Digital Timer.
Video 1: Detailed installation guide for the myTouchSmart In-Wall Digital Timer. This video demonstrates how to replace an existing switch with the timer, including wiring and mounting.
Operasi & Pengaturcaraan
Your myTouchSmart In-Wall Digital Timer offers flexible programming options.
1. Changing the Door (Optional)
The timer includes a light almond replacement door to match existing switches. To change the door, locate the left and right snap-in spots on the timer. Gently pull one side of the door off, then the other. Align the bottom of the new door with the hinges and snap it into place.

Figure 3: Timer controls with hinged door open, showing buttons and LED indicators.
2. Menetapkan Semula Pemasa
To begin setting up or to clear all settings and restore factory defaults, press the recessed RESET button using a non-metallic pointed object (e.g., toothpick, pencil tip).
3. Menetapkan Masa Semasa
Before creating schedules, set the current time. Press and hold the UP or DOWN arrow beneath the display until the correct time appears.
4. Custom Programming (My ON/OFF Times)
To set a custom ON time, press the 'my on time' button. The display will flash. Use the UP/DOWN arrows to adjust the desired activation time. The setting is stored after 5 seconds of inactivity.
To set a custom OFF time, press the 'my off time' button. Repeat the process using the UP/DOWN arrows to set the desired deactivation time.
Blue indicator LEDs next to the buttons will illuminate to show which settings are active.
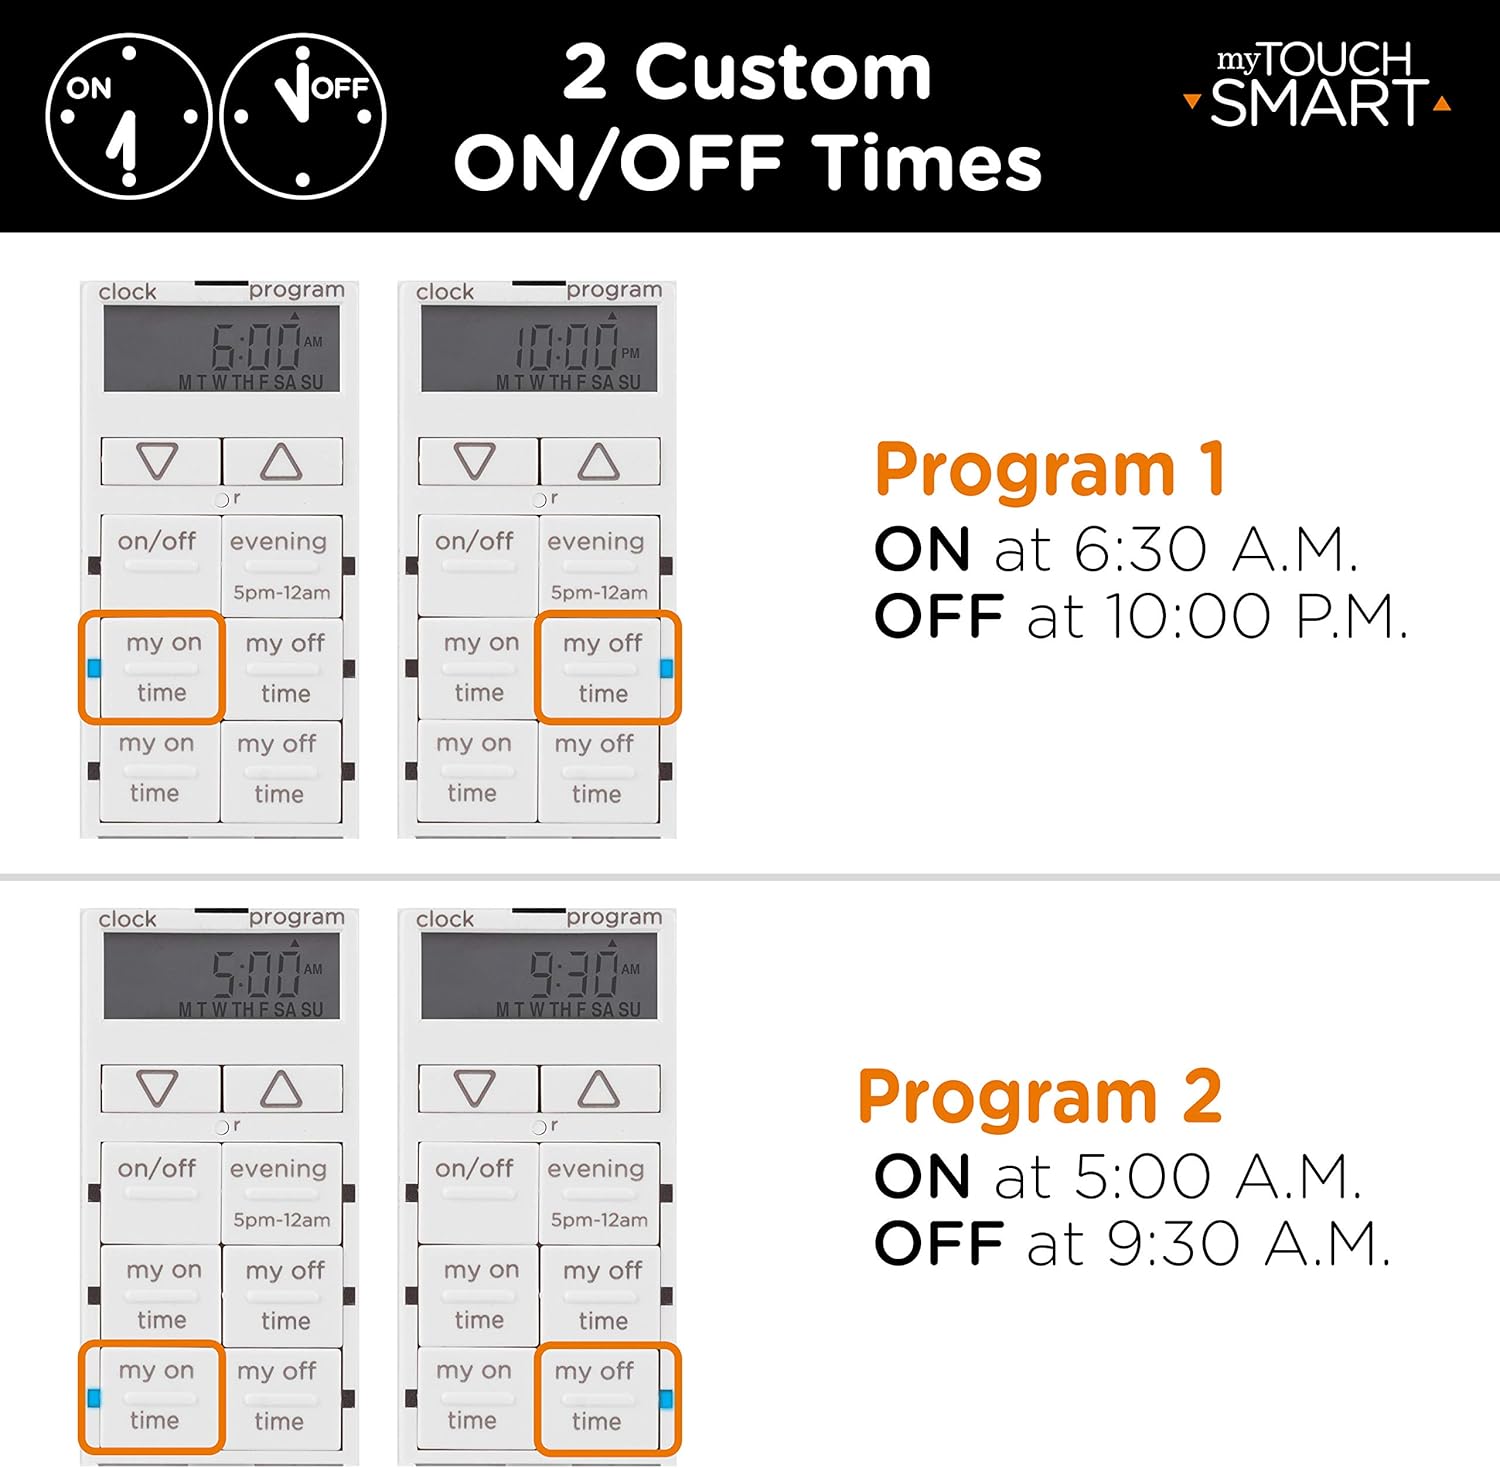
Gambar 4: Cthamples of custom ON/OFF programming.

Figure 5: Simple setup process for the timer.
5. Preset Programming (Evening)
The 'evening' preset button activates your connected device at 5 PM and turns it off at midnight. This provides a quick, one-touch option for common evening schedules.
This preset can be combined with custom 'my on time' or 'my off time' settings for varied schedules. For example, you can extend the run time by setting 'my on time' earlier than 5 PM, or use 'my off time' to shut off lighting before midnight.
6. Penggantian Manual
Lights can be manually controlled at any time by pressing the main ON/OFF button (the hinged door itself) or the dedicated ON/OFF override buttons.
Video 2: Detailed programming guide for the myTouchSmart In-Wall Digital Timer. This video demonstrates how to set custom ON/OFF times, use preset options, and manually override settings.
Aplikasi
The myTouchSmart In-Wall Digital Timer is versatile and suitable for various applications:
- Indoor lighting (e.g., ceiling lights)
- Outdoor lighting (e.g., patio lights)
- Kipas siling
- Peminat ekzos
- Other compatible devices requiring scheduled operation

Figure 6: Indoor and outdoor applications for the digital timer.
Spesifikasi
| Ciri | Spesifikasi |
|---|---|
| Mod Operasi | ON-OFF-ON |
| Penilaian Semasa | 15 Amps |
| Vol Operasitage | 120 Volt (AC) |
| Jenis Kenalan | Biasa Terbuka |
| Jenis Penyambung | skru |
| Jenis Suis | Butang Tekan |
| Terminal | skru |
| Dimensi (L x W x H) | 6.85 x 2.7 x 4.85 inci |
| Jenis Pemasangan | pintu |
| Jenis Penggerak | Butang Tekan |
| Bilangan Jawatan | 6 |
| Kaedah Kawalan | Butang Tekan |
| Wattage | 1200 watt |
| bahan | logam |
| Berat Barang | 0.39 paun |
| Pensijilan | UL Tersenarai |
Menyelesaikan masalah
If you encounter issues with your timer, please review langkah penyelesaian masalah biasa berikut:
- Tiada Kuasa ke Peranti: Ensure the circuit breaker is ON. Verify all wire connections are secure.
- Timer Not Responding: Perform a reset by pressing the recessed RESET button with a non-metallic pointed object.
- Incorrect Schedule: Re-check your programmed ON/OFF times and ensure the current time is set correctly.
- Lights/Fans Not Turning On/Off: Confirm the load wire is correctly connected to the 'LOAD' terminal and the line wire to the 'LINE' terminal. Ensure the neutral wire connection is secure.
For further assistance, refer to the official product manual or contact customer support.
Penyelenggaraan
The myTouchSmart In-Wall Digital Timer requires minimal maintenance. Periodically wipe the surface with a soft, dry cloth. Do not use abrasive cleaners or solvents. Ensure the hinged door operates smoothly.
Waranti & Sokongan
For the most up-to-date warranty information and detailed support, please visit the official product page or contact myTouchSmart customer service.
Manual dalam talian: https://byjasco.com/HEP-ET/20000-99999/41431/manual
Sokongan Pelanggan: 1-800-654-8483 (between 7 a.m. and 8 p.m. CST)