
1. Pengenalan
Terima kasih kerana membeliasing the GooDee Mini Projector GD-DE-9. This manual provides essential information for setting up, operating, and maintaining your projector. Please read it thoroughly before use to ensure optimal performance and safety.
The GooDee GD-DE-9 is a portable LED projector designed for home entertainment, gaming, and presentations. It features a native resolution of 800x480p, supports up to 1080p input, and offers multiple connectivity options including HDMI, VGA, USB, AV, and SD card. Its advanced cooling system ensures quiet operation, and the integrated 2W speaker provides clear audio.

Rajah 1.1: Depan view of the GooDee Mini Projector GD-DE-9.
2. Maklumat Keselamatan
Untuk mengelakkan kebakaran, renjatan elektrik atau kecederaan, sila patuhi langkah berjaga-jaga keselamatan berikut:
- Jangan buka projektor casing. Rujuk semua servis kepada kakitangan perkhidmatan yang berkelayakan.
- Jangan dedahkan projektor kepada hujan atau lembapan untuk mengelakkan kebakaran atau kejutan elektrik.
- Pastikan pengudaraan yang betul. Jangan sekat bukaan pengudaraan.
- Gunakan hanya penyesuai kuasa yang dibekalkan dengan projektor.
- Elakkan melihat terus ke dalam kanta projektor apabila lamp sedang aktif.
- Letakkan projektor pada permukaan yang stabil dan rata.
- Cabut palam projektor daripada soket kuasa semasa ribut petir atau apabila tidak digunakan untuk jangka masa yang lama.
3. Kandungan Pakej
Sila pastikan semua item disertakan dalam pakej anda:
- GooDee Mini Projector GD-DE-9
- Penyesuai Kuasa
- Alat Kawalan Jauh
- Kabel HDMI
- AV kabel
- Manual Pengguna
4. Produk Lebihview
4.1 Komponen Projektor

Rajah 4.1: Sisi view dengan port input/output.
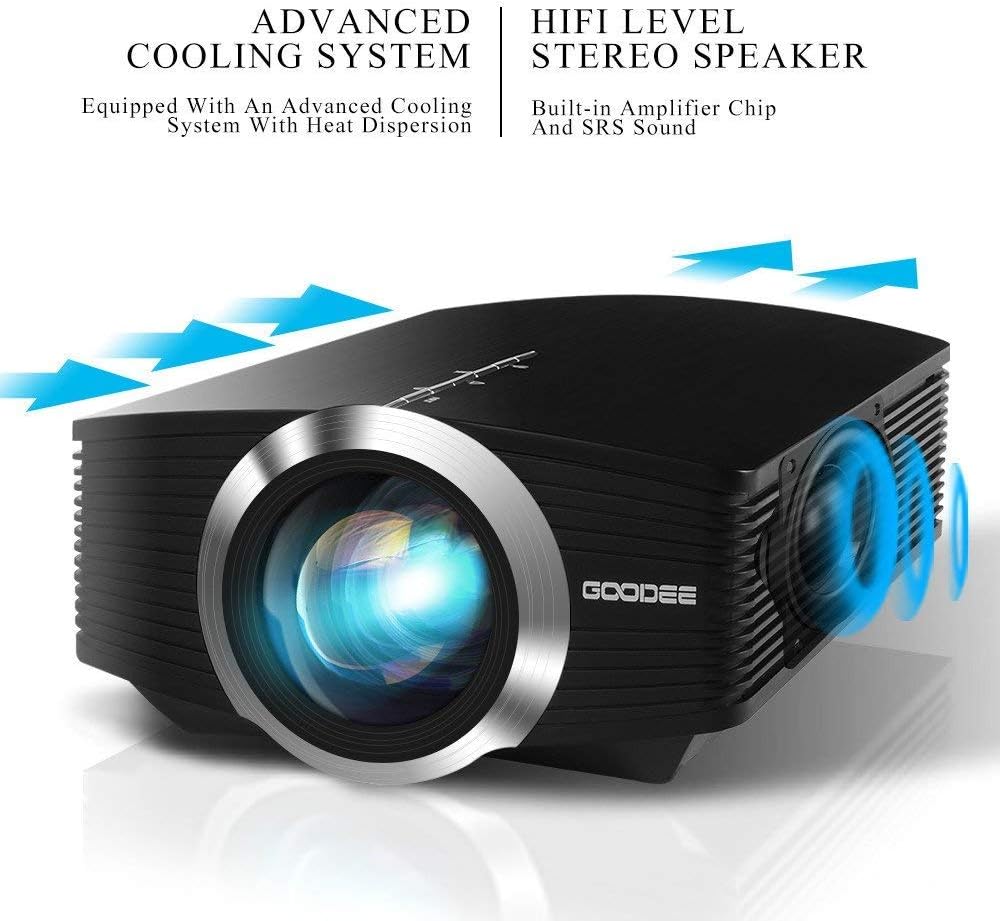
The projector features a direct light path optical technology for enhanced brightness and an advanced cooling system for quiet operation.

Figure 4.2: Advanced Cooling System and HIFI Stereo Speaker.
4.2 Alat Kawalan Jauh
The remote control allows you to operate the projector from a distance. Insert two AAA batteries (not included) into the remote control before use.

Figure 4.3: Remote Control.
5. Persediaan
5.1 Jarak Penempatan dan Unjuran
The image size is adjusted by changing the projection distance. For optimal viewing, a projection distance between 1.5 to 4 meters is recommended, yielding screen sizes from 50 to 130 inches. The best projection size is typically 80-100 inches at a distance of 6.6-8 feet.

Figure 5.1: Projection Distance and Screen Size Chart.
Gambar 5.2: Cthample Projector Placement.
5.2 Sambungan Kuasa
Sambungkan penyesuai kuasa ke port input kuasa projektor, kemudian pasangkan penyesuai ke soket kuasa.
5.3 Menyambungkan Peranti Input
The projector supports various input sources including HDMI, VGA, USB, AV, and SD card. It can connect to PCs, laptops, DVD players, PS3/4, Xbox ONE, and smartphones/tablets (via MHL cable and adapter, not included).

Figure 5.3: Multimedia Connection Diagram.
To connect a smartphone or tablet, ensure your device supports MHL functionality. You will need an MHL cable and a suitable adapter (not included).

Figure 5.4: Connecting Smartphones/Tablets.
5.4 Focus Adjustment and Keystone Correction
Adjust the focus ring on the projector lens until the image is clear. Use the keystone correction feature to adjust the image if it appears trapezoidal. The projector supports a ±15° keystone correction.
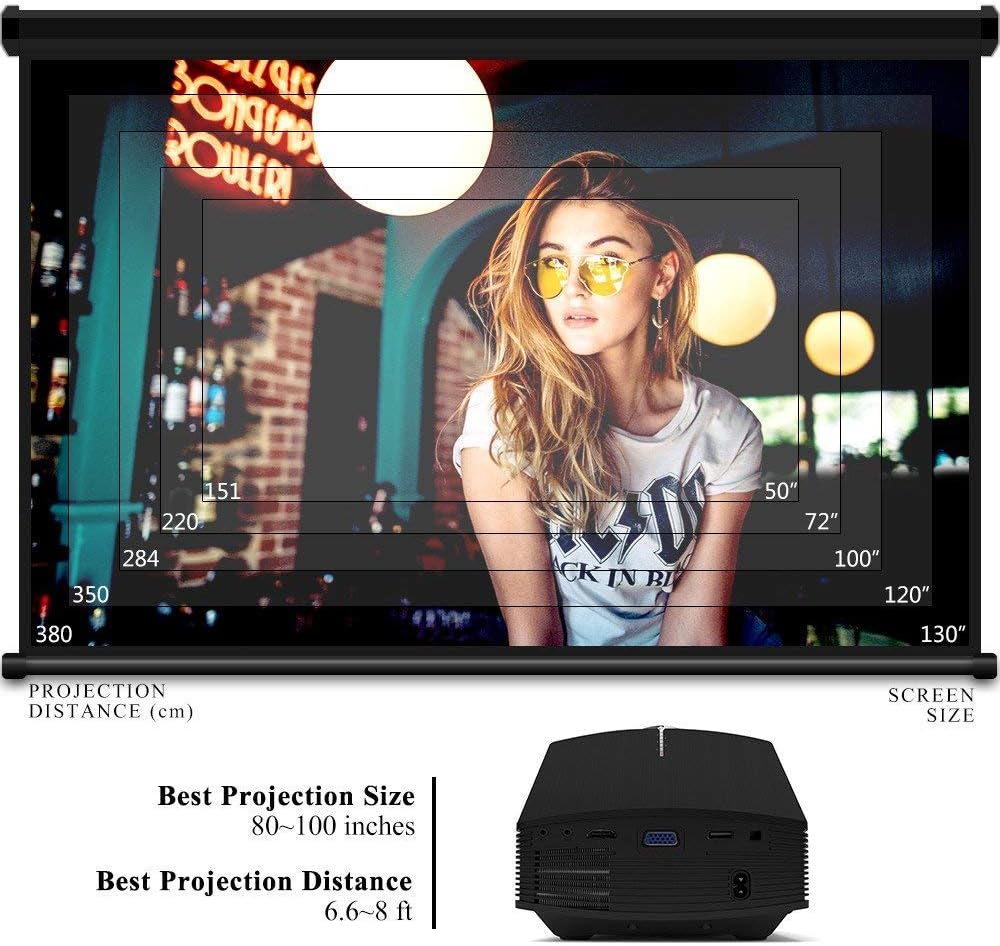
Figure 5.5: Focus and Keystone Adjustment.
6. Arahan Operasi
6.1 Hidupkan/Mati Kuasa
Press the power button on the projector or the remote control to turn the projector on or off.
6.2 Pemilihan Sumber
Press the 'Source' button on the projector or remote control to cycle through available input sources (HDMI, VGA, USB, AV, SD). Select the desired input source corresponding to your connected device.
6.3 Menu Navigasi
Use the arrow buttons on the projector or remote control to navigate through the on-screen menu. Press 'OK' or 'Enter' to confirm selections. Use the 'Menu' button to access settings and 'Exit' or 'Return' to go back.
6.4 Keluaran Audio
The projector has a built-in 2W speaker. For external audio, connect speakers or headphones to the 3.5mm audio output jack on the projector.
7. Penyelenggaraan
7.1 Membersihkan Lensa
Use a soft, lint-free cloth or lens cleaning paper to gently wipe the projector lens. Do not use abrasive cleaners or solvents.
7.2 Membersihkan Lubang Udara
Regularly clean the air vents to ensure proper airflow and prevent overheating. Use a soft brush or compressed air to remove dust accumulation.
7.3 Penyimpanan
When not in use, store the projector in a cool, dry place, away from direct sunlight and extreme temperatures. Use the original packaging or a protective case to prevent dust and damage.
8. Penyelesaian masalah
| Masalah | Kemungkinan Punca | Penyelesaian |
|---|---|---|
| Tiada imej dipaparkan | Incorrect input source selected; Cable not connected properly; Device not powered on. | Pilih sumber input yang betul; Periksa semua sambungan kabel; Pastikan peranti sumber dihidupkan. |
| Imej kabur | Fokus tidak dilaraskan; Projektor terlalu dekat/jauh dari skrin. | Laraskan gelang fokus; Laraskan jarak unjuran. |
| Imej adalah trapezoid | Projektor tidak berserenjang dengan skrin. | Laraskan pembetulan keystone. |
| Tiada bunyi | Volume too low; Muted; External audio device not connected/configured. | Increase volume; Unmute; Check external audio connections and settings. |
| Alat kawalan jauh tidak berfungsi | Batteries low/dead; Obstruction between remote and projector; Remote sensor blocked. | Replace batteries; Remove obstructions; Ensure remote sensor is clear. |
9. Spesifikasi
| Ciri | Perincian |
|---|---|
| Jenama | GooDee |
| Nombor Model | GD-DE-9 |
| Jenis Paparan | LCD |
| Resolusi Asli | 800 x 480 piksel |
| Resolusi Disokong | Sehingga 1080p |
| Kecerahan | 3000 Lumen (LED) |
| Lamp kehidupan | 30,000 Jam |
| Teknologi Ketersambungan | HDMI, USB, VGA, AV, SD Card |
| Antara Muka Perkakasan | HDMI, USB, VGA |
| Penceramah Bersepadu | 2W Stereo Speaker |
| Jarak Unjuran | 1.5 - 4 meters (6.6 - 8 feet recommended) |
| Saiz Skrin | 50 - 130 inches (80 - 100 inches recommended) |
| Pembetulan Batu Kunci | Manual ±15° |
| Faktor Bentuk | Mudah alih |
| Jenis Pemasangan | Pemasangan Atas Meja |
| warna | Hitam |
| Dimensi Pakej | 33 x 21.6 x 11.8 cm |
| Berat Barang | 1.48 kg |
| Penggunaan yang Disyorkan | Permainan, Teater Rumah |
| Peranti Serasi | Smartphone, PC, Laptop, DVD Player, PS3/4, Xbox ONE, Fire TV Stick |
10. Waranti dan Sokongan
GooDee offers a 3-year warranty for this projector. If you encounter any issues or are not completely satisfied with your purchase, please contact GooDee customer support. A refund or replacement is available within the first 2 months of purchase. Customer satisfaction is our top priority.
For support, please refer to the contact information provided on the GooDee official webtapak atau platform pembelian anda.