1. Pengenalan
This manual provides detailed instructions for the installation, configuration, operation, and maintenance of the TP-Link CPE610 5GHz 300Mbps 23dBi Outdoor CPE/Access Point. The CPE610 is designed for outdoor wireless networking applications, offering excellent beam directivity, improved latency, and noise immunity with its high-gain directional 2x2 MIMO cassegrain antenna and dedicated metal reflector.
Proper setup, grounding, and cable shielding are essential for protection against lightning and electrostatic discharge. Consult an IT professional for assistance if needed.
2. Kandungan Pakej
Sahkan bahawa semua item yang disenaraikan di bawah disertakan dalam pakej anda. Jika mana-mana item hilang atau rosak, hubungi penjual anda.
- TP-Link CPE610 Outdoor CPE Unit
- 24V 0.5A Passive PoE Adapter
- Kord Kuasa AC
- Tali Pemasangan Tiang
- Panduan Pemasangan
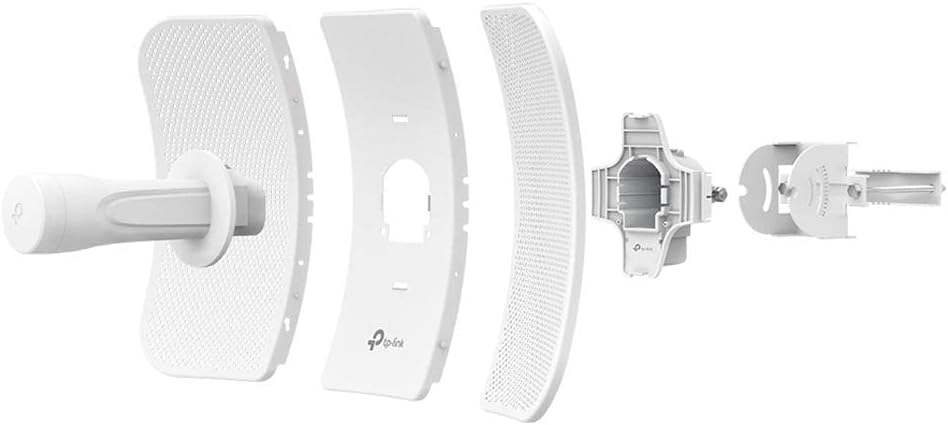
This image displays the individual components of the TP-Link CPE610, including the main antenna unit, the reflector panels, and the mounting bracket with its associated hardware.
3. Persediaan dan Pemasangan
Follow these steps for proper installation and initial setup of your CPE610.
3.1 Pemasangan Perkakasan
- Assemble the CPE Unit: Attach the reflector panels to the main CPE unit. Ensure all parts are securely fastened.
- Pemasangan: Use the provided pole mounting straps to secure the CPE610 to a pole or mast. Ensure the device is positioned for clear line-of-sight to the target area.
- Sambungkan Penyesuai PoE: Connect an Ethernet cable from the CPE610's Ethernet port to the "PoE" port on the 24V 0.5A Passive PoE Adapter.
- Sambungkan ke Rangkaian: Connect another Ethernet cable from the "LAN" port on the PoE Adapter to your computer or network switch/router.
- Hidupkan kuasa: Connect the AC power cord to the PoE Adapter and then to a power outlet. The device will power on.

This image shows the TP-Link CPE610 with its adjustable mounting bracket, illustrating how it attaches to a pole for outdoor deployment.
3.2 Initial Configuration (PharOS Web Antara muka)
The CPE610 is managed via the PharOS web antara muka.
- Prepare your Computer: Before connecting, set your computer's IP address manually to
192.168.0.10dengan topeng subnet dari255.255.255.0. - Access PharOS: Buka a web pelayar dan navigasi ke
http://192.168.0.254. - log masuk: Nama pengguna dan kata laluan lalai ialah
admin. You will be prompted to change the password upon first login. - Persediaan Pantas: Use the Quick Setup wizard to configure the device.
- Select the desired operating mode (e.g., Access Point, Client, Repeater, Bridge).
- Configure wireless settings such as SSID, security type (WPA2-PSK recommended), and password.
- Adjust network settings, including IP address, subnet mask, and gateway, to match your network infrastructure.
- Simpan Tetapan: Apply and save all configurations.
- Restore Computer IP: Change your computer's IP address back to DHCP (automatic) or its original static IP.
Nota: For client mode setup, especially with mesh networks like Google Wifi, it may be necessary to disable WDS (Wireless Distribution System) in the CPE610's settings for proper connectivity.
4. Operating the CPE610
Once configured, the CPE610 operates autonomously. You can monitor its status and adjust settings via the PharOS web antara muka.
4.1 Status Pemantauan
- Halaman Status: The PharOS Status page provides real-time information on wireless connection, network traffic, and system logs.
- Kekuatan Isyarat: Regularly check the signal strength indicators to ensure optimal performance, especially after initial installation or environmental changes.
4.2 Tetapan Lanjutan
The PharOS interface offers advanced options for fine-tuning performance:
- Kuasa penghantaran: Adjust the transmission power (0 to 27dBm/500mW) to comply with local regulations and optimize range.
- Pharos MAXtream TDMA: Enable this technology for improved throughput, capacity, and reduced latency in Point-to-MultiPoint (PtMP) applications.
- Pemilihan Saluran: Select appropriate 5GHz channels to avoid interference.
- Peningkatan Firmware: Periodically check for and install firmware updates from the TP-Link website to enhance features and security.
5. Penyelenggaraan
Regular maintenance ensures the longevity and optimal performance of your CPE610.
- Pemeriksaan Fizikal: Periodically inspect the device and cabling for any signs of wear, damage, or corrosion, especially in harsh outdoor environments.
- Pembersihan: Gently clean the exterior of the unit with a soft, dry cloth. Do not use liquid cleaners or aerosols.
- Kemas kini Firmware: Keep the device firmware updated to the latest version available from the official TP-Link website. This can improve stability, performance, and security.
- Pembumian: Ensure proper grounding and cable shielding are maintained to protect against lightning and electrostatic discharge.
- Tetapan Semula Jauh: The Passive PoE adapter allows for remote resetting of the device. Refer to the installation guide for specific instructions.
6. Penyelesaian masalah
This section addresses common issues you might encounter with the CPE610.
6.1 No Power/Device Not Responding
- Semak Sambungan Kuasa: Ensure the AC power cord is securely connected to the PoE adapter and a working power outlet.
- Verify Ethernet Cable: Confirm the Ethernet cable from the CPE to the PoE adapter's "PoE" port is properly connected and undamaged.
- PoE Adapter Functionality: Test the PoE adapter with another compatible device if possible, or try a different PoE adapter.
6.2 Cannot Access PharOS Web Antara muka
- Konfigurasi Alamat IP: Ensure your computer's IP address is set manually to
192.168.0.10(or within the same subnet as the CPE's default192.168.0.254) before attempting to access the interface. - Sambungan Kabel: Verify the Ethernet cable from the PoE adapter's "LAN" port to your computer is secure.
- Browser Issues: Cuba yang berbeza web pelayar web atau kosongkan cache pelayar web anda.
- Tembok Api/Antivirus: Temporarily disable any firewall or antivirus software that might be blocking access.
6.3 Poor Wireless Performance/Connection Drops
- Garis penglihatan: Ensure there is a clear line of sight between the CPE610 and the target device/access point. Obstructions can severely degrade performance.
- Penjajaran Antena: Precisely align the directional antenna for optimal signal strength. Use the signal strength indicators in the PharOS interface.
- Gangguan: Check for potential sources of interference (e.g., other 5GHz devices, physical obstacles). Try changing the wireless channel.
- Perisian tegar: Pastikan perisian tegar terkini dipasang.
- WDS Setting: If operating in client mode, ensure WDS is disabled if experiencing connectivity issues, especially with mesh networks.
7. Spesifikasi
| Ciri | Perincian |
|---|---|
| Jenama | TP-Link |
| Model | CPE610 |
| Antena | High-gain directional 2x2 MIMO antenna with 23dBi gain |
| Kekerapan | 5GHz |
| Standard Tanpa Wayar | 802.11n/a |
| Maximum Wireless Rate | 300Mbps |
| Kuasa Penghantaran | Adjustable from 0 to 27dBm/500mW |
| Sokongan PoE | Passive PoE (24V 0.5A adapter included) |
| PoE Range | Sehingga 60 meter (200 kaki) |
| Pengurusan | Centralized management system - Pharos Control |
| warna | putih |
| Berat Barang | 0.46 Kilogram |
| UPC | 845973081027 |
8. Maklumat Waranti
The TP-Link CPE610 comes with a Waranti 2 tahun from the date of purchase. This warranty covers defects in materials and workmanship under normal use. It does not cover damage caused by accidents, misuse, unauthorized modifications, or external factors such as lightning strikes or power surges not mitigated by proper grounding.
For warranty claims, please retain your proof of purchase and contact TP-Link customer support.
9. Sokongan Teknikal
For further assistance, technical support, or to download the latest firmware and documentation, please visit the official TP-Link webtapak.
- Rasmi TP-Link Webtapak: www.tp-link.com
- Halaman Sokongan: Locate the support section for your specific model (CPE610) for FAQs, troubleshooting guides, and contact information.
It is recommended to consult the online resources before contacting technical support, as many common issues can be resolved through available documentation.