1. Pengenalan
This manual provides detailed instructions for the safe and effective use of the SMART SENSOR AS8805 Digital Sulfur Dioxide Gas Monitor. This device is designed for high-sensitivity detection of sulfur dioxide (SO2) gas, featuring sound and light alarms, and a rechargeable Li-battery for portable operation. Please read this manual thoroughly before operating the device and retain it for future reference.
2. Maklumat Keselamatan
Sentiasa patuhi langkah berjaga-jaga keselamatan berikut untuk mengelakkan kecederaan atau kerosakan pada peranti:
- Jangan cuba mengubah suai atau membuka peranti.
- Pastikan peranti digunakan dalam julat suhu dan kelembapan operasi yang dinyatakan.
- Jauhkan peranti daripada medan elektromagnet yang kuat.
- Periksa peranti dengan kerap untuk sebarang tanda kerosakan atau pincang fungsi.
- Perform zero calibration in a clean air environment, free from SO2 or other interfering gases.
- Recharge the battery promptly when the low power indicator is active to maintain optimal performance and safety.
- This device is designed for detecting SO2 gas. Do not use it for other gas types without proper calibration and verification.
3. Produk Lebihview
The SMART SENSOR AS8805 is a compact and portable sulfur dioxide gas detector. Familiarize yourself with its components:

Rajah 3.1: Depan View of the AS8805 Detector. This image shows the front of the device, highlighting the digital LCD display, power on/off key, up key (addition), down key (subtraction), and enter key. The alarm light is visible at the top left, and the sulfur dioxide gas sensor is at the top right.
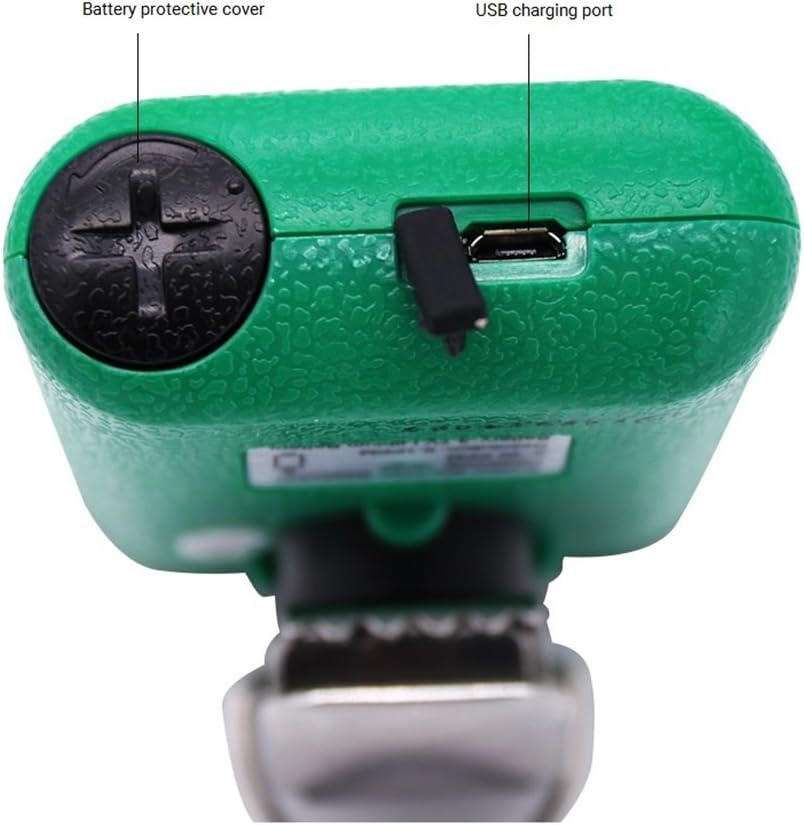
Rajah 3.2: Atas View of the AS8805 Detector. This image displays the top section of the device, indicating the battery protective cover and the USB charging port.

Rajah 3.3: Sisi View of the AS8805 Detector. This image illustrates the side of the device, pointing out the gas sensor inside and the alarm light.
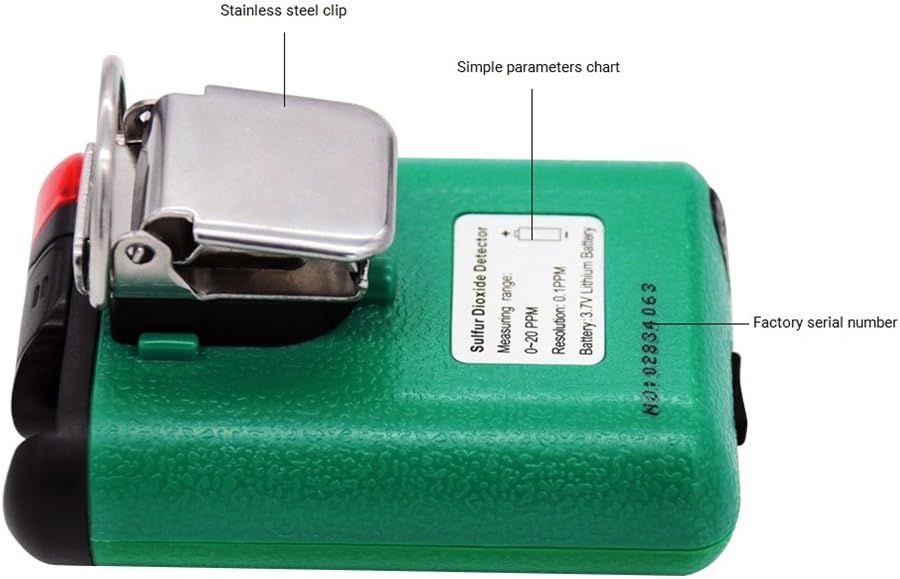
Rajah 3.4: Belakang View of the AS8805 Detector. This image shows the back of the device, featuring the stainless steel clip, a simple parameters chart, and the factory serial number.
3.1 Komponen Utama
- Sulfur Dioxide Gas Sensor: Detects SO2 concentration in the air.
- Lampu Penggera: Provides visual indication during an alarm event.
- Paparan LCD Digital: Shows real-time gas concentration, battery status, and other operational information.
- Kunci Hidup/Mati Kuasa: Digunakan untuk menghidupkan atau mematikan peranti.
- Up Key (Addition): Digunakan untuk menavigasi menu atau increasinnilai g.
- Down Key (Subtraction): Digunakan untuk menavigasi menu atau decreasinnilai g.
- Masukkan kunci: Used to confirm selections or enter menus.
- Battery Protective Cover: Secures the internal battery.
- Port Pengecasan USB: For recharging the device's internal Li-battery.
- Stainless Steel Clip: Allows for convenient carrying and attachment.
4. Persediaan
4.1 Membuka Kotak dan Kandungan Pakej
Carefully unpack the device and verify that all standard accessories are present:

Figure 4.1: Standard Package Contents. This image shows the items included in the standard package: the AS8805 gas monitor, power charger and cable, user manual, explosive-proof certificate, certificate of calibration, and warranty card.
- 1x Sulfur Dioxide Gas Monitor (AS8805)
- 1x Manual Pengguna
- 1x Explosive-proof Certificate
- 1x Kad Waranti
- 1x Power Charger
- 1x Kabel Kuasa
4.2 Mengecas Bateri
The device is powered by a 3.7V Li-battery. Before first use, or when the low power indicator appears, charge the device:
- Connect the provided power cable to the USB charging port on the top of the device (refer to Figure 3.2).
- Connect the other end of the cable to the power charger, and then plug the charger into a suitable power outlet.
- Ikon bateri pada paparan LCD akan menunjukkan status pengecasan.
- A full charge typically allows for approximately 60 hours of continuous operation without alarms.
4.3 Hidupkan Kuasa Awal
Untuk menghidupkan peranti:
- Tekan dan tahan butang Kekunci Hidupkan/Mati sehingga paparan menyala.
- The device will perform a self-test and warm-up sequence. During this time, the display may show various readings before settling.
5. Operasi
5.1 Hidupkan/Mati Kuasa
- Hidupkan kuasa: Tekan dan tahan butang Kekunci Hidupkan/Mati for a few seconds until the display turns on.
- Matikan: Tekan dan tahan butang Kekunci Hidupkan/Mati selama beberapa saat sehingga paparan dimatikan.
5.2 Paparan Maklumat
The digital LCD display shows the following information:
- Real-time SO2 Concentration: Displayed in parts per million (ppm).
- Penunjuk Status Bateri: Menunjukkan tahap cas bateri semasa.
- Penunjuk Penggera: Visual cues for high or low alarm conditions.
5.3 Alarm Functions and Settings
The device features adjustable high and low alarm values with three alarm methods: sound, light, and vibration. The alarm sound can reach up to 80dB.
- Penggera Tinggi Lalai: 10.0 ppm
- Penggera Rendah Lalai: 5.0 ppm
To adjust alarm values:
- Dengan peranti dihidupkan, tekan butang Kekunci Naik or Kekunci Turun to enter the password interface.
- Enter the password (e.g., "123" as shown in the calibration video, though specific password should be confirmed in the full user manual). Use the Up dan Down Keys to change digits and the Masukkan Kunci to move to the next digit or confirm.
- After entering the correct password, navigate through the menu using the Up dan Down Keys to find the alarm setting options.
- Adjust the high and low alarm thresholds as required using the Up dan Down Keys, and confirm each setting with the Masukkan Kunci.
5.4 Penentukuran Sifar
Zero calibration ensures accurate readings by setting the baseline in a clean air environment. This procedure should be performed regularly or if you suspect inaccurate readings.
- Ensure the device is in a clean environment, free from any SO2 gas.
- Hidupkan peranti.
- Access the calibration menu by pressing the Kekunci Naik or Kekunci Turun to enter the password interface.
- Enter the password (e.g., "123").
- After successful password entry, navigate to the calibration option (often labeled "CAL" or "ZERO CAL").
- Confirm the zero calibration selection with the Masukkan Kunci. The device will then perform the zero calibration, displaying a changing number as it stabilizes.
- Wait for the device to stabilize and confirm the calibration. The display may show "F" or return to 0.0 ppm, indicating successful calibration.
5.5 Auto/Hand Power Off Function
The device includes an auto power-off feature to conserve battery life. This can be set manually.
- Auto Matikan: If enabled, the device will automatically turn off after 10 minutes of no operation.
- Refer to the full user manual for specific instructions on how to enable or disable the auto power-off function.
6. Penyelenggaraan
6.1 Penjagaan Bateri
- Recharge the 3.7V Li-battery when the low power indicator is displayed.
- Elakkan daripada menghabiskan bateri sepenuhnya dengan kerap untuk memanjangkan jangka hayatnya.
- Gunakan hanya pengecas dan kabel yang disediakan.
6.2 Sensor Life
The electrochemical sensor has an estimated life of 2 years. After this period, the sensor's accuracy may degrade, and replacement or professional calibration may be required.
6.3 Pembersihan
- Lap bahagian luar peranti dengan lembut, damp kain.
- Jangan gunakan pembersih atau pelarut yang melelas.
- Pastikan tiada cecair memasuki bukaan sensor atau port pengecasan.
7. Penyelesaian masalah
| Masalah | Kemungkinan Punca | Penyelesaian |
|---|---|---|
| Peranti tidak dihidupkan. | Bateri lemah atau habis. | Cas peranti menggunakan pengecas dan kabel yang disediakan. |
| Bacaan yang tidak tepat. | Sensor requires zero calibration; sensor lifespan exceeded. | Perform zero calibration in clean air. If issues persist, consider sensor replacement or professional service. |
| Penggera berbunyi secara berterusan. | High SO2 concentration detected; alarm settings too low. | Evacuate the area and ventilate. Check and adjust alarm thresholds if necessary. |
| Paparan kosong atau beku. | Software error or battery issue. | Try restarting the device. If problem persists, contact support. |
8. Spesifikasi
| Ciri | Perincian |
|---|---|
| Nombor Model Produk | AS8805 |
| Gas Measurement Type | Sulfur Dioksida (SO2) |
| Julat Pengukuran | 0 ~ 20 ppm |
| Testing Resolution | 0.1 ppm |
| Prinsip Pengukuran | Elektrokimia |
| Jangka Hayat Sensor | 2 tahun |
| Penggera Rendah/Tinggi | Supported, adjustable values |
| Kaedah Penggera | Bunyi, Cahaya, Getaran |
| Tahap Bunyi Penggera | Sehingga 80 dB |
| Suhu Operasi | -10 ~ 50 ℃ (14 ~ 122 ℉) |
| Kelembapan Operasi | 15 ~ 95% RH (Standard) |
| Jenis Bateri | 3.7V Li-battery (754060p) |
| Masa Kerja Bateri | Approx. 60 hours (no alarm) |
| Auto Matikan | Yes (after 10 minutes of no operation, if enabled) |
| Berat Bersih Produk | 200g (7.1 auns) |
| Saiz Produk | 120 * 65 * 38 mm |
| UPC | 785197913523 |
9. Waranti dan Sokongan
The SMART SENSOR AS8805 Digital Sulfur Dioxide Gas Monitor comes with a warranty as detailed in the included Warranty Card. Please refer to the card for specific terms and conditions.
For technical support, service, or inquiries regarding your device, please contact your retailer or the manufacturer directly. Keep your purchase receipt and warranty card handy when seeking support.