
pengenalan
This manual provides detailed instructions for the setup, operation, and maintenance of your Digoo DG-C3 Wireless Weather Station. This device integrates a hygrometer, thermometer, weather forecast station, and alarm clock functions, offering comprehensive environmental monitoring and timekeeping capabilities. Please read this manual thoroughly before using the product to ensure correct operation and to maximize its features.
Kandungan Pakej
- Digoo DG-C3 Wireless Weather Station Unit
- Kabel Kuasa USB
- Manual Pengguna (dokumen ini)
Nota: Bateri (3x AAA) tidak disertakan dan mesti dibeli secara berasingan.
Produk Selesaiview
Familiarize yourself with the various components of your Digoo DG-C3 weather station.
Paparan Depan
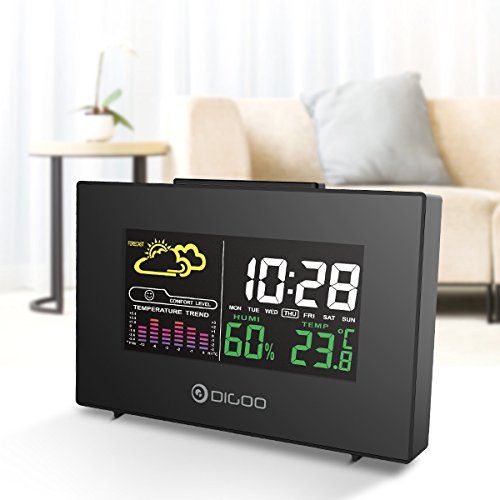
The front display features a color backlit screen showing the current time, day of the week, indoor humidity, indoor temperature, and a weather forecast icon. It also includes a comfort level indicator and a temperature trend graph.
- Masa & Tarikh: Digital display of current time and day.
- Ramalan cuaca: Ikon yang menunjukkan keadaan cuaca yang diramalkan (cth., cerah, mendung, hujan).
- Tahap Keselesaan: Indicates indoor comfort based on temperature and humidity.
- Trend Suhu: Bar graph showing recent temperature changes.
- Kelembapan: Peratustage display of indoor humidity.
- Suhu: Digital display of indoor temperature (Celsius or Fahrenheit).
Kembali Panel
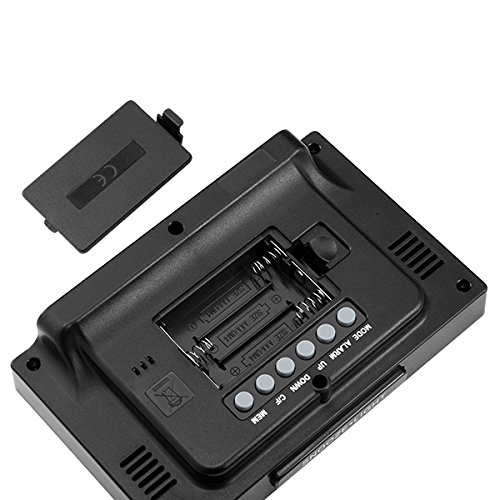
The back of the unit houses the battery compartment and various control buttons for setting the device.
- Petak Bateri: Holds 3x AAA batteries for power backup.
- Butang MOD: Used to switch between display modes and enter setting mode.
- Butang PENGGERA: Digunakan untuk menetapkan dan mengaktifkan/menyahaktifkan penggera.
- Butang KE ATAS: Used to increase values during settings or view maximum records.
- Butang TURUN: Used to decrease values during settings or view minimum records.
- Butang °C/°F: Bertukar antara unit suhu Celsius dan Fahrenheit.
- Butang MEM: Biasalah view memory records for temperature and humidity.
Panel Atas
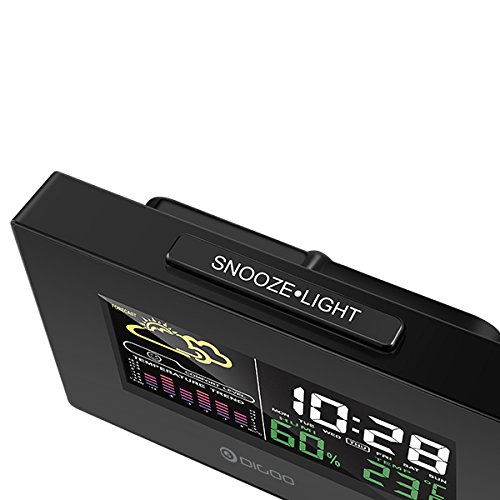
The top of the unit features a single button for snooze and backlight functions.
- SNOOZE·LIGHT Button: Press to activate the backlight or snooze the alarm.
Persediaan
1. Menghidupkan
- Pemasangan Bateri: Open the battery compartment cover on the back of the unit. Insert 3x AAA batteries, ensuring correct polarity (+/-). Close the cover. Batteries provide backup power and allow for portability.
- USB Power Connection: For continuous power and backlight, connect the provided USB cable to the USB port on the unit and to a compatible USB power adapter (not included) or a computer USB port.
- The display will light up and show default settings.
2. Initial Settings (Time, Date, Unit)
- Tetapan Masa:
- Tekan dan tahan butang MODE button for approximately 3 seconds to enter time setting mode. The hour digit will flash.
- Gunakan UP or TURUN butang untuk melaraskan jam.
- Tekan MODE again to confirm the hour and move to minute setting. The minute digit will flash.
- Gunakan UP or TURUN butang untuk melaraskan minit.
- Tekan MODE again to confirm and move to 12/24 hour format selection.
- Gunakan UP or TURUN buttons to select 12-hour or 24-hour format.
- Tekan MODE untuk mengesahkan dan keluar dari tetapan masa.
- Tetapan Tarikh:
- Selepas menetapkan masa, tekan MODE again to enter date setting mode. The year will flash.
- Gunakan UP or TURUN butang untuk melaraskan tahun.
- Tekan MODE to confirm and move to month setting.
- Gunakan UP or TURUN butang untuk melaraskan bulan.
- Tekan MODE to confirm and move to day setting.
- Gunakan UP or TURUN butang untuk melaraskan hari.
- Tekan MODE to confirm and exit date setting.
- Pemilihan Unit Suhu:
- Tekan ke ° C / ° F button on the back of the unit to switch between Celsius (°C) and Fahrenheit (°F) temperature display.
Arahan Operasi
1. Fungsi Jam Penggera
- Menetapkan Penggera:
- Tekan ke PENGGERA butang sekali untuk memaparkan masa penggera semasa.
- Tekan dan tahan butang PENGGERA button for approximately 3 seconds. The hour digit will flash.
- Gunakan UP or TURUN butang untuk melaraskan jam penggera.
- Tekan PENGGERA again to confirm the hour and move to minute setting. The minute digit will flash.
- Gunakan UP or TURUN butang untuk melaraskan minit penggera.
- Tekan PENGGERA untuk mengesahkan dan keluar dari tetapan penggera.
- Mengaktifkan/Menyahaktifkan Penggera:
- Semasa dalam mod paparan masa biasa, tekan butang PENGGERA button repeatedly to toggle the alarm ON or OFF. An alarm icon will appear on the display when the alarm is active.
- Fungsi Tunda:
- Apabila penggera berbunyi, tekan TUNDA·CAHAYA button on the top of the unit to activate the snooze function. The alarm will temporarily stop and sound again after a few minutes (typically 5-10 minutes).
- To stop the alarm completely, press any other button on the back panel.
2. Ramalan Cuaca
The weather station provides a weather forecast based on internal atmospheric pressure changes. The forecast icons (e.g., sunny, cloudy, rainy) are predictions for the next 12-24 hours and may not always match local weather services, which use more comprehensive data.
- The forecast icon is displayed on the upper left of the screen.
- The device requires a period of stable operation (typically 24 hours) to calibrate and provide accurate forecasts.
3. Paparan Suhu dan Kelembapan
- The current indoor temperature and humidity are continuously displayed on the screen.
- Viewing Min/Max Records:
- Tekan ke MEM button once to display the maximum recorded temperature and humidity.
- Tekan MEM again to display the minimum recorded temperature and humidity.
- Tekan MEM a third time to return to current readings.
- To clear the min/max records, press and hold the MEM butang selama 3 saat viewmengambil rekod.
4. Kawalan Lampu Latar
- When powered by USB, the backlight will remain on.
- When powered by batteries only, press the TUNDA·CAHAYA button to temporarily activate the backlight for a few seconds.
Penyelenggaraan
- Pembersihan: Wipe the unit with a soft, dry cloth. Do not use abrasive cleaners or solvents. Avoid getting moisture into the unit.
- Penggantian Bateri: When the display becomes dim or functions irregularly, replace the 3x AAA batteries in the back compartment. Ensure correct polarity.
- Storan: If not using the device for an extended period, remove the batteries to prevent leakage. Store in a cool, dry place.
Menyelesaikan masalah
| Masalah | Kemungkinan Punca | Penyelesaian |
|---|---|---|
| Paparan kosong atau malap. | Low batteries or no power connection. | Replace batteries or connect the USB power cable. |
| Masa/tarikh yang salah. | Time/date not set correctly after power loss or initial setup. | Follow the "Initial Settings" section to reset time and date. |
| Ramalan cuaca nampaknya tidak tepat. | Device needs calibration time; local conditions may differ from pressure-based forecast. | Allow 24 hours for calibration. Understand that the forecast is based on internal pressure changes. |
| Penggera tidak berbunyi. | Alarm is not activated or volume is too low (if adjustable). | Ensure the alarm icon is displayed. Check alarm settings. |
Spesifikasi
| model: | DG-C3 |
| Ketersambungan: | USB (untuk kuasa) |
| Sumber Kuasa: | 3x AAA Batteries (not included) or USB Power |
| Ciri Khas: | Hygrometer, Thermometer, Weather Forecast, Alarm Clock, Color Backlight, Portable |
| paparan: | Color Backlit LCD |
| Unit Suhu: | °C / °F boleh dipilih |
Waranti dan Sokongan
Untuk maklumat waranti atau sokongan teknikal, sila rujuk dokumentasi yang diberikan semasa pembelian atau hubungi peruncit anda. Simpan resit pembelian anda sebagai bukti pembelian.