SportRack Crest 2
SportRack Crest 2 Non-Locking Bike Rack Instruction Manual
Model: SR2901B
1. Pengenalan
This manual provides detailed instructions for the assembly, installation, operation, and maintenance of your SportRack Crest 2 Non-Locking hitch-mounted bike rack. This platform-style carrier is designed to transport up to two bicycles, with a maximum combined weight of 90 pounds, using a 1.25-inch or 2-inch trailer receiver hitch. It features adjustable rubberized hooks and wheel trays to accommodate various bike frames and sizes, ensuring secure transport and protection of your bike's finish. The rack also includes a tilting mechanism for convenient access to your vehicle's rear cargo area.
2. Maklumat Keselamatan
Read and understand all instructions before installing and using the bike rack. Failure to follow these instructions may result in property damage, personal injury, or death.
- Ensure the bike rack is securely attached to the vehicle's hitch receiver before each use.
- Do not exceed the maximum weight capacity of 90 pounds (45 pounds per bike).
- Verify that all bikes are properly secured to the rack using the rubberized hooks and wheel straps.
- Regularly check all bolts, nuts, and straps for tightness, especially during long trips.
- Berhati-hati dengan peningkatan panjang dan lebar kenderaan anda apabila rak basikal dipasang, terutamanya semasa mengundur atau bergerak di ruang yang sempit.
- Avoid driving over rough terrain or at excessive speeds, as this can stress the rack and bikes.
- Remove the bike rack when not in use to prevent damage and improve fuel efficiency.
- Produk ini mengandungi bahan kimia yang diketahui oleh Negeri California untuk menyebabkan kanser dan kecacatan kelahiran atau bahaya pembiakan lain (amaran Proposisi 65).
3. Kandungan Pakej
Sahkan bahawa semua komponen hadir sebelum memulakan pemasangan:
- Hitch-mounted bike carrier frame
- Vertical mast with adjustable arms
- Wheel trays (2 sets)
- Rubberized frame hooks (2)
- Wheel straps (4)
- Hitch pin and clip
- Perkakasan pemasangan (bolt, pencuci, nat)
- Manual arahan
4. Persediaan dan Pemasangan
4.1 Membongkar dan Perhimpunan Awal
Carefully remove all components from the packaging. Refer to the package contents list to ensure all parts are present. Begin by assembling the main frame components according to the included diagrams.

Figure 4.1: Fully assembled SportRack Crest 2 Non-Locking bike rack.
4.2 Memasang pada Halangan Kenderaan
- Slide the hitch arm of the bike rack into your vehicle's 1.25-inch or 2-inch receiver hitch.
- Selaraskan lubang pin halangan pada rak dengan lubang pada penerima kenderaan anda.
- Insert the hitch pin through both holes and secure it with the provided clip. Ensure the pin is fully engaged and the clip is locked.
- Tighten any anti-wobble mechanisms if present (not included with this non-locking model, but a locking kit is available separately).

Figure 4.2: Bike rack installed on a vehicle's hitch receiver, ready for bikes.
4.3 Adjusting Wheel Trays and Frame Hooks
The wheel trays and rubberized frame hooks are adjustable to fit various bike sizes and styles.
- Position the wheel trays to match the wheelbase of your bicycle.
- Adjust the vertical mast and horizontal arms to align with your bike's frame. The rubberized hooks should securely hold the top tube or frame structure without damaging the finish.

Figure 4.3: Adjustable rubberized hooks and wheel trays for securing bikes.
5. Arahan Operasi
5.1 Memuatkan Basikal
- Place the first bicycle onto the rack, ensuring its wheels rest securely in the wheel trays.
- Lower the rubberized frame hook over the bike's top tube or frame, pressing down firmly to secure the bike. The hook should be snug against the frame.
- Use the provided wheel straps to secure both front and rear wheels to the wheel trays. This prevents wheel rotation and lateral movement during transit.
- Repeat the process for the second bicycle, ensuring proper spacing and no contact between bikes.
- Before driving, gently shake the bikes and rack to confirm they are stable and secure.
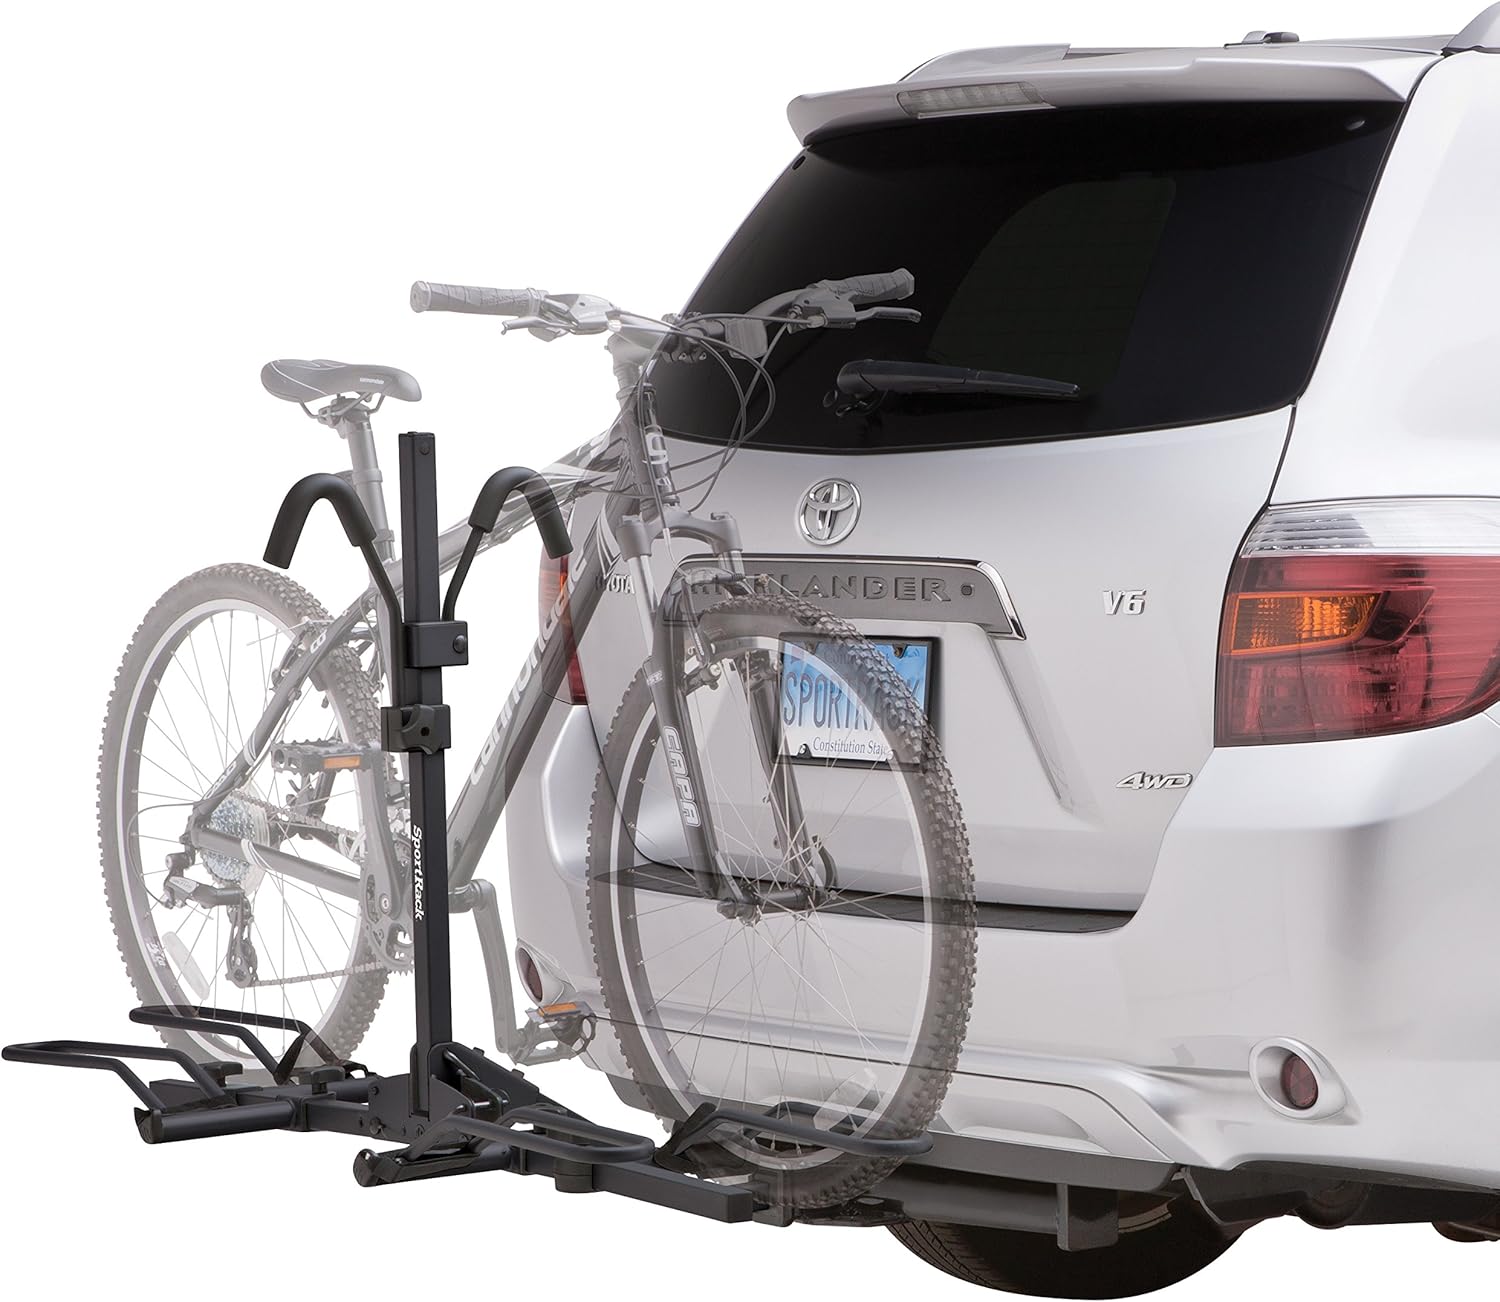
Figure 5.1: A bicycle loaded and secured on the rack.

Figure 5.2: Securing the bicycle frame with the rubberized hook.
5.2 Using the Tilting Feature
The SportRack Crest 2 features a tilting mechanism that allows access to your vehicle's rear cargo area without removing the bikes. Locate the tilt release mechanism (typically a pin or lever) at the base of the vertical mast. Follow the manufacturer's specific instructions for engaging and disengaging the tilt function. Always ensure the rack is securely locked in either the upright or tilted position before proceeding.
6. Penyelenggaraan
- Pembersihan: Clean the rack regularly with mild soap and water to remove dirt, road grime, and salt. Rinse thoroughly and dry to prevent corrosion.
- Pemeriksaan: Periodically inspect all components for signs of wear, damage, or corrosion. Check bolts, nuts, and straps for tightness and replace any worn or damaged parts immediately.
- Pelinciran: Apply a light lubricant to moving parts, such as the tilting mechanism, to ensure smooth operation.
- Storan: When not in use, store the bike rack in a dry, protected area to prolong its lifespan.
7. Penyelesaian masalah
| Masalah | Kemungkinan Punca | Penyelesaian |
|---|---|---|
| Rack sways or wobbles excessively | Hitch pin not fully secured; anti-wobble mechanism (if applicable) not tightened; loose assembly bolts. | Ensure hitch pin is fully inserted and clipped. If your hitch has an anti-wobble bolt, tighten it. Check and tighten all assembly bolts on the rack. |
| Bikes are not secure or move during transit | Frame hooks not properly engaged; wheel straps loose or missing; bikes improperly positioned. | Press frame hooks down firmly onto the bike frame. Ensure wheel straps are tightly secured around both wheels. Reposition bikes to ensure stable contact with wheel trays and hooks. Consider using additional bungee cords for extra security on long trips. |
| Difficulty tilting the rack | Tilt mechanism obstructed or corroded; release pin stuck. | Clear any debris from the tilt mechanism. Apply a light lubricant to the pivot points and release pin. Ensure the rack is not overloaded. |
| Scratches on bike frame | Rubberized hooks worn or improperly positioned; bikes rubbing against each other or rack. | Ensure rubberized hooks are intact and correctly positioned. Adjust bike spacing to prevent contact. Replace worn rubber components. Some frame styles may require a Thule Frame Adapter for optimal protection. |
8. Spesifikasi
| Ciri | Perincian |
|---|---|
| Nama Model | Crest 2 |
| Nombor Model | SR2901B |
| Jenama | SportRack |
| warna | Hitam |
| Kapasiti Muatan | 90 Pounds (45 lbs per bike) |
| Number of Bikes | 2 |
| Jenis Pemasangan | Hitch Mount (1.25-inch or 2-inch receiver) |
| Dimensi Item (L x W x H) | 35 x 44 x 42.6 inci |
| Berat Barang | 27.75 paun |
| bahan | Powder-coated steel, aluminum |
| Tilting Feature | Yes, for rear vehicle access |
| UPC | 770527994044 |
9. Waranti dan Sokongan
9.1 Maklumat Waranti
The SportRack Crest 2 Non-Locking bike rack comes with a waranti seumur hidup terhad. This warranty covers defects in materials and workmanship under normal use. For specific terms, conditions, and limitations of the warranty, please refer to the warranty card included with your product or visit the official SportRack webtapak.
9.2 Sokongan Pelanggan
If you have any questions, require assistance with assembly or operation, or need to report a warranty claim, please contact SportRack customer support. Contact information can typically be found on the product packaging, the official SportRack webtapak, atau melalui peruncit anda.
Ask a question about this manual
Ask about setup, troubleshooting, compatibility, parts, safety, or missing instructions. Manuals+ will review the question and use this page’s manual context to help answer it.