
1. Produk Lebihview
The LOOK Cycle KEO 2 Max Carbon Bike Pedals are designed for road cycling, offering efficient power transfer and stability. These clipless pedals feature a large 500 mm² stainless steel contact area and a lightweight carbon body. They are equipped with a durable Chromoly+ spindle and adjustable tension settings to suit individual rider preferences.

Figure 1: A LOOK Cycle KEO 2 Max Carbon Bike Pedal shown mounted on a bicycle crank arm, highlighting its design and contact area.
2. Persediaan dan Pemasangan
2.1 Menyahkotak dan Komponen
Before installation, ensure all components are present. The package includes:
- Racing Pedals (Left and Right)
- KEO Cleats (typically included, verify package contents)
- Mounting hardware for cleats
2.2 Pedal Installation on Crank Arms
To install the pedals:
- Apply a thin layer of grease to the pedal threads. This prevents seizing and facilitates future removal.
- Identify the left and right pedals. The right pedal (R) has standard threading (tighten clockwise). The left pedal (L) has reverse threading (tighten counter-clockwise).
- Carefully thread each pedal into its respective crank arm by hand to avoid cross-threading.
- Once hand-tight, use an appropriate pedal wrench (or Allen key if applicable) to fully tighten the pedals. Ensure they are securely fastened to prevent loosening during use, which can damage the crank arm threads.

Rajah 2: Sebelah view of the KEO 2 Max Carbon pedal, showing the spindle and pedal body.
2.3 Cleat Installation on Cycling Shoes
Install the KEO cleats onto your cycling shoes according to the cleat manufacturer's instructions. Proper cleat positioning is crucial for comfort and efficiency. Adjustments can be made for fore/aft position, lateral position, and rotation.
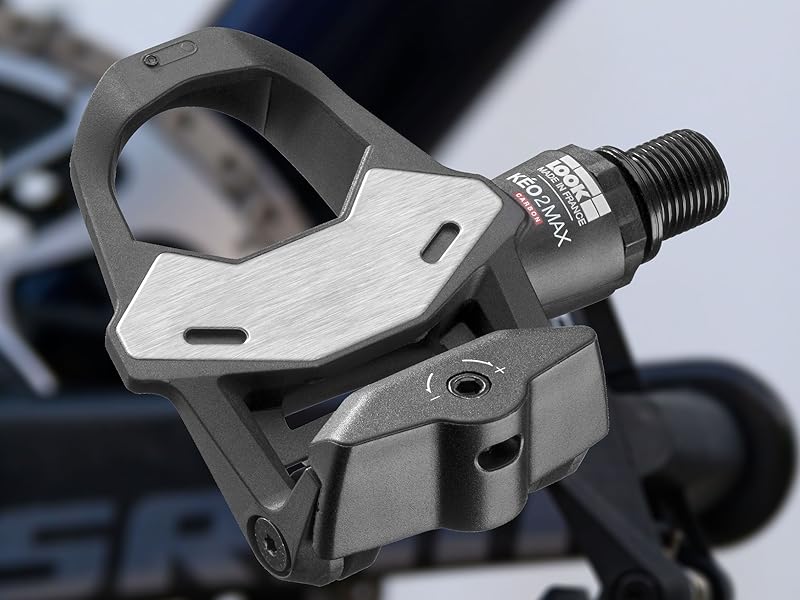
Figure 3: A cycling shoe with a KEO cleat attached, demonstrating how the cleat interfaces with the pedal mechanism.
3. Operating the Pedals
3.1 Clipping In
To clip into the pedals, position the front of your cleat under the front hook of the pedal. Then, press down firmly with your heel until you hear a "click," indicating that the cleat is securely engaged.
3.2 Clipping Out
To unclip, twist your heel outwards, away from the bicycle frame. This action releases the cleat from the pedal mechanism. Practice clipping in and out in a safe, controlled environment before riding on public roads.
3.3 Adjustable Tension
The KEO 2 Max Carbon pedals feature adjustable tension, allowing you to customize the force required to clip in and out. This adjustment is made using an Allen key on the rear mechanism of the pedal. The tension can be set between 8 and 12 Nm.
- Turn the screw towards the "–" symbol to decrease tension (easier to clip out).
- Turn the screw towards the "+" symbol to increase tension (more secure hold, harder to clip out).

Figure 4: Detail of the tension adjustment screw on the KEO 2 Max pedal, showing the plus and minus indicators for adjusting release tension.
4. Penyelenggaraan
Regular maintenance ensures optimal performance and longevity of your pedals.
- Pembersihan: Periodically clean the pedals and cleats to remove dirt, mud, and debris. Use a damp kain dan sabun lembut, mengelakkan bahan kimia yang keras.
- Pelinciran: Apply a small amount of grease to the pedal threads before installation and reapply if pedals are removed and reinstalled.
- Cleat Wear: Inspect your cleats regularly for wear. Worn cleats can lead to difficulty clipping in/out or accidental unclipping. Replace cleats as needed.
- Pemeriksaan Spindle: Check the pedal spindles for any signs of play or damage. If excessive play is detected, consult a professional bike mechanic.
- Keketatan: Ensure pedals are securely tightened to the crank arms. Loose pedals can cause damage to both the pedal and crank arm.
5. Penyelesaian masalah
| Masalah | Kemungkinan Punca | Penyelesaian |
|---|---|---|
| Difficulty clipping in/out | Tension too high/low, worn cleats, debris in mechanism | Adjust tension, replace cleats, clean pedal mechanism |
| Pedal feels loose on crank arm | Pedal not tightened sufficiently, damaged threads | Retighten pedal (ensure correct threading), consult mechanic for damaged threads |
| Squeaking or creaking noise | Lack of lubrication, loose components, worn bearings | Lubricate pedal threads, check tightness, consult mechanic for worn bearings |
6. Spesifikasi Produk
| Ciri | Perincian |
|---|---|
| Jenama | LIHAT |
| Nama Model | Keo |
| Nombor Bahagian | 16090 |
| warna | Hitam |
| bahan | Carbon (body), Chromoly+ (spindle) |
| Berat Barang | 125 grams (KEO 2 MAX Carbon) |
| Kawasan Perhubungan | 500 mm² (Stainless Steel) |
| Pelarasan Ketegangan | 8 hingga 12 Nm |
| Saiz Benang | 2 |
| Pengguna yang Dicadangkan | Unisex |
| Jenis Sukan | Berbasikal |
6.1 Apa yang ada di dalam Kotak
- Racing Pedals (pair)
- KEO Cleats (typically included)
- Perkakasan pemasangan
7. Video Produk
7.1 KEO Classic 3 Plus Overview (Related Model)
Video ini memberikan penamatview of the KEO Classic 3 Plus pedals, a related model from LOOK Cycle, showcasing features like stainless steel contact area, comfort, stability, and stiffness. While not the exact KEO 2 Max Carbon, it illustrates general KEO pedal characteristics.
8. Waranti dan Sokongan
The LOOK Cycle KEO 2 Max Carbon Bike Pedals come with a Waranti Pengeluar 2 Tahun. For warranty claims, technical support, or further assistance, please refer to the official LOOK Cycle webtapak atau hubungi perkhidmatan pelanggan mereka secara langsung.
Untuk maklumat dan sumber tambahan, lawati pegawai itu LOOK Store on Amazon.