
1. Pengenalan
Terima kasih kerana membeliasing the BYINTEK BT140 WiFi Projector. This manual provides essential information for setting up, operating, and maintaining your projector. Please read it thoroughly before use to ensure proper functionality and to extend the lifespan of your device.
2. Maklumat Keselamatan
Untuk mengelakkan kebakaran, renjatan elektrik atau kecederaan, sila patuhi langkah berjaga-jaga keselamatan berikut:
- Jangan lihat terus ke dalam kanta projektor apabila lamp sedang aktif. Cahaya yang terang boleh menyebabkan kerosakan mata.
- Pastikan pengudaraan yang betul. Jangan sekat bukaan pengudaraan. Terlalu panas boleh merosakkan projektor.
- Letakkan projektor di atas permukaan yang stabil dan rata untuk mengelakkannya daripada jatuh.
- Jauhkan projektor daripada air, kelembapan dan bahan mudah terbakar.
- Gunakan hanya penyesuai kuasa yang dibekalkan dengan projektor.
- Jangan cuba membaiki projektor sendiri. Rujuk semua servis kepada kakitangan yang berkelayakan.
- Cabut palam projektor daripada soket kuasa semasa ribut petir atau apabila tidak digunakan untuk jangka masa yang lama.
3. Kandungan Pakej
Sila pastikan semua item ada:
- BYINTEK BT140 Projector
- Kabel Kuasa
- Alat Kawalan Jauh
- AV kabel
- Manual Pengguna (dokumen ini)
Note: Specific accessories may vary slightly depending on the region or retailer.
4. Produk Lebihview
Biasakan diri anda dengan komponen dan antara muka projektor.
Imej: Depan view of the BYINTEK BT140 Projector, showing the lens and ventilation grilles.
Antara muka:
- HDMI: Connect to devices like laptops, Blu-ray players, gaming consoles.
- USB: Sambungkan pemacu USB untuk main balik media.
- Slot Kad SD: Insert SD cards for media playback.
- DARI: Sambungkan ke peranti lama menggunakan kabel AV yang disertakan.
- VGA: Connect to computers with a VGA output.
- Keluar Audio: Sambungkan pembesar suara atau fon kepala luaran.
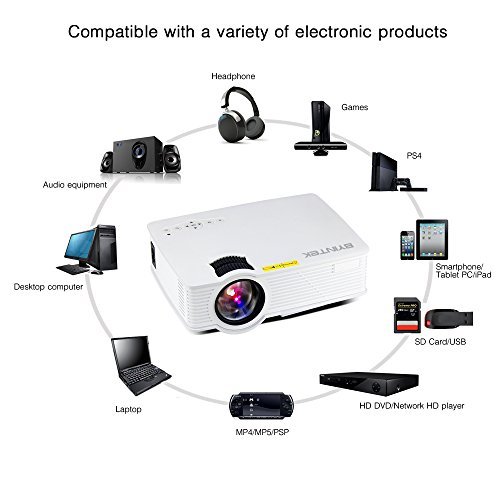
Image: Diagram illustrating various devices compatible with the BYINTEK BT140 Projector, including laptops, smartphones, tablets, gaming consoles (PS4, PSP), desktop computers, headphones, audio equipment, and HD media players, connected via HDMI, USB, SD, AV, and VGA ports.
5. Persediaan
5.1 Penempatan
Place the projector on a stable surface. The recommended projection distance is 1.5 to 2.5 meters for an optimal screen size of 50 to 80 inches. The projector supports image sizes from 34 to 100 inches.
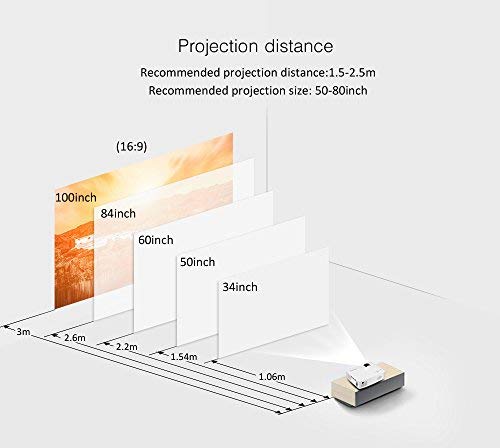
Image: Diagram showing recommended projection distances and corresponding screen sizes for the BYINTEK BT140 Projector, ranging from 34 inches at 1.06m to 100 inches at 3m.
5.2 Sambungan Kuasa
- Sambungkan kabel kuasa ke port input kuasa projektor.
- Palamkan hujung kabel kuasa yang lain ke salur keluar dinding.
5.3 Menyambung Peranti
- HDMI: Connect an HDMI cable from your source device (e.g., laptop, game console) to the projector's HDMI port.
- USB/SD: Insert a USB drive or SD card into the respective port for direct media playback.
- AV/VGA: Use the appropriate cable to connect older devices.
5.4 Pelarasan Fokus
Putar gelang fokus pada kanta projektor sehingga imej yang diunjurkan jelas dan tajam.
5.5 Pembetulan Keystone
If the projected image appears trapezoidal, adjust the keystone correction dial (usually located near the lens) to square the image. The projector supports vertical keystone correction of ±15 degrees.
5.6 Wireless Connection (Airplay/Miracast)
The BT140plus model includes a built-in wireless push module supporting Airplay and Miracast functionality for wireless connection to smartphones, tablets, and iPads. Refer to the on-screen instructions for pairing your device.
6. Arahan Operasi
6.1 Menghidupkan/Mematikan
- Hidupkan kuasa: Tekan butang kuasa pada projektor atau alat kawalan jauh.
- Matikan: Tekan butang kuasa sekali lagi. Sahkan penutupan jika digesa.
6.2 Pemilihan Sumber Input
Use the "Source" button on the remote control or the projector's control panel to cycle through available input sources (HDMI, USB, SD, AV, VGA, Wireless).
6.3 Main Semula Media (USB/SD)
When a USB drive or SD card is inserted, the projector's multimedia interface will typically appear. Navigate through folders and select your desired media file (videos, photos, music) using the remote control.
- Format Video yang Disokong: RMVB/RM (Realvideo2.0/3.0/4.0), AVI (Xvid/H264), FLV (Sorenson H.263), MOV (H264), MP4 (MPEG4, AVC), MPG (MPG1)
- Format Audio yang Disokong: MP3, WMA, AAC, AC3
7. Penyelenggaraan
7.1 Membersihkan Lensa
Use a soft, lint-free cloth or lens cleaning paper to gently wipe the projector lens. Avoid using abrasive cleaners or excessive force, which can scratch the lens.
7.2 Membersihkan Badan dan Lubang Udara Projektor
Wipe the projector's exterior with a soft, dry cloth. Use a small brush or compressed air to clear dust from the ventilation openings to ensure proper airflow and prevent overheating.
7.3 Lamp kehidupan
The BYINTEK BT140 uses an LED lamp with an estimated lifespan of 20,000 hours, significantly reducing the need for lamp replacement compared to conventional lamps.
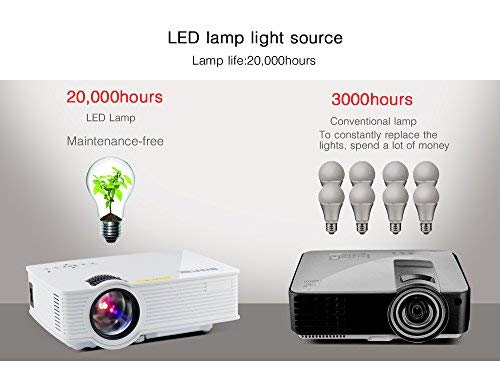
Image: Comparison showing the BYINTEK BT140's LED lamp with 20,000 hours lifespan versus conventional lamps with 3,000 hours lifespan, highlighting the maintenance-free aspect of LED technology.
8. Penyelesaian masalah
Jika anda menghadapi masalah dengan projektor anda, rujuk kepada masalah dan penyelesaian biasa berikut:
| Masalah | Kemungkinan Punca / Penyelesaian |
|---|---|
| Tiada gambar di skrin |
|
| Imej kabur |
|
| Imej adalah trapezoid |
|
| Tiada bunyi |
|
| Alat kawalan jauh tidak berfungsi |
|
9. Spesifikasi
Below are the technical specifications for the BYINTEK BT140 Projector:
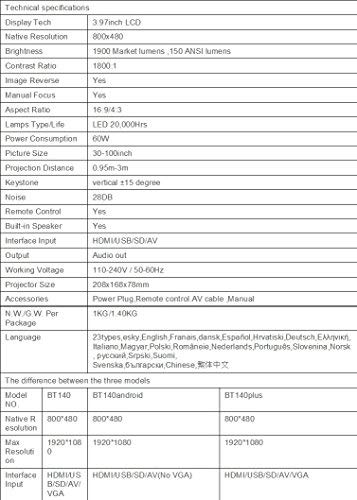
Image: Table detailing the technical specifications of the BYINTEK BT140 Projector, including display tech, resolution, brightness, contrast, aspect ratio, lamp life, power consumption, and interface inputs.
| Ciri | Perincian |
|---|---|
| Teknologi Paparan | 3.97" LCD |
| Resolusi Asli | 800 x 480 |
| Resolusi Paparan Maksimum | 1920 x 1080 (Support 1080P) |
| Kecerahan | 1900 Lumens (150 ANSI lumens) |
| Nisbah Kontras | 1800:1 |
| Imej Songsang | ya |
| Fokus Manual | ya |
| Nisbah Aspek | 16:9 / 4:3 |
| Lamp Type / Life | LED, 20,000 Jam |
| Penggunaan Kuasa | 70W |
| Saiz Gambar | 34-100 inci |
| Jarak Unjuran | 0.95m - 3m |
| Pembetulan Batu Kunci | Menegak ±15 darjah |
| Tahap Kebisingan | 28dB |
| Alat Kawalan Jauh | ya |
| Pembesar Suara Terbina dalam | ya |
| Interface Input | HDMI / USB / SD / AV / VGA |
| Output Audio | Port audio keluar |
| Bekerja Voltage | 110-240V / 50-60Hz |
| Saiz Projektor | 208 x 168 x 78mm |
| Berat Bersih | 950 Grams (1KG N.W./G.W. Per Package) |
| Teknologi Ketersambungan | Wi-Fi (for Airplay/Miracast) |
| Peranti Serasi | Komputer riba, Telefon Pintar, Tablet |
10. Waranti dan Sokongan
BYINTEK products are designed for reliability and performance. For warranty information or technical support, please refer to the warranty card included with your product or contact BYINTEK customer service through their official weblaman web atau peruncit anda.
Untuk bantuan lanjut, anda boleh melawati BYINTEK Store on Amazon.