1. Pengenalan
This manual provides detailed instructions for the setup, operation, and maintenance of your AmScope SM-4TZZ-FRL-5M3 Trinocular Stereo Microscope. This heavy-duty, highly-flexible microscope is designed for biological and industrial applications, offering ease-of-use and reliability. It features a wide zoom range and a double-arm boom-stand, making it suitable for various workshop or laboratory tasks.
Ciri-ciri utama termasuk:
- 3.5X-180X super widefield zoom magnification
- 8-inch large working distance and 2.5-inch field of view
- Fluorescent cool, even, and bright illumination
- 3D boom stand for flexible head positioning
- 5MP USB 3.0 digital camera for photos and videos on Windows, Mac, and Linux
2. Maklumat Keselamatan
Please read and understand all safety instructions before operating the microscope. Failure to do so may result in injury or damage to the equipment.
- Keselamatan Elektrik: Ensure the power cord is properly connected to a grounded outlet. Do not operate with wet hands. Disconnect power before cleaning or servicing.
- Pengendalian: Handle the microscope with care. Avoid sudden impacts or dropping the unit.
- Persekitaran: Use the microscope in a clean, dry, and stable environment. Avoid extreme temperatures, humidity, and dust.
- Komponen Optik: Do not touch optical surfaces with bare hands. Use only approved cleaning methods for lenses.
- Pengudaraan: Ensure adequate ventilation around the fluorescent ring light to prevent overheating.
3. Kandungan Pakej
Sahkan bahawa semua komponen ada dan tidak rosak semasa membongkar:
- Trinocular Stereo Microscope Head
- Double-Arm Boom Stand with Base
- Pair of WF10X/20 Eyepieces
- Fluorescent Ring Light (Model FRL8) with Power Cord
- 5MP USB 3.0 Digital Camera with USB Cable
- Penutup Habuk
- Manual Pengguna (dokumen ini)
4. Arahan Persediaan
4.1. Boom Stand Assembly
Assemble the boom stand by securely attaching the vertical post to the heavy base. Then, attach the horizontal boom arm to the vertical post using the provided clamps and knobs. Ensure all connections are tight and stable.

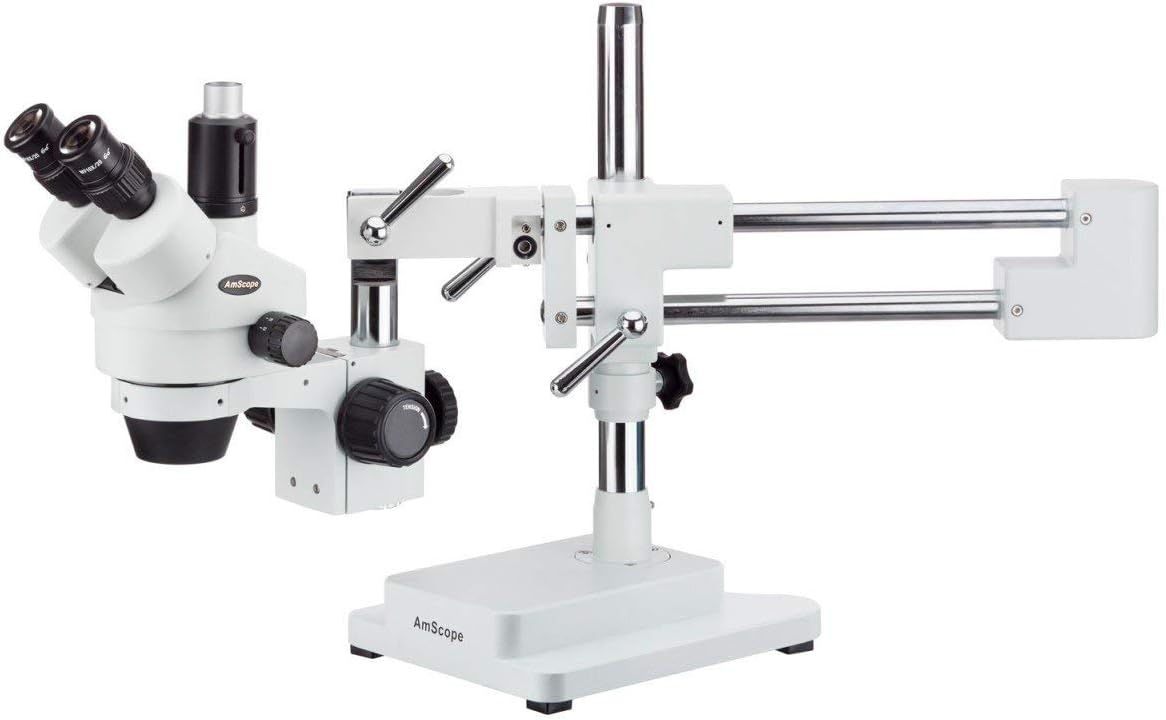
Image 1: AmScope Trinocular Stereo Microscope assembled on its double-arm boom stand.
4.2. Microscope Head Installation
Carefully mount the trinocular stereo microscope head onto the boom arm. Secure it in place using the locking screw or clamp mechanism on the boom arm. Adjust the position for comfortable viewing.
Imej 2: Sisi view of the AmScope Trinocular Stereo Microscope, showing the boom stand and microscope head assembly.
4.3. Eyepiece Installation
Insert the WF10X/20 eyepieces into the two ocular tubes on the microscope head. Gently push them down until they are seated firmly.
4.4. Fluorescent Ring Light Attachment
Attach the fluorescent ring light to the objective housing of the microscope head. Ensure it is securely fastened and positioned to provide even illumination to the specimen area. Connect the ring light's power cord to a suitable electrical outlet.

Image 3: AmScope Fluorescent Ring Light (Model FRL8) with its power cord.
4.5. 5MP USB 3.0 Camera Connection
Remove the dust cap from the trinocular port on the microscope head. Insert the 5MP USB 3.0 digital camera into this port. Connect the camera to your computer using the provided USB cable. Install the necessary software drivers and application from the manufacturer's weblaman web atau media yang disertakan.
5. Arahan Operasi
5.1. Menghidupkan
Ensure all electrical connections are secure. Turn on the power switch for the fluorescent ring light. If using the camera, ensure your computer is on and the camera software is running.
5.2. Placing a Specimen
Place your specimen directly under the objective lens on the microscope's working stage. Adjust the boom arm to position the microscope head appropriately over the specimen.
5.3. Adjusting Magnification (Zoom)
Rotate the zoom knob located on the microscope head to change the magnification from 3.5X to 180X. The zoom is continuous, allowing for precise adjustment.
5.4. Memberi tumpuan
Use the coarse and fine focus knobs on the microscope stand to bring the specimen into sharp focus. Start with the coarse adjustment for large changes, then use the fine adjustment for precise focusing.
5.5. Adjusting Illumination
The fluorescent ring light provides cool and even illumination. If your ring light has a dimmer, adjust it to achieve the desired brightness for optimal viewing.
5.6. Using the Digital Camera
Once the camera is connected and software installed, open the camera application on your computer. The live view from the microscope will be displayed. Use the software to capture images, record videos, and perform measurements as needed.
6. Penyelenggaraan
6.1. Cleaning Lenses and Optical Components
Use a soft, lint-free cloth specifically designed for optical lenses. For stubborn smudges, a small amount of lens cleaning solution can be applied to the cloth, not directly to the lens. Avoid touching optical surfaces with fingers.
6.2. Pembersihan Am
Wipe the exterior surfaces of the microscope and stand with a soft, damp cloth. Do not use harsh chemicals or abrasive cleaners. Ensure the microscope is unplugged before cleaning.
6.3. Penyimpanan
When not in use, cover the microscope with the provided dust cover to protect it from dust and debris. Store in a cool, dry place away from direct sunlight and vibrations.
7. Penyelesaian masalah
- Tiada Imej Kelihatan: Check if the fluorescent ring light is on. Ensure the eyepieces are correctly installed. Verify the specimen is properly positioned and the focus knobs are adjusted.
- Imej Kabur: Adjust the coarse and fine focus knobs. Ensure the eyepieces are clean. Check for any obstructions on the objective lens or specimen.
- Camera Not Connecting/No Live View: Ensure the USB cable is securely connected to both the camera and the computer. Verify that the camera drivers are installed correctly and the camera software is running. Try restarting the computer and camera software.
- Ring Light Not Working: Check the power connection to the ring light and the wall outlet. Ensure the power switch on the ring light is in the 'ON' position.
8. Spesifikasi
| Ciri | Spesifikasi |
|---|---|
| Nombor Model | SM-4TZZ-FRL-5M3 |
| Julat Pembesaran | 3.5X - 180X |
| Kanta Objektif | 0.7-4.5X |
| Cermin mata | WF10X/20 |
| Jarak Kerja | 8 inci (203mm) |
| Bidang View | 2.5 inci (63.5mm) |
| Pencahayaan | Fluorescent Ring Light |
| Kamera | 5MP USB 3.0 Digital Camera |
| Sumber Kuasa | Elektrik Bertali |
| Berat Barang | 65 paun (29.5 kg) |
| Dimensi Pakej | 25.59 x 19.29 x 12.99 inci |
| ASIN | B071L7FX4L |
| UPC | 840979118401 |
9. Maklumat Waranti
This AmScope product is covered by a manufacturer's warranty. Please refer to the warranty card included with your purchase or visit the official AmScope webtapak untuk terma dan syarat jaminan terperinci. Simpan bukti pembelian anda untuk tuntutan waranti.
10. Sokongan
For technical assistance, troubleshooting not covered in this manual, or spare parts, please contact AmScope customer support. You can find contact information and additional resources on the official AmScope weblaman web atau melalui kedai Amazon mereka: