
1. Pengenalan
This manual provides essential information for the safe and effective operation of your Thsinde 18B+ Auto Ranging Digital Multimeter. Please read this manual thoroughly before use and retain it for future reference.
1.1 Maklumat Keselamatan
AMARAN:
- Sentiasa mematuhi kod keselamatan tempatan dan nasional.
- Jangan gunakan multimeter jika ia kelihatan rosak atau jika wayar ujian telah rosak.
- Pastikan fungsi dan julat yang betul dipilih sebelum membuat pengukuran.
- Jangan sekali-kali memohon voltage to the meter when the function switch is set to current, resistance, or diode/continuity.
- Berhati-hati apabila bekerja dengan voltagadalah melebihi 30V AC RMS, puncak 42V atau 60V DC. Ini voltagia menimbulkan bahaya kejutan.
- Gantikan bateri dan fius hanya dengan jenis dan penarafan yang dinyatakan.
- Pastikan jari berada di belakang penghadang prob semasa pengukuran.
2. Produk Lebihview
The Thsinde 18B+ is an auto-ranging digital multimeter designed for measuring AC/DC voltage, AC/DC current, resistance, continuity, diode, frequency, and non-contact voltage (NCV). It features a large backlit LCD display and True RMS measurement capability.

Figure 2.1: Thsinde 18B+ Digital Multimeter and Accessories
This image displays the Thsinde 18B+ digital multimeter, its orange protective rubber sleeve, a set of red and black test leads, a pair of red and black alligator clips, and a 9V battery. The multimeter's display shows "0.000" with "TRUE RMS" and "AUTOAPO" indicators. The function dial is set to AC/DC Voltage.
2.1 Komponen dan Paparan
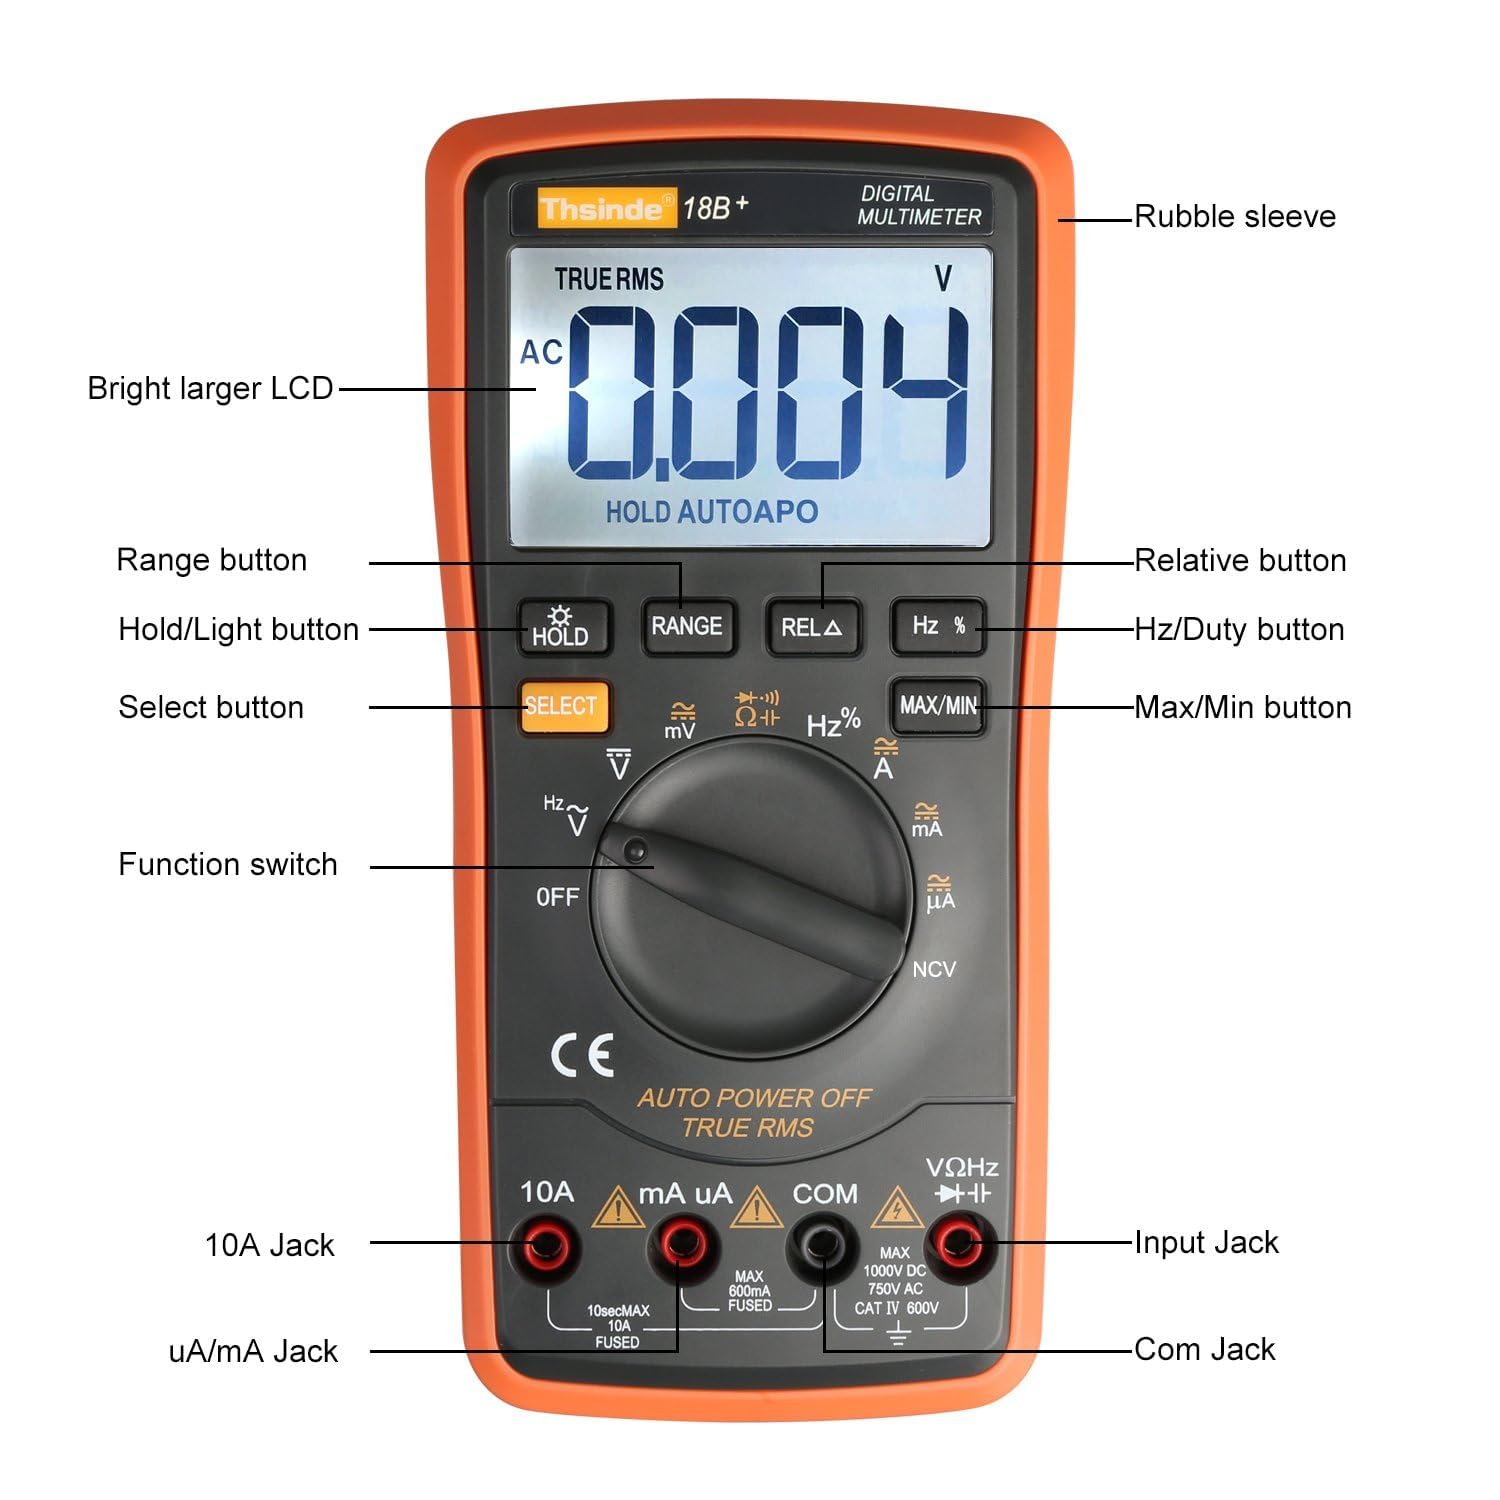
Figure 2.2: Multimeter Components Diagram
This diagram labels the key components of the Thsinde 18B+ multimeter. These include the Rubble sleeve, Bright larger LCD, Range button, Hold/Light button, Select button, Hz/Duty button, Relative button, Max/Min button, Function switch, 10A Jack, uA/mA Jack, Com Jack, and Input Jack.
- Rubble sleeve: Luar pelindung casing.
- Bright larger LCD: Digital display for readings.
- Butang: HOLD/Light, RANGE, REL Δ, Hz %, MAX/MIN, SELECT.
- Suis fungsi: Rotary dial to select measurement modes.
- Bicu Input:
- Bicu 10A: Untuk pengukuran arus tinggi (sehingga 10A).
- uA/mA Jack: Untuk mikroampere dan miliampsebelum pengukuran semasa.
- COM Jack: Input biasa (negatif) untuk semua ukuran.
- VΩHz→→+ Jack: Input positif untuk voltage, resistance, frequency, diode, and continuity measurements.

Figure 2.3: Display Feature Icons
This image highlights various functions and display indicators of the multimeter, including Diode test, Frequency, Capacitor, AC/DC voltage, AC/DC current, Beeper continuity, NCV (Non-Contact Voltage), Backlight, True RMS, Electric resistance, Max/Min value, Data hold, LCD display, Relative value, Auto Power Off (APO), and Beeper diode ON/OFF.
3. Persediaan
3.1 Pemasangan Bateri
- Pastikan multimeter dimatikan.
- Cari petak bateri di bahagian belakang unit.
- Tanggalkan skru penahan dan tanggalkan penutup bateri.
- Connect a 9V battery (included) to the battery clips, observing correct polarity (+ and -). The positive terminal is typically on the left when viewing dari belakang.
- Place the battery into the compartment, ensuring it fits snugly.
- Gantikan penutup bateri dan kencangkannya dengan skru.
3.2 Menghubungkan Petunjuk Ujian
- Masukkan petunjuk ujian hitam ke dalam bicu input "COM" (Umum).
- Untuk kebanyakan ukuran (voltage, resistance, frequency, diode, continuity), insert the red test lead into the "VΩHz→→+" input jack.
- For current measurements, insert the red test lead into the "uA/mA" jack for low currents or the "10A" jack for high currents.
4. Arahan Operasi
4.1 Operasi Am
- Hidupkan/Mati Kuasa: Rotate the function switch from "OFF" to any desired measurement function to turn the meter ON. Rotate back to "OFF" to power OFF.
- Auto Ranging: Multimeter secara automatik memilih julat ukuran yang sesuai.
- Pegangan Data (HOLD): Tekan butang "HOLD" untuk membekukan bacaan semasa pada paparan. Tekan sekali lagi untuk melepaskan.
- Lampu latar: Press and hold the "HOLD" button to activate the display backlight. Press and hold again to turn it off. The backlight may have an automatic timeout.
- Auto Shutoff (APO): The meter will automatically power off after approximately 15 minutes of inactivity to conserve battery. To disable APO, press and hold the "SELECT" button while turning the function switch from "OFF" to a measurement mode. "APO" will disappear from the display.

Figure 4.1: Backlit LCD Display in Low Light
This image demonstrates the multimeter's large, backlit LCD display, showing a DC voltage reading of "0.158" in a dimly lit area, highlighting its readability in various lighting conditions.
4.2 Fungsi Pengukuran
4.2.1 AC/DC Jldtage Measurement (V~ / V↓)
- Set the function switch to V~ (AC Voltage) or V↓ (DC Voltagdan).
- Connect the red test lead to the VΩHz→→+ jack and the black test lead to the COM jack.
- Sentuhkan prob ujian ke titik litar di mana voltage perlu diukur.
- Paparan akan menunjukkan voltage membaca.
4.2.2 AC/DC Current Measurement (A~ / A↓, mA~ / mA↓, µA~ / µA↓)
- Set the function switch to the appropriate current range (A, mA, or µA). Use the "SELECT" button to toggle between AC and DC current if necessary.
- Connect the red test lead to the 10A jack (for up to 10A) or the uA/mA jack (for up to 600mA). Connect the black test lead to the COM jack.
- Open the circuit where current is to be measured and connect the test probes in series with the circuit.
- Paparan akan menunjukkan bacaan semasa.
- PERHATIAN: Jangan sekali-kali sambungkan meter secara selari dengan voltantage source when in current mode, as this can blow the fuse or damage the meter.
4.2.3 Pengukuran Rintangan (Ω)
- Set the function switch to Ω.
- Connect the red test lead to the VΩHz→→+ jack and the black test lead to the COM jack.
- Ensure the circuit or component under test is de-energized.
- Touch the test probes across the component to measure its resistance.
- Paparan akan menunjukkan bacaan rintangan.
4.2.4 Continuity Test (🔊)
- Set the function switch to Ω and press "SELECT" until the continuity symbol (🔊) appears.
- Connect the red test lead to the VΩHz→→+ jack and the black test lead to the COM jack.
- Ensure the circuit or component under test is de-energized.
- Touch the test probes across the component or circuit path.
- If resistance is below approximately 50Ω, the buzzer will sound, indicating continuity.
4.2.5 Diode Test (→→+)
- Set the function switch to Ω and press "SELECT" until the diode symbol (→→+) appears.
- Connect the red test lead to the VΩHz→→+ jack and the black test lead to the COM jack.
- Pastikan diod dicabut dari litar.
- Sentuhkan prob merah ke anod dan prob hitam ke katod diod. Paparan akan menunjukkan volum hadapantage penurunan.
- Balikkan kuar. Paparan harus menunjukkan "OL" (Gelung Terbuka) untuk diod yang baik.
4.2.6 Frequency/Duty Cycle Measurement (Hz %)
- Set the function switch to Hz %.
- Connect the red test lead to the VΩHz→→+ jack and the black test lead to the COM jack.
- Touch the test probes to the circuit where frequency or duty cycle is to be measured.
- The display will show the frequency in Hz. Press "SELECT" to toggle to duty cycle measurement (%).
4.2.7 Capacitance Measurement (⊕)
- Set the function switch to ⊕.
- Connect the red test lead to the VΩHz→→+ jack and the black test lead to the COM jack.
- Pastikan kapasitor dinyahcas sepenuhnya sebelum ujian.
- Sentuhkan prob ujian pada terminal kapasitor.
- The display will show the capacitance value in Farads (F), microfarads (µF), or nanofarads (nF).
4.2.8 Bukan Kenalan Voltage (NCV) Pengesanan
- Set the function switch to NCV.
- Move the top front part of the multimeter close to the conductor or outlet you want to test.
- Sekiranya AC voltage is detected (typically above 700V RMS as per product description, but usually much lower for NCV detection in general use), the meter will beep and the NCV indicator light will illuminate.

Rajah 4.2: No-Contact Voltage (NCV) Pengesanan
This image shows the Thsinde 18B+ multimeter being used to detect non-contact voltage near a power strip. The display shows "APO" and the NCV symbol, indicating the function is active. A wireless signal icon emanates from the meter towards the power strip, illustrating its ability to detect live AC voltage tanpa sentuhan langsung.
5. Penyelenggaraan
5.1 Penggantian Bateri
When the battery indicator appears on the display, replace the 9V battery as described in Section 3.1. Always use a fresh 9V battery.
5.2 Penggantian Fius
If the current measurement functions stop working, the fuse(s) may need replacement. This meter uses HRC fuses. Refer to the specifications for correct fuse ratings.
- Pastikan multimeter dimatikan dan petunjuk ujian diputuskan.
- Unscrew the retaining screws on the back cover and carefully open the casing.
- Locate the blown fuse(s). There are typically two fuses: one for the mA/µA range and one for the 10A range.
- Carefully remove the old fuse(s) and replace with new fuse(s) of the identical type and rating.
- Tutup casing and secure with screws.
- AMARAN: Never use a fuse with a different rating or bypass a fuse. This can lead to serious injury or damage to the meter.
5.3 Pembersihan
Lap meter dengan iklanamp kain dan detergen lembut. Jangan gunakan bahan pelelas atau pelarut. Pastikan meter kering sepenuhnya sebelum digunakan.
6. Penyelesaian masalah
- Meter tidak menghidupkan: Check battery installation and ensure the battery is not depleted.
- No reading or "OL" (Overload) displayed:
- Ensure test leads are correctly inserted and making good contact.
- Verify the function switch is set to the correct measurement mode.
- The measured value may exceed the selected range (if not in auto-ranging) or the meter's maximum capability.
- For resistance/continuity, ensure the circuit is de-energized.
- Pengukuran semasa tidak berfungsi: Check the appropriate fuse (mA/µA or 10A) as described in Section 5.2.
- Bacaan tidak tepat:
- Pastikan bateri tidak lemah.
- Check for proper test lead connection.
- Sahkan fungsi dan julat yang betul dipilih.
- Environmental factors (temperature, humidity) can affect accuracy.
- Buzzer tidak berbunyi semasa ujian kesinambungan: The resistance may be above the continuity threshold (typically 50Ω).
7. Spesifikasi
| Fungsi Pengukuran | Julat / Ketepatan |
|---|---|
| Paparan | 6000 Counts, True RMS |
| DC Voltage | Sehingga 1000V |
| Vol. ACtage | Sehingga 750V |
| Arus DC | Sehingga 10A |
| AC Semasa | Sehingga 10A |
| Rintangan | ya |
| Kapasitansi | Up to 20000 µF |
| Kekerapan | ya |
| Ujian Diod | ya |
| Kesinambungan | Ya (Buzzer) |
| NCV (Voltage) | Yes (with alarm sound) |
| Sumber Kuasa | Bateri 1 x 9V |
| Auto Matikan | Yes (approx. 15 mins, can be disabled) |
| Penilaian Keselamatan | CAT III 1000V, CAT IV 600V (as marked on device) |
Catatan: Spesifikasi boleh berubah tanpa notis.
8. Waranti dan Sokongan
The Thsinde 18B+ Digital Multimeter comes with a 1-year warranty from the date of purchase. This warranty covers manufacturing defects and material faults under normal use.
For warranty claims, technical support, or any questions regarding the product, please contact Thsinde customer service through the retailer where the product was purchased.