pengenalan
Thank you for choosing the Atlanta Digital LCD Radio Alarm Clock, Model 1882-0. This compact and easy-to-use alarm clock features a clear LCD display, temperature indication, and a radio-controlled time function for automatic synchronization. This manual provides detailed instructions for setup, operation, and maintenance to ensure optimal performance.
Maklumat Keselamatan
- Keselamatan Bateri: Use only the specified battery type. Ensure correct polarity (+/-) when inserting batteries. Do not mix old and new batteries, or different types of batteries. Remove batteries if the device will not be used for an extended period. Dispose of used batteries responsibly according to local regulations.
- penempatan: Place the clock on a stable, flat surface. Avoid direct sunlight, extreme temperatures, high humidity, or dusty environments.
- Pembersihan: Do not use abrasive cleaners or solvents. Wipe with a soft, dry cloth.
- Pendedahan Air: Peranti ini tidak kalis air. Elakkan pendedahan kepada air atau cecair lain.
Kandungan Pakej
- Atlanta Digital LCD Radio Alarm Clock (Model 1882-0)
- Manual Arahan (dokumen ini)
- (Bateri biasanya tidak disertakan dan mesti dibeli secara berasingan)
Produk Selesaiview
Biasakan diri anda dengan komponen dan kawalan utama jam loceng anda.

Rajah 1: Depan View. This image displays the front of the Atlanta Digital LCD Radio Alarm Clock. The large LCD screen shows the current time (10:40), radio control signal indicator, DST indicator, alarm time (6:00), and temperature (24.6°C). Below the screen are three buttons: "TIME", "ALARM", and "+ / -". A red snooze/light button is visible on the top edge.
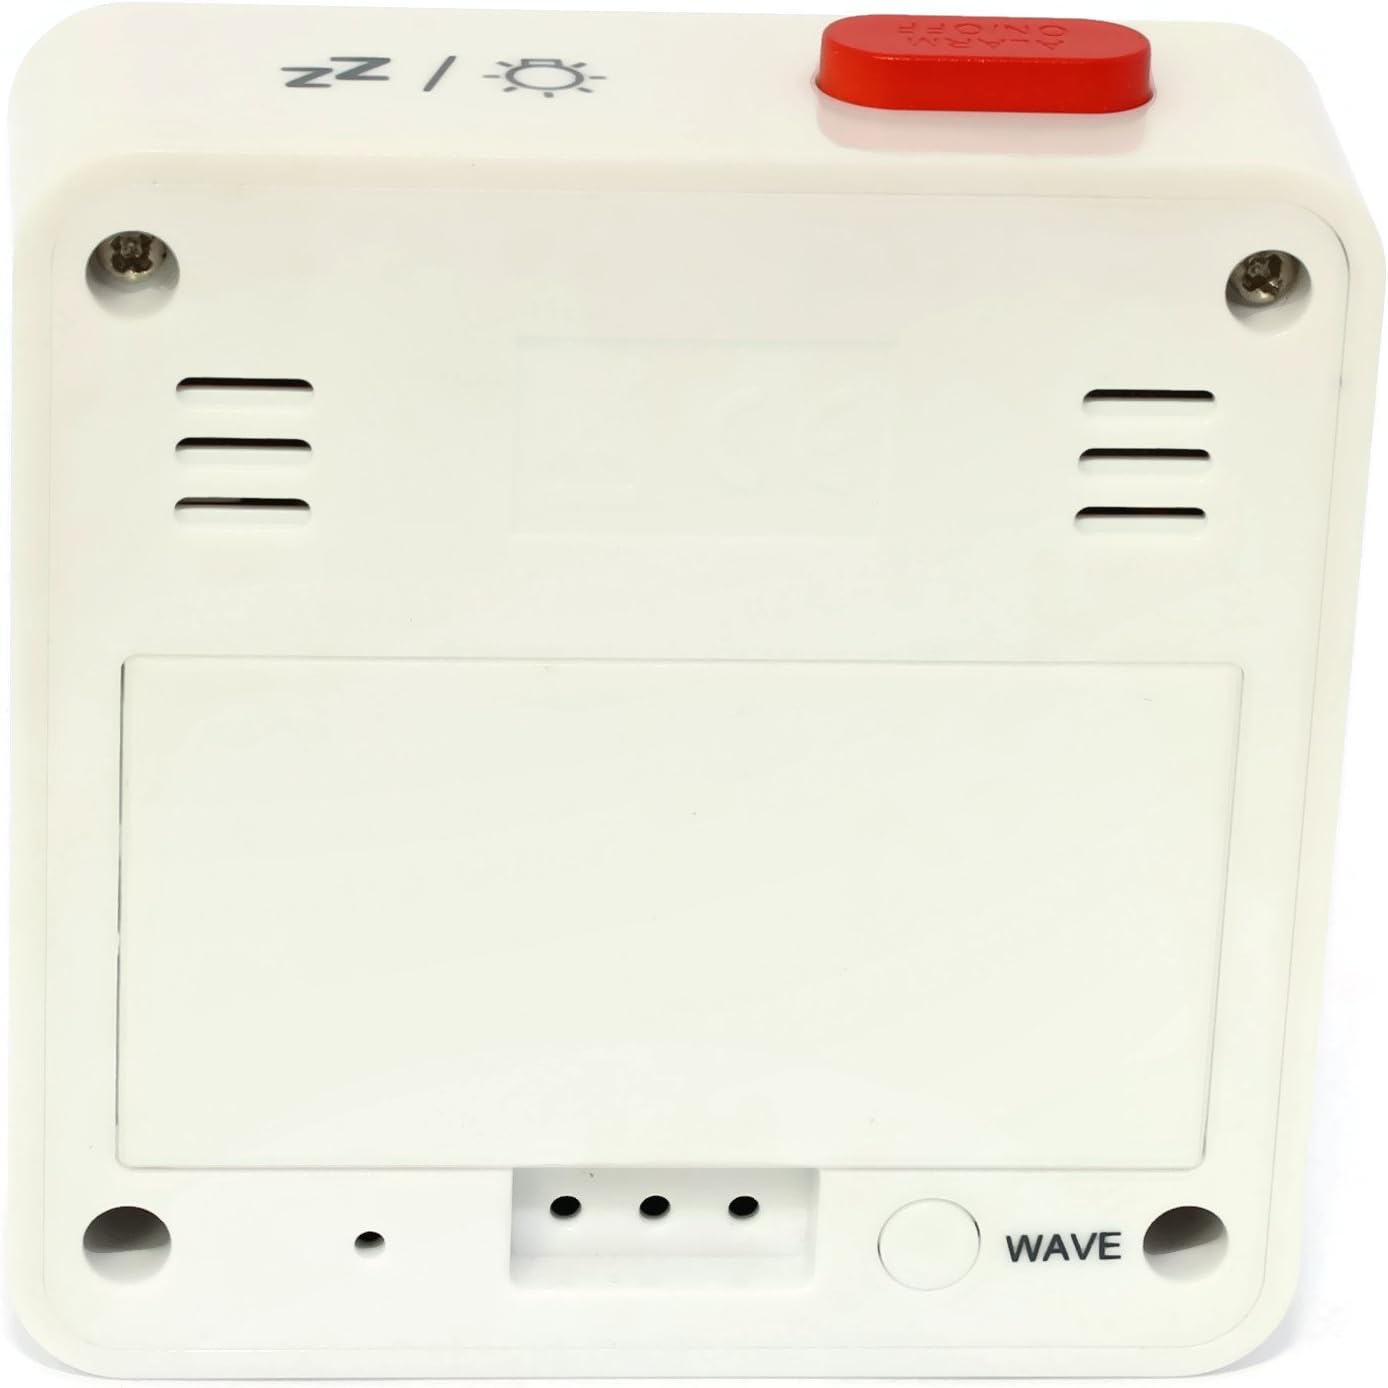
Rajah 2: Belakang View. This image shows the back of the Atlanta Digital LCD Radio Alarm Clock. The large rectangular cover for the battery compartment is prominent. Below it, a circular "WAVE" button is visible, used for manual radio signal reception. Ventilation slots are present on both sides of the upper back panel.
Controls and Display Elements:
- Paparan LCD: Shows time, alarm time, temperature, and radio control status.
- Butang MASA: Used to set the current time manually.
- Butang PENGGERA: Digunakan untuk menetapkan dan mengaktifkan/menyahaktifkan penggera.
- + / - Butang: Used to adjust values (time, alarm) and potentially toggle settings.
- SNOOZE / LIGHT Button (Top): Activates snooze function during an alarm; illuminates the display backlight.
- WAVE Button (Back): Initiates manual radio signal reception for time synchronization.
- Battery Compartment (Back): Memegang bateri yang diperlukan.
Persediaan
1. Pemasangan Bateri
- Open the battery compartment cover located on the back of the clock (refer to Figure 2).
- Insert the required batteries (e.g., 2x AAA, not included) according to the polarity markings (+ and -) inside the compartment.
- Tutup penutup petak bateri dengan selamat.
- The clock will power on and attempt to receive the radio-controlled time signal.
2. Penyegerakan Masa Permulaan (Kawalan Radio)
Upon battery insertion, the clock will automatically search for the radio time signal. This process may take several minutes. During this time, a signal icon (e.g., ((()))) akan berkelip pada paparan.
- For best reception, place the clock near a window and away from electronic devices that may cause interference.
- Once the signal is successfully received, the time will be set automatically, and the signal icon will appear solid.
- If the signal is not received after a few minutes, press the GELOMBANG button on the back of the clock to initiate a manual search.
3. Manual Time Setting (If Radio Control is Unavailable)
- Tekan dan tahan butang MASA button for approximately 3 seconds until the hour digits begin to flash.
- Gunakan + or - butang untuk melaraskan jam.
- Tekan ke MASA button again to confirm the hour and move to the minute setting.
- Gunakan + or - butang untuk melaraskan minit.
- Tekan ke MASA butang sekali lagi untuk mengesahkan dan keluar dari mod tetapan masa.
Arahan Operasi
1. Menetapkan Penggera
- Tekan dan tahan butang PENGGERA button for approximately 3 seconds until the alarm hour digits begin to flash.
- Gunakan + or - buttons to adjust the desired alarm hour.
- Tekan ke PENGGERA button again to confirm the hour and move to the alarm minute setting.
- Gunakan + or - buttons to adjust the desired alarm minutes.
- Tekan ke PENGGERA butang sekali lagi untuk mengesahkan dan keluar dari mod tetapan penggera.
2. Mengaktifkan/Menyahaktifkan Penggera
- Tekan sebentar PENGGERA button to toggle the alarm on or off.
- When the alarm is active, an alarm icon (e.g., a bell symbol) will appear on the display.
- Apabila penggera berbunyi, tekan SNOOZE / CAHAYA button on top to activate the snooze function. The alarm will sound again after a few minutes.
- Untuk mematikan penggera sepenuhnya, tekan sebarang butang lain (cth., MASA, PENGGERA, +, -) or let it sound for its full duration.
3. Fungsi Lampu Belakang
Tekan ke SNOOZE / CAHAYA button on the top of the clock to illuminate the display for a few seconds, allowing for easy viewdalam keadaan cahaya rendah.
4. Paparan Suhu
The clock continuously displays the ambient temperature. The unit of temperature (Celsius or Fahrenheit) may be switchable by a dedicated button or a combination of existing buttons (refer to specific model variations if applicable, otherwise it defaults to Celsius as shown in the image).
Penyelenggaraan
Pembersihan
- Wipe the clock's exterior with a soft, dry, lint-free cloth.
- Jangan gunakan pembersih cecair, semburan aerosol atau bahan yang melelas, kerana ini boleh merosakkan kemasan atau komponen dalaman.
Penggantian Bateri
- Apabila paparan menjadi malap atau jam berfungsi tidak menentu, sudah tiba masanya untuk menggantikan bateri.
- Ikuti langkah pemasangan bateri yang digariskan dalam bahagian "Persediaan".
- Ensure proper disposal of old batteries.
Menyelesaikan masalah
| Masalah | Kemungkinan Punca | Penyelesaian |
|---|---|---|
| Paparan kosong atau malap. | Bateri mati atau tidak dimasukkan dengan betul. | Gantikan bateri, pastikan polariti yang betul. |
| Masa tidak betul. | Poor radio signal reception or manual time not set. | Move the clock to a location with better reception (near a window). Press the GELOMBANG button for manual synchronization. If still incorrect, set the time manually. |
| Penggera tidak berbunyi. | Penggera tidak diaktifkan atau ditetapkan dengan tidak betul. | Ensure the alarm icon is visible on the display. Recheck alarm time settings. |
| Fungsi tunda tidak berfungsi. | Alarm was turned off instead of snoozed. | Pastikan anda menekan SNOOZE / CAHAYA button when the alarm sounds, not other buttons. |
Spesifikasi
- model: 1882-0
- Jenama: Atlanta
- warna: putih
- Bahan: plastik
- Jenis Paparan: LCD Digital
- Dimensi (L x W x H): 6.5 x 2.1 x 6.5 cm (kira-kira 2.56 x 0.83 x 2.56 inci)
- Berat: 65 gram (lebih kurang 2.29 auns)
- Sumber Kuasa: Battery powered (e.g., 2x AAA, not included)
- Ciri Khas: Temperature Display, Alarm, Radio-Controlled Time, Backlight, Snooze
- Penggunaan yang Dimaksudkan: Dalaman
Waranti dan Sokongan
Specific warranty information for your Atlanta product may vary by region and retailer. Please refer to the documentation provided at the time of purchase or visit the official Atlanta webtapak untuk terma dan syarat jaminan terperinci.
For technical support or inquiries, please contact your retailer or the manufacturer's customer service department. Contact information can typically be found on the product packaging or the official brand webtapak.
Note: Information regarding spare parts availability is not provided by the manufacturer.