1. Pengenalan
This manual provides detailed instructions for the installation, operation, and maintenance of your ASRock AB350M-HDV MicroATX Motherboard. The ASRock AB350M-HDV is designed to support AMD Socket AM4 A-Series APUs (Bristol Ridge) and Ryzen Series CPUs (Summit Ridge), featuring a Digi Power design and 7 Power Phase design for stable performance. It supports DDR4 memory and offers various connectivity options including SATA3, USB 3.0, and an Ultra M.2 slot.
2. Produk Lebihview
The ASRock AB350M-HDV motherboard is a MicroATX form factor board, ideal for compact PC builds. It features essential components for a modern computing system.

Rajah 2.1: Bersudut view of the ASRock AB350M-HDV Motherboard, showcasing its compact MicroATX design and various components.
Ciri-ciri Utama:
- Supports AMD Socket AM4 A-Series APUs (Bristol Ridge) and Ryzen Series CPUs (Summit Ridge).
- DDR4 memory support up to 3200+ (OC) for Ryzen CPUs and 2400 for A-series APUs.
- 1 PCIe 3.0 x16 slot and 1 PCIe 2.0 x1 slot for expansion cards.
- 4 SATA3 ports and 1 Ultra M.2 (PCIe Gen3 x4 & SATA3) slot for storage.
- 6 USB 3.0 ports (2 front, 4 rear) and 2 USB 2.0 ports for peripheral connectivity.
- Integrated Gigabit Ethernet for network connectivity.
- Video outputs: VGA, DVI, HDMI.

Rajah 2.2: Atas-bawah view of the ASRock AB350M-HDV Motherboard, highlighting the CPU socket, RAM slots, M.2 slot, and PCIe slots.
3. Persediaan dan Pemasangan
Follow these steps carefully to install your ASRock AB350M-HDV motherboard and its components.
3.1 Pemasangan CPU
- Cari soket CPU AM4 pada papan induk.
- Angkat tuil beban di sisi soket.
- Sejajarkan tanda segi tiga pada CPU dengan tanda yang sepadan pada soket. Letakkan CPU ke dalam soket dengan berhati-hati tanpa memaksanya.
- Turunkan tuil beban untuk memastikan CPU di tempatnya.
- Pasang penyejuk CPU mengikut arahan pengeluarnya.
3.2 RAM (Memory) Installation
- Locate the DDR4 DIMM slots. This motherboard has 4 slots.
- Buka klip di kedua-dua hujung slot DIMM.
- Jajarkan takuk pada modul RAM dengan kunci dalam slot DIMM.
- Insert the RAM module firmly into the slot until the clips snap into place. Ensure both clips are closed.
3.3 Storage Device Installation (SATA & M.2)
Pemacu SATA:
- Connect one end of a SATA data cable to a SATA3 port on the motherboard.
- Sambungkan hujung kabel data SATA yang satu lagi ke cakera keras atau SSD anda.
- Sambungkan kabel kuasa SATA daripada unit bekalan kuasa (PSU) anda ke peranti storan.
M.2 SSD:
- Locate the Ultra M.2 slot on the motherboard.
- Remove the M.2 screw and standoff from the slot.
- Masukkan SSD M.2 ke dalam slot pada sudut 30 darjah.
- Push the M.2 SSD down and secure it with the screw and standoff.
3.4 Sambungan Kuasa
- Connect the 24-pin ATX power connector from your PSU to the 24-pin power socket on the motherboard.
- Connect the 8-pin (or 4-pin) ATX 12V power connector from your PSU to the corresponding socket near the CPU.
3.5 Sambungan Panel Hadapan
Connect the cables from your PC case (Power Button, Reset Button, HDD LED, Power LED, USB, Audio) to the corresponding headers on the motherboard. Refer to the motherboard layout diagram in your physical manual for exact header locations.
3.6 Pemasangan Kad Grafik
- Cari slot PCIe 3.0 x16.
- Tanggalkan penutup slot pengembangan yang sepadan daripada bekas PC anda.
- Align the graphics card with the PCIe slot and press it down firmly until it clicks into place.
- Pasangkan kad grafik pada bekas dengan skru.
- Connect any required PCIe power cables from your PSU to the graphics card.
4. Arahan Operasi
4.1 But Pertama dan Persediaan BIOS/UEFI
- Selepas memasang semua komponen, sambungkan monitor, papan kekunci dan tetikus anda.
- Hidupkan sistem anda.
- Semasa permulaan, tekan berulang kali DEL or F2 kunci untuk memasuki utiliti persediaan BIOS/UEFI.
- In the BIOS, you can configure boot order, system time, and other advanced settings. Save changes and exit to boot into your operating system installation media.
4.2 Pemasangan Pemandu
After installing your operating system, install the necessary drivers for the motherboard components. These typically include chipset drivers, audio drivers, LAN drivers, and any specific utility drivers. Drivers can be found on the ASRock official webtapak untuk model papan induk khusus anda.
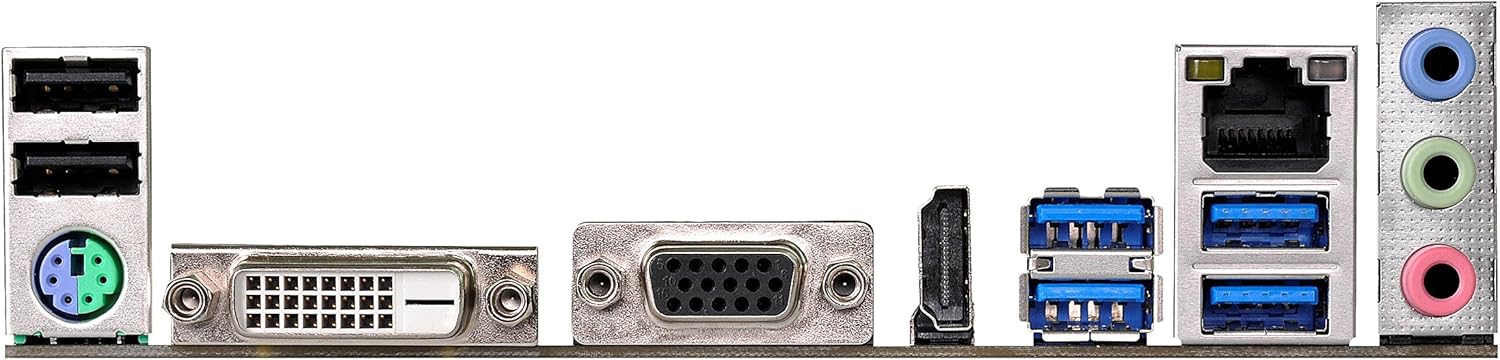
Figure 4.1: Rear I/O panel of the ASRock AB350M-HDV Motherboard, showing USB ports, video outputs (VGA, DVI, HDMI), LAN port, and audio jacks.
5. Penyelenggaraan
Penyelenggaraan yang betul memastikan jangka hayat dan prestasi optimum papan induk anda.
5.1 Pembersihan
- Bersihkan habuk dari papan induk dan komponen secara kerap menggunakan udara termampat.
- Pastikan sistem dimatikan dan dicabut plag sebelum dibersihkan.
- Elakkan menggunakan pembersih cecair terus pada komponen.
5.2 Kemas Kini BIOS/UEFI
Periksa ASRock secara berkala website for BIOS/UEFI updates. Updates can improve compatibility, stability, and performance. Follow the instructions provided by ASRock carefully when performing a BIOS update to avoid system damage.
6. Penyelesaian masalah
Bahagian ini menyediakan penyelesaian kepada isu biasa yang mungkin anda hadapi.
6.1 Tiada Kuasa / Tiada POST (Ujian Kendiri Hidup Kuasa)
- Semak Sambungan Kuasa: Ensure the 24-pin and 8-pin (or 4-pin) CPU power connectors are securely seated.
- Verify PSU: Test your power supply unit (PSU) to ensure it is functional and providing adequate power.
- Pasang semula Komponen: Remove and re-install the CPU, RAM, and graphics card to ensure they are properly seated.
- Kosongkan CMOS: Refer to your physical manual for instructions on how to clear the CMOS (Complementary Metal-Oxide-Semiconductor) settings, which can resolve boot issues.
6.2 Tiada Output Paparan
- Sambungan Monitor: Ensure your monitor is correctly connected to the graphics card or motherboard (if using an APU with integrated graphics).
- Kad Grafik: If using a dedicated graphics card, ensure it is properly installed and has sufficient power. Test with another graphics card if possible.
- APU Compatibility: If using an AMD A-Series APU, ensure your monitor is connected to the motherboard's video outputs (VGA, DVI, HDMI). Ryzen CPUs without integrated graphics require a dedicated graphics card.
6.3 Sistem Pengoperasian Tidak Boleh Dibut
- Pesanan But: Check the BIOS/UEFI settings to ensure the correct boot device (e.g., SSD/HDD with OS) is prioritized.
- Peranti Storan: Verify that your storage device is detected in the BIOS.
- OS Installation: If the OS is newly installed, ensure the installation process completed successfully.
7. Spesifikasi
| Jenama | ASRock |
| Nama Model | AB350M-HDV |
| Soket CPU | Soket AM4 |
| Jenis Chipset | AMD Promontory B350 |
| Pemproses yang Serasi | AMD A-Series APUs (Bristol Ridge), Ryzen Series CPUs (Summit Ridge) |
| Teknologi Memori RAM | DDR4 |
| Kelajuan Jam Memori | 2133 MHz (Base), up to 3200+ (OC) for Ryzen CPU |
| Slot Memori Tersedia | 4 |
| Antara Muka Kad Grafik | PCI Express (1x PCIe 3.0 x16, 1x PCIe 2.0 x1) |
| Total SATA Ports | 4 (SATA3) |
| Slot M.2 | 1 (Ultra M.2, PCIe Gen3 x4 & SATA3) |
| Jumlah Port USB | 8 (6x USB 3.0, 2x USB 2.0) |
| Output Video | VGA, DVI, HDMI |
| Jenis Penyambung Kuasa Utama | 24-Pin ATX |
| Faktor Bentuk | MicroATX |
| Berat Barang | 1.3 paun |
8. Maklumat Waranti
The ASRock AB350M-HDV Motherboard comes with a Waranti 1 Tahun. For specific terms and conditions, please refer to the warranty card included with your product or visit the official ASRock webtapak.
9. Sokongan
For further assistance, technical support, or driver downloads, please visit the official ASRock webtapak:
You can also find contact information for customer service and support resources on their webtapak.