
1. Pengenalan
Thank you for choosing the OSD Audio PRE-1 High Definition Preamplifier. This unit is designed to enhance your audio experience by providing versatile source selection and precise audio control. The PRE-1 acts as a central hub for various audio components, including turntables, CD/DVD players, and tape decks, delivering a clean and powerful signal to your main amplebih hidup.
This manual provides detailed instructions for the proper setup, operation, and maintenance of your PRE-1 preamplifier. Please read this manual thoroughly before operating the unit to ensure optimal performance and longevity.
2. Maklumat Keselamatan Penting
- Sumber Kuasa: Connect the unit only to the type of power source indicated on the marking label.
- Pengudaraan: Ensure adequate ventilation. Do not block any ventilation openings. Install in accordance with the manufacturer’s instructions.
- Air dan Kelembapan: Jangan gunakan peralatan ini berhampiran air atau dedahkannya kepada titisan atau percikan.
- haba: Jangan pasang berhampiran mana-mana sumber haba seperti radiator, daftar haba, dapur, atau radas lain (termasuk amppenghidup) yang menghasilkan haba.
- Pembersihan: Bersihkan hanya dengan kain kering.
- Servis: Jangan cuba servis produk ini sendiri. Rujuk semua perkhidmatan kepada pegawai perkhidmatan yang berkelayakan.
- Pembumian: Unit ini mesti dibumikan dengan betul.
3. Kandungan Pakej
Sila pastikan item berikut disertakan dalam pakej anda:
- OSD Audio PRE-1 High Definition Preamplebih hidup
- Kabel Kuasa
- Manual Pengguna (dokumen ini)
4. Produk Lebihview
4.1. Panel hadapan
The front panel provides access to all primary controls and a microphone input for convenient use.

This image displays the front panel of the OSD Audio PRE-1 Preamplifier, including its physical dimensions for installation planning.

A terperinci view of the left side of the PRE-1's front panel, highlighting the Microphone Level, Bass, Midrange, and Treble adjustment knobs.

A terperinci view of the right side of the PRE-1's front panel, showing the Loudness, Balance, and Volume controls, along with input selection and function buttons.
- Butang Kuasa: Menghidupkan atau mematikan unit.
- Input Mik: Bicu 1/4 inci untuk menyambungkan mikrofon.
- Tahap Mik: Melaraskan kelantangan input mikrofon.
- Kawalan Bes: Melaraskan output frekuensi rendah.
- Kawalan Tengah: Adjusts the mid-range frequency output.
- Kawalan Treble: Melaraskan output frekuensi tinggi.
- Kekerasan: Engages or disengages a loudness contour for enhanced bass and treble at low volumes.
- Baki: Melaraskan keseimbangan saluran kiri/kanan.
- Kelantangan: Master volume control for all outputs.
- Pilihan Input: Rotary knob to choose between Phono, AUX1, AUX2, and CD/DVD inputs.
- Tape Button: Activates the Tape Monitor loop.
- Butang Mono: Combines stereo signals into a monaural output.
- Penapis Rendah: Engages a low-frequency cut-off filter.
- Redam: Silences all audio output.
4.2. Panel belakang
The rear panel houses all the necessary input and output connections for your audio system.
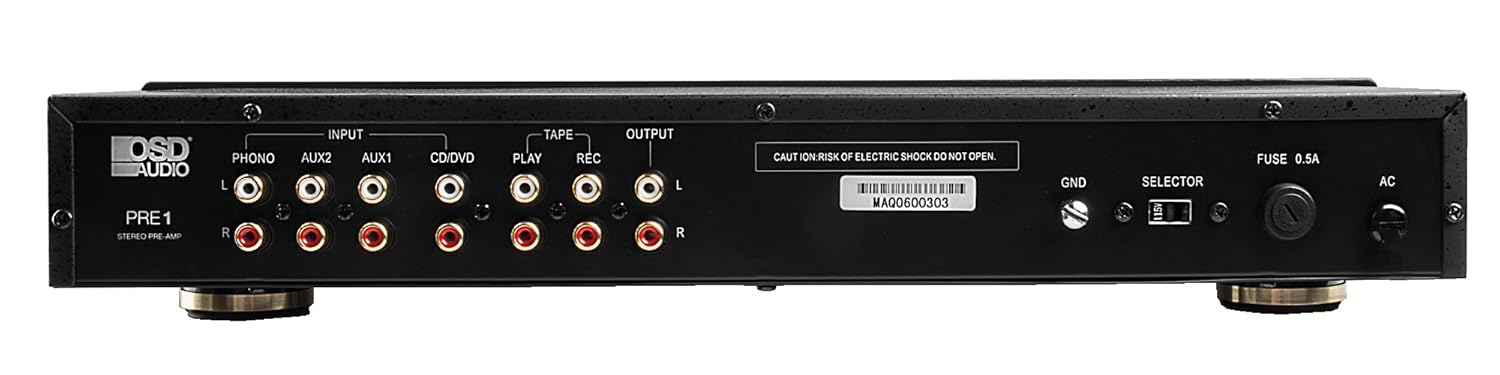
The rear panel of the PRE-1 Preamplifier, showing all input and output connections for various audio devices.
- Phono Input (L/R): RCA inputs for connecting a turntable. Includes a ground terminal.
- AUX1 Input (L/R): RCA inputs for general auxiliary devices.
- AUX2 Input (L/R): RCA inputs for a second auxiliary device.
- CD/DVD Input (L/R): RCA inputs for CD or DVD players.
- Tape Play (L/R): RCA inputs for the playback output of a tape deck or other recording device.
- Tape Rec (L/R): RCA outputs for connecting to the recording input of a tape deck or other recording device.
- Output (L/R): RCA outputs to connect to your main power amplebih hidup.
- Ground Terminal (GND): Connects to the ground wire of your turntable to reduce hum.
- Suis Pemilih: For internal configuration (typically left in default position unless specified).
- Fius: Replace only with the specified fuse type and rating.
- Input Kuasa AC: Connects to the supplied power cable.
5. Persediaan dan Sambungan
Follow these steps to properly set up your OSD Audio PRE-1 Preamplebih hidup:
- penempatan: Place the PRE-1 on a stable, flat surface, ensuring adequate ventilation around the unit. Avoid placing it near heat sources or in direct sunlight.
- Matikan: Ensure all audio components, including the PRE-1 and your main amplifier, are turned off before making any connections.
- Sambungkan Sumber:
- Meja Putar: Connect the RCA cables from your turntable to the Phono Input (L/R) on the PRE-1. Connect the turntable's ground wire to the GND terminal on the PRE-1.
- Pemain CD/DVD: Connect the RCA cables from your CD/DVD player to the CD/DVD Input (L/R).
- Other Devices (e.g., Streamer, Tuner): Connect RCA cables from these devices to the AUX1 Input (L/R) or AUX2 Input (L/R).
- Tape Deck: Connect the playback outputs of your tape deck to the Tape Play (L/R) inputs. Connect the recording inputs of your tape deck to the Tape Rec (L/R) keluaran.
- Sambung ke Amplebih hidup: Sambungkan Output (L/R) RCA jacks on the PRE-1 to the input jacks of your main power amplebih hidup.
- Sambungan Kuasa: Sambungkan kabel kuasa yang dibekalkan ke Input Kuasa AC on the rear panel of the PRE-1, then plug it into a suitable wall outlet.
- Kuasa Awal Hidup: Turn on your main power amplifier first, then turn on the PRE-1. When powering off, turn off the PRE-1 first, then your main amplebih hidup.
6. Arahan Operasi
Once your PRE-1 is connected, follow these steps for basic operation:
- Pilih Input: Gunakan Pilih Input rotary knob on the front panel to choose the desired audio source (Phono, AUX1, AUX2, CD/DVD).
- Laraskan Kelantangan: Mulakan dengan Kelantangan knob at its minimum setting. Begin playing your selected audio source and slowly increase the volume to a comfortable listening level.
- Kawalan Nada: Gunakan Bass, Pertengahan, dan Treble knobs to adjust the tonal characteristics of your audio. Turn clockwise to increase, counter-clockwise to decrease.
- Kawalan Baki: Laraskan Baki knob to fine-tune the left and right channel output for optimal stereo imaging.
- Kekerasan: Tekan ke Kelantangan button to activate a contour that boosts bass and treble frequencies, which can be beneficial at lower listening volumes. Press again to deactivate.
- Penapis Rendah: Tekan ke Penapis Rendah button to engage a filter that reduces very low frequencies. This can help eliminate rumble from turntables or other unwanted low-frequency noise. Press again to deactivate.
- Mono: Tekan ke Mono button to combine the left and right stereo channels into a single monaural signal. This is useful for playing mono recordings. Press again for stereo.
- Redam: Tekan ke bisu button to instantly silence the audio output. Press again to restore sound.
- Penggunaan Mikrofon: Plug a microphone into the Input Mic. Adjust the microphone's volume using the Tahap Mik tombol.
- Tape Monitoring/Recording: If you have a tape deck connected, select the appropriate input for playback. To record, ensure your tape deck is set to record and the PRE-1 is passing the desired source through the Tape Rec outputs.
7. Penyelenggaraan
Proper care and maintenance will ensure the longevity and optimal performance of your PRE-1 Preamplebih hidup.
- Pembersihan: Use a soft, dry cloth to clean the exterior of the unit. Do not use liquid cleaners, aerosols, or harsh chemicals, as they may damage the finish or internal components.
- Pengudaraan: Periksa secara berkala bahawa bukaan pengudaraan bebas daripada habuk dan halangan.
- Sambungan: Occasionally check all cable connections to ensure they are secure. Loose connections can lead to signal loss or interference.
- Storan: Jika menyimpan unit ini untuk tempoh yang lama, cabut plagnya dari soket kuasa dan simpan di tempat yang sejuk dan kering, jauh daripada cahaya matahari langsung dan suhu yang melampau.
8. Penyelesaian masalah
If you experience issues with your OSD Audio PRE-1, refer to the following common problems and solutions:
| Masalah | Kemungkinan Punca | Penyelesaian |
|---|---|---|
| Tiada kuasa | Power cable not connected; Power outlet not active; Blown fuse | Ensure power cable is securely connected. Test the outlet with another device. Check and replace the fuse if necessary (refer to specifications for fuse type). |
| Tiada keluaran bunyi | Incorrect input selected; Volume too low; Mute engaged; Loose audio cables; Main amplifier off or incorrect input selected | Select the correct input source. Increase the volume. Disengage Mute. Check all RCA cable connections. Ensure your main amplifier is on and set to the correct input. |
| Bunyi herot | Volume too high (clipping); Incorrect tone control settings; Faulty cables | Reduce the volume. Adjust Bass, Mid, and Treble controls to neutral or desired settings. Try replacing audio cables. |
| Bunyi dengung atau berdengung | Ground loop; Loose ground wire (Phono); Interference from other electronics | Ensure turntable ground wire is connected to the PRE-1's GND terminal. Try moving the PRE-1 or other audio components away from power cables or other electronic devices. Use a ground loop isolator if necessary. |
| Mikrofon tidak berfungsi | Mic not connected; Mic Level too low; Faulty microphone | Ensure microphone is securely plugged into the Mic Input. Increase the Mic Level. Test with another microphone if available. |
9. Spesifikasi
Below are the technical specifications for the OSD Audio PRE-1 Preamplebih hidup:
| Ciri | Spesifikasi |
|---|---|
| Model | PRA-1 |
| Jenama | Audio OSD |
| Bilangan Saluran | 2 |
| Jenis Pemasangan | Lekapan Permukaan |
| UPC | 819603012446 |
| ASIN | B01MPYJLPX |
| Pengeluar | Audio OSD |
10. Waranti dan Sokongan
OSD Audio products are designed for reliability and performance. For specific warranty details and terms, please refer to the warranty card included with your product or visit the official OSD Audio website. If you require technical assistance or have questions not covered in this manual, please contact OSD Audio customer support.
OSD Audio Customer Support: Please visit the OSD Audio webtapak untuk maklumat hubungan dan sumber sokongan.