pengenalan
This manual provides detailed instructions for the installation, configuration, and maintenance of your Biostar TB85 Motherboard. The Biostar TB85 is designed to support Intel LGA 1150 processors and DDR3 memory, offering a stable and efficient platform for various computing needs. Please read this manual thoroughly before proceeding with installation to ensure proper setup and operation.
Persediaan
Proper installation is crucial for the stable operation of your motherboard. Follow these steps carefully.
1. Susun Atur Papan Induk
Biasakan diri anda dengan pelbagai komponen dan penyambung pada papan induk.

Figure 1: Biostar TB85 Motherboard Overview. This image displays the top-down view of the motherboard, highlighting the LGA 1150 CPU socket, four DDR3 RAM slots, multiple PCI Express slots, SATA ports, and various headers for front panel connections and USB ports.
2. CPU Installation (LGA 1150)
- Cari soket CPU LGA 1150 pada papan induk.
- Tekan tuil beban ke bawah dengan lembut dan tarik ke sisi untuk membuka penutup soket CPU.
- Carefully align the CPU with the socket, ensuring the gold triangle on the CPU matches the triangle on the socket. Do not force the CPU into the socket.
- Lower the CPU into the socket.
- Tutup penutup soket dan tolak tuil beban kembali ke kedudukan terkunci.
- Sapukan tampal haba pada CPU dan pasangkan penyejuk CPU mengikut arahan pengeluarnya.
3. Pemasangan RAM (DDR3)
- Locate the DDR3 memory slots. The Biostar TB85 has four DDR3 DIMM slots.
- Buka klip di kedua-dua hujung slot memori.
- Jajarkan modul memori dengan slot, pastikan takuk pada modul sepadan dengan kunci dalam slot.
- Tekan ke bawah dengan kuat pada kedua-dua hujung modul memori sehingga klip terpasang pada tempatnya.
4. Pemasangan Papan Induk
- Install standoffs in your PC case that align with the screw holes on the ATX motherboard.
- Letakkan papan induk ke dalam bekas dengan berhati-hati, selaraskan lubang skru dengan pegangan.
- Selamatkan papan induk dengan skru. Jangan terlalu ketat.
5. Sambungan Bekalan Kuasa
- Connect the 24-pin ATX power connector from your power supply to the corresponding port on the motherboard.
- Sambungkan penyambung kuasa CPU ATX 12V 8-pin (atau 4-pin) ke port berhampiran soket CPU.
6. Storage and Peripherals
- Connect SATA data cables from your storage devices (HDDs, SSDs) to the SATA 3 ports on the motherboard.
- Connect the front panel connectors (power button, reset button, HDD LED, power LED) to the appropriate headers on the motherboard. Refer to the motherboard diagram for exact pinouts.
- Sambungkan pengepala panel hadapan USB 2.0 dan USB 3.0 jika bekas anda menyokongnya.
- Install any PCI Express expansion cards (e.g., graphics card) into the available slots and secure them.
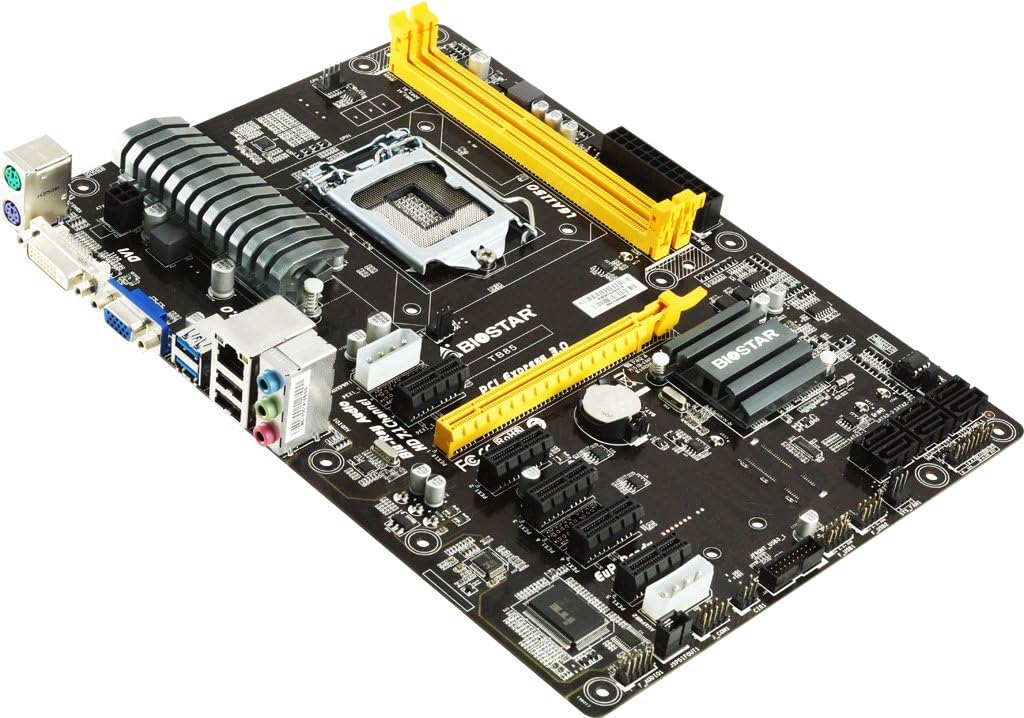
Figure 2: Biostar TB85 Motherboard Angled View. This image provides an angled perspective of the motherboard, showcasing the rear I/O panel with USB, audio, and video ports, as well as the CPU socket and the arrangement of PCI Express slots.
Beroperasi
Once all components are installed, you can proceed with initial power-on and operating system setup.
1. But Pertama
- Pastikan semua sambungan selamat.
- Sambungkan monitor, papan kekunci dan tetikus anda.
- Power on your system. The system should perform a Power-On Self-Test (POST).
- If the system boots successfully, you will see the BIOS/UEFI splash screen or a prompt to enter setup.
2. Persediaan BIOS/UEFI
To access the BIOS/UEFI setup utility, press the DEL key during the POST process. In the BIOS/UEFI, you can configure various system settings, including boot order, CPU settings, memory timings, and peripheral options.
3. Pemasangan Sistem Pengendalian
Insert your operating system installation media (USB drive or DVD) and set the boot order in the BIOS/UEFI to prioritize the installation media. Follow the on-screen prompts to install your preferred operating system (e.g., Windows 7, Windows 8).
Penyelenggaraan
Penyelenggaraan tetap membantu memastikan jangka hayat dan prestasi optimum papan induk anda.
1. Pembersihan
- Bersihkan habuk dari papan induk dan komponen secara berkala menggunakan udara termampat. Pastikan sistem dimatikan dan dicabut plag sebelum dibersihkan.
- Elakkan menggunakan pembersih cecair terus pada komponen.
2. Kemas Kini BIOS
Check the Biostar official website for the latest BIOS updates. BIOS updates can improve system stability, add support for new hardware, or fix known issues. Follow the update instructions provided by Biostar carefully to avoid damaging the motherboard.
3. Pemeriksaan Komponen
Occasionally inspect cables and connections to ensure they are secure. Check for any signs of physical damage or overheating on components.
Menyelesaikan masalah
Bahagian ini menyediakan penyelesaian kepada isu biasa yang mungkin anda hadapi.
1. Tiada Kuasa / Tiada But
- Verify that the power supply is connected correctly to the motherboard (24-pin ATX and 8-pin/4-pin CPU power).
- Pastikan kabel butang kuasa daripada bekas disambungkan dengan betul ke pengepala panel hadapan papan induk.
- Uji bekalan kuasa dengan sistem lain atau penguji bekalan kuasa.
2. Tiada Output Paparan
- Ensure the monitor is connected to the correct video output (either integrated graphics or a dedicated graphics card).
- Letakkan semula kad grafik dan modul memori.
- Cuba boot dengan hanya satu RAM yang dipasang.
3. System Beep Codes
If your system emits a series of beeps during startup, these are POST (Power-On Self-Test) error codes. Consult the Biostar website or a general BIOS beep code reference for the specific meaning of the sequence. Common issues indicated by beep codes include memory errors, graphics card issues, or CPU problems.
4. Clearing CMOS
If you encounter boot issues or incorrect BIOS settings, you can clear the CMOS (Complementary Metal-Oxide-Semiconductor) to reset BIOS settings to default. To do this:
- Power off the system and unplug the power cord.
- Locate the CLR_CMOS jumper on the motherboard (refer to the motherboard diagram).
- Move the jumper from pins 1-2 to 2-3 for 5-10 seconds, then move it back to 1-2.
- Alternatively, remove the CMOS battery for 1-2 minutes and then reinsert it.
- Reconnect the power cord and power on the system.
Spesifikasi
Key technical specifications for the Biostar TB85 Motherboard:
| Ciri | Spesifikasi |
|---|---|
| Jenama | Biostar |
| Nombor Model | TB85 |
| Soket CPU | LGA 1150 |
| Pemproses yang Serasi | Intel Core i7, i5, i3, Pentium (LGA 1150) |
| Jenis Chipset | Intel B85 |
| Teknologi Memori RAM | DDR3 |
| Kelajuan Jam Memori | 1600 MHz / 1333 MHz / 1066 MHz |
| Slot Memori Tersedia | 4 |
| Antara Muka Kad Grafik | PCI Express |
| Standard Bas Sistem Disokong | SATA 3 |
| Jumlah Port USB | 6 (including USB 2.0) |
| Platform | Windows 7, Windows 8 |
Waranti dan Sokongan
For warranty information and technical support, please refer to the official Biostar website or contact your local dealer. Keep your proof of purchase for warranty claims. The Biostar website typically provides drivers, BIOS updates, and additional support resources.
Official Biostar Webtapak: www.biostar.com.tw