
1. Produk Lebihview
The deleyCON Universal Projector Ceiling Mount (Model MK-W-53) provides a secure and adjustable solution for mounting your projector to the ceiling. Designed for versatility, it accommodates most standard projectors with a hole spacing between 210 mm and 330 mm. This mount offers optimal positioning with adjustable height, tilt, and 360° swivel capabilities, supporting projectors up to 13.5 kg (30 lbs).
Ciri-ciri utama termasuk:
- Adjustable height from 380 mm to 580 mm.
- Tilt adjustment of ±15°.
- Full 360° rotation (swivel).
- Maximum load capacity of 13.5 kg (30 lbs).
- Integrated cable management system.
- Universal compatibility for projectors with mounting hole distances between 210 mm and 330 mm.
2. Maklumat Keselamatan
Please read and understand all instructions before installation and use. Improper installation can lead to equipment damage or personal injury.
- Had Berat: Jangan melebihi kapasiti beban maksimum 13.5 kg (30 lbs).
- Struktur Siling: Ensure the ceiling structure can safely support the combined weight of the mount and the projector. If unsure, consult a qualified professional.
- Alatan: Gunakan alat yang sesuai untuk pemasangan.
- Pengikat: Use only the provided fasteners or suitable alternatives for your specific ceiling type.
- Pengurusan Kabel: Route cables carefully to prevent pinching or damage.
- Pemeriksaan biasa: Periksa semua skru dan sambungan secara berkala untuk memastikan ia kekal kukuh.
- Kanak-kanak: Jauhkan kanak-kanak dari kawasan pemasangan.
3. Kandungan Pakej
Sahkan bahawa semua komponen hadir sebelum memulakan pemasangan.

Imej: All components included with the deleyCON Universal Projector Ceiling Mount. This includes the main mount assembly, various screws, washers, anchors, and an Allen key for installation.
- 1x deleyCON Projector Ceiling Mount (Model MK-W-53)
- Mounting hardware for ceiling attachment (screws, anchors)
- Projector attachment screws (4x M3x8, 4x M4x10, 4x M5x10, 4x M6x10)
- Washers and spacers
- kunci Allen
- Illustrated user manual
Important: Please check which screw size your projector requires for attachment before proceeding with installation.
4. Persediaan dan Pemasangan
Follow these steps for secure installation of your projector mount.
4.1. Attaching the Ceiling Plate
- Select a suitable location on your ceiling, ensuring it can support the weight.
- Use the ceiling plate as a template to mark the drilling points.
- Drill pilot holes according to the marked points and insert appropriate anchors (if necessary for your ceiling type).
- Securely attach the ceiling plate to the ceiling using the provided screws.

Imej: The ceiling plate of the projector mount securely fastened to a ceiling surface.
4.2. Assembling the Mount Arm
The mount arm consists of an adjustable pole. Connect the pole to the ceiling plate and the projector attachment plate.

Imej: The deleyCON projector mount fully assembled, demonstrating the adjustable arm and projector attachment plate.
4.3. Memasang Projektor
- Identify the mounting holes on your projector.
- Select the appropriate screws (M3, M4, M5, or M6) from the provided hardware that fit your projector's mounting holes.
- Attach the projector attachment arms to your projector using the selected screws. Ensure the arms are evenly spaced and secure. The mount supports hole distances between 210 mm and 330 mm.
- Carefully lift the projector with the attached arms and connect it to the main mount assembly. Secure all connections firmly.

Imej: A terperinci view of the projector attachment plate, highlighting the adjustable arms and the maximum weight capacity of 13.5 kg (30 lbs).

Imej: A projector securely attached to the deleyCON ceiling mount, ready for use.
5. Adjustments and Operation
The deleyCON projector mount offers multiple adjustment options for optimal viewing.
5.1. Pelarasan Ketinggian
The mount's height can be adjusted between 380 mm and 580 mm. Loosen the locking mechanism on the telescopic pole, adjust to the desired height, and then firmly re-tighten the mechanism.
5.2. Penyesuaian Tilt
The projector can be tilted ±15° to achieve the perfect vertical angle. Loosen the tilt adjustment screws, set the desired angle, and then re-tighten the screws to secure the position.
5.3. Swivel (Rotation) Adjustment
The projector can be rotated 360° horizontally. Loosen the swivel locking mechanism, rotate the projector to the desired horizontal orientation, and then re-tighten the mechanism.
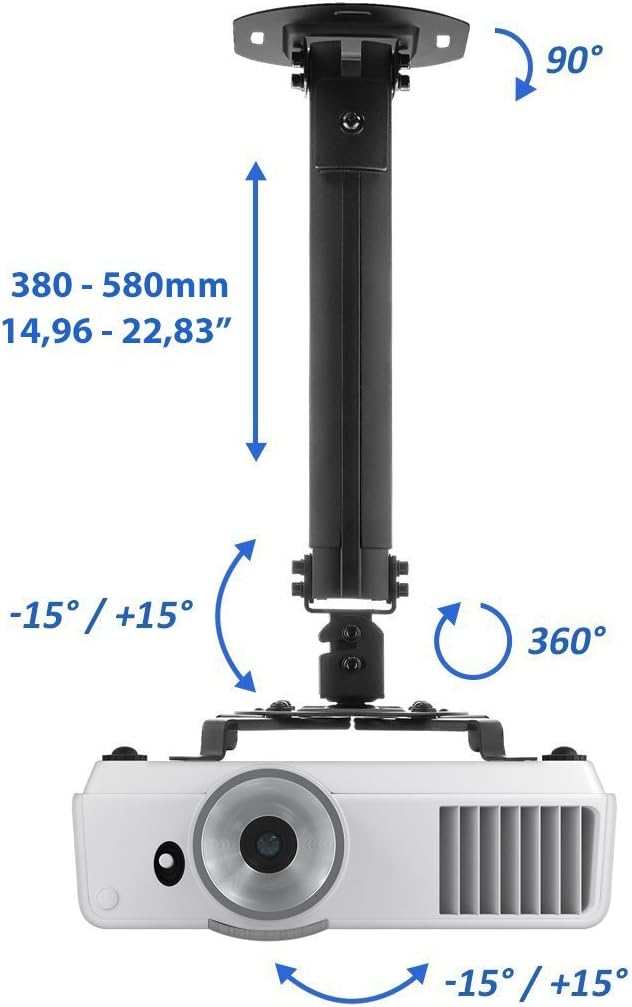
Imej: A diagram illustrating the adjustable features of the mount: height range (380-580mm), tilt angle (±15°), and 360° swivel rotation.
5.4. Pengurusan Kabel
Utilize the integrated cable management system within the mount arm to route your projector's power and video cables neatly, ensuring a clean installation and preventing cable damage.
6. Penyelenggaraan
To ensure the longevity and safe operation of your deleyCON projector mount, follow these maintenance guidelines:
- Pembersihan: Lap pelekap dengan kain lembut dan kering. Elakkan pembersih atau pelarut yang kasar.
- Pemeriksaan Pengikat: Periodically (e.g., every 6 months) check all mounting screws and connections to ensure they are tight and secure.
- Had Berat: Do not add additional weight or accessories that would exceed the 13.5 kg (30 lbs) weight limit.
- Pemeriksaan Kerosakan: Inspect the mount for any signs of wear, damage, or corrosion. If any damage is found, discontinue use and contact customer support.
7. Penyelesaian masalah
If you encounter issues with your projector mount, refer to the following common problems and solutions:
- Gunung berasa tidak stabil:
- Ensure all ceiling mounting screws are securely tightened.
- Verify that the ceiling structure is adequate for the weight.
- Check all connections between the mount components and the projector.
- Projector is not level:
- Adjust the tilt mechanism (±15°) to correct the vertical angle.
- Adjust the swivel mechanism (360°) for horizontal alignment.
- Cannot adjust height/tilt/swivel:
- Ensure the corresponding locking mechanisms or screws are sufficiently loosened before attempting adjustment.
- Do not force adjustments; if resistance is met, re-check the locking mechanisms.
- Projector attachment screws do not fit:
- The package includes various screw sizes (M3, M4, M5, M6). Ensure you are using the correct size for your projector. Refer to your projector's manual.
- If none fit, you may need to acquire specific screws for your projector (not included).
If the problem persists, please contact deleyCON customer support.
8. Spesifikasi Produk
| Nombor Model: | MK-W-53 |
| Jenama: | deleyCON |
| warna: | Hitam |
| Jenis Gunung: | Pemasangan Siling |
| Kapasiti Berat: | Sehingga 13.5 kg (30 lbs) |
| Pelarasan Ketinggian: | 380 mm - 580 mm (14.96" - 22.83") |
| Sudut Kecondongan: | ±15° |
| Putaran Pusing: | 360° |
| Projector Hole Spacing: | 210 mm - 330 mm (8.27" - 12.99") |
| Berat produk: | 1.13 kg |
| Dimensi Pakej: | 34 x 15 x 9 cm |
| Ciri Khas: | Adjustable, Integrated Cable Management |
9. Waranti dan Sokongan
For warranty information or technical support, please refer to the official deleyCON webtapak atau hubungi perkhidmatan pelanggan mereka secara langsung. Simpan resit pembelian anda untuk tuntutan waranti.
Contact information (example, please refer to actual product documentation for current details):
- Webtapak: www.deleycon.com
- e-mel: info@deleycon.com