
pengenalan
The UNI-T UT151C is a high-reliability handheld digital multimeter designed for precise electrical measurements. It functions as a multimeter, LCR meter, and temperature tester, capable of measuring DC/AC voltage, DC/AC current, resistance, capacitance, and temperature. This manual provides essential information for the safe and effective operation, setup, and maintenance of your UT151C device.
Maklumat Keselamatan
Amaran: To avoid electric shock or personal injury, read all safety information before using this product. Use the product only as specified in this manual, or the protection provided by the product may be impaired.
- Always ensure the test leads are in good condition and properly connected.
- Jangan gunakan lebih daripada vol yang dinilaitage, seperti yang ditandakan pada meter, antara terminal atau antara mana-mana terminal dan tanah bumi.
- Berhati-hati apabila bekerja dengan voltagadalah melebihi 30V AC RMS, puncak 42V atau 60V DC. Ini voltagia menimbulkan bahaya kejutan.
- Sebelum mengukur arus, pastikan litar dinyahtenagakan dan meter disambung secara bersiri.
- Sebelum menukar fungsi, putuskan sambungan petunjuk ujian daripada litar yang sedang diuji.
- Do not operate the meter with the case open or if the battery cover is not securely closed.
- Gantikan bateri sebaik sahaja penunjuk bateri lemah muncul untuk memastikan bacaan yang tepat.
Produk Selesaiview
Familiarize yourself with the components of your UNI-T UT151C Digital Multimeter.
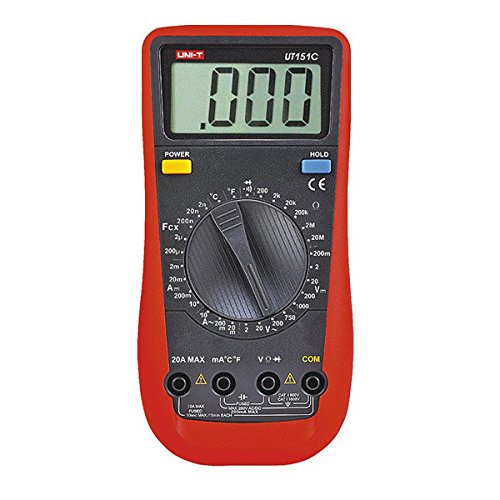
Rajah 1: Depan view of the UNI-T UT151C Digital Multimeter. This image displays the LCD screen, the central rotary function switch, and the input terminals at the bottom. The 'HOLD' button is visible on the right side of the display.
- Paparan LCD: Menunjukkan bacaan ukuran, unit dan penunjuk fungsi.
- Suis Putar Fungsi: Used to select the desired measurement function (e.g., V~, V-, A~, A-, Ω, F, °C/°F, Diode, Continuity).
- Bicu Input: Terminals for connecting test leads. Typically include COM (common), VΩmA (voltage, resistance, small current), and 20A (high current).
- Butang TAHAN: Membekukan bacaan semasa pada paparan.
- Butang Kuasa: Menghidupkan atau mematikan peranti.
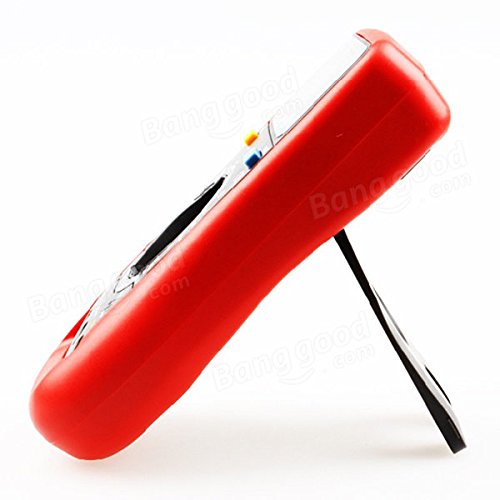
Rajah 2: sebelah view of the UNI-T UT151C Digital Multimeter. This image highlights the integrated kickstand, allowing the meter to be propped up for easier viewing semasa penggunaan.
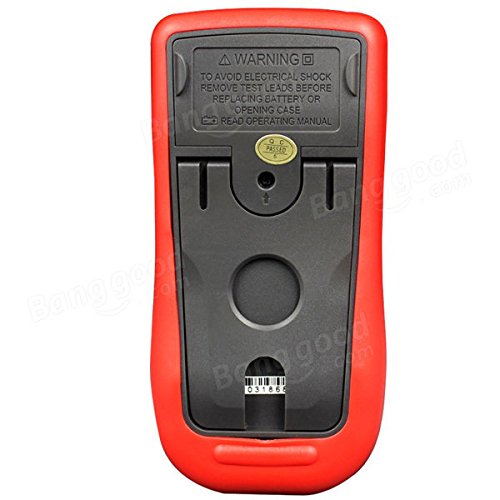
Rajah 3: belakang view of the UNI-T UT151C Digital Multimeter. This image shows the battery compartment cover and important safety warnings regarding electrical shock and battery replacement.
Persediaan
1. Pemasangan Bateri
The UNI-T UT151C requires a 9V (6F22) battery for operation. The battery is not included.
- Ensure the multimeter is powered off and disconnect any test leads.
- Cari petak bateri di bahagian belakang meter (rujuk Rajah 3).
- Tanggalkan skru penahan dan tanggalkan penutup bateri.
- Connect a new 9V battery to the battery clips, observing correct polarity.
- Letakkan bateri ke dalam petak dan gantikan penutup, selamatkannya dengan skru.
Nota: Replace the battery immediately when the low battery indicator appears on the display to maintain measurement accuracy.
2. Menghubungkan Petunjuk Ujian
Sentiasa sambungkan petunjuk ujian hitam ke COM (common) jack. Connect the red test lead to the appropriate input jack based on the measurement type:
- Untuk voltage, resistance, capacitance, diode, continuity, and temperature measurements, connect the red lead to the VΩmA jek.
- For current measurements up to 200mA, connect the red lead to the VΩmA jek.
- For current measurements up to 20A, connect the red lead to the 20A jek.
Awas: Incorrect lead connection can damage the meter or the circuit under test.
Arahan Operasi
Follow these steps for various measurement functions.
1. Hidupkan/Mati Kuasa
Tekan ke KUASA button to turn the multimeter on. The meter features an auto power-off function to conserve battery life. To turn it off manually, press the KUASA butang lagi.
2. Mengukur DC Voltage (V-)
- Sambungkan petunjuk hitam ke COM dan petunjuk merah ke VΩmA.
- Set the rotary switch to the desired V- range (e.g., 2V, 20V, 200V, 1000V). If the voltage is unknown, start with the highest range and decrease as needed.
- Sambungkan wayar ujian secara selari merentasi komponen atau litar yang hendak diukur.
- Baca voltagnilai e pada paparan LCD.
3. Mengukur Vol ACtage (V~)
- Sambungkan petunjuk hitam ke COM dan petunjuk merah ke VΩmA.
- Set the rotary switch to the desired V~ range (e.g., 2V, 20V, 200V, 750V).
- Connect the test leads in parallel across the AC source or component.
- Baca voltagnilai e pada paparan LCD.
4. Measuring DC Current (A-)
- Awas: Always connect the meter in series with the circuit. Never connect it in parallel across a voltagsumber e apabila mengukur arus.
- Putuskan sambungan kuasa ke litar.
- Pecahkan litar pada titik di mana arus hendak diukur.
- For currents up to 200mA, connect the black lead to COM dan petunjuk merah ke VΩmA.
- For currents up to 20A, connect the black lead to COM dan petunjuk merah ke 20A.
- Tetapkan suis putar kepada yang sesuai A- julat.
- Connect the test leads to complete the circuit.
- Apply power to the circuit and read the DC current value.
5. Measuring AC Current (A~)
- Follow the same safety precautions and connection steps as for DC Current measurement.
- Tetapkan suis putar kepada yang sesuai A~ julat.
- Apply power to the circuit and read the AC current value.
6. Mengukur Rintangan (Ω)
- Ensure the circuit or component is completely de-energized before measuring resistance.
- Sambungkan petunjuk hitam ke COM dan petunjuk merah ke VΩmA.
- Tetapkan suis putar ke Ω julat.
- Sambungkan petunjuk ujian merentasi komponen.
- Baca nilai rintangan pada paparan.
7. Measuring Capacitance (F)
- Pastikan kapasitor dinyahcas sepenuhnya sebelum pengukuran untuk mengelakkan kerosakan pada meter.
- Sambungkan petunjuk hitam ke COM dan petunjuk merah ke VΩmA.
- Tetapkan suis putar ke F (Capacitance) range.
- Sambungkan petunjuk ujian merentasi terminal kapasitor.
- Baca nilai kapasitans pada paparan.
8. Measuring Temperature (°C/°F)
- Connect the temperature probe (if included and compatible) to the COM dan VΩmA bicu, memerhati kekutuban.
- Tetapkan suis putar ke °C or °F kedudukan.
- Letakkan hujung probe suhu pada atau berhampiran objek yang suhunya hendak diukur.
- Baca nilai suhu pada paparan.
9. Ujian Diod
- Pastikan diod dicabut dari litar.
- Sambungkan petunjuk hitam ke COM dan petunjuk merah ke VΩmA.
- Tetapkan suis putar ke Diod simbol.
- Sambungkan wayar merah ke anod dan wayar hitam ke katod diod. Voltan hadapantagPenurunan e (contohnya, 0.5V hingga 0.8V untuk diod silikon) akan dipaparkan.
- Balikkan petunjuk. Paparan harus menunjukkan "OL" (Gelung Terbuka) untuk diod yang baik.
10. Ujian Kesinambungan
- Pastikan litar atau komponen dinyahtenagakan.
- Sambungkan petunjuk hitam ke COM dan petunjuk merah ke VΩmA.
- Tetapkan suis putar ke Kesinambungan symbol (often shared with Diode test).
- Sambungkan petunjuk ujian merentasi komponen atau laluan litar.
- If there is continuity (low resistance), the buzzer will sound, and a low resistance value will be displayed. "OL" indicates an open circuit.
11. Fungsi Pegangan Data
Tekan ke TAHAN button to freeze the current reading on the display. Press it again to release the hold and resume live measurements.
Penyelenggaraan
Penyelenggaraan yang betul memastikan jangka hayat dan ketepatan multimeter anda.
- Pembersihan: Lap kes dengan iklanamp kain dan bahan pencuci ringan. Jangan gunakan pelelas atau pelarut.
- Penggantian Bateri: Replace the 9V battery when the low battery indicator appears. Refer to the "Battery Installation" section for instructions.
- Penggantian fius: If the current measurement function fails, the fuse may need replacement. This typically requires opening the back case. Refer to the safety warnings on the back of the meter (Figure 3) and consult a qualified technician if unsure. Use only fuses of the specified type and rating.
- Storan: If the meter is not used for an extended period, remove the battery to prevent leakage. Store the meter in a cool, dry place, away from direct sunlight and extreme temperatures.
Menyelesaikan masalah
If you encounter issues with your UNI-T UT151C, refer to the following common problems and solutions:
| Masalah | Kemungkinan Punca | Penyelesaian |
|---|---|---|
| Tiada paparan atau paparan samar | Bateri mati atau lemah | Ganti bateri 9V. |
| "OL" (Lebihan) dipaparkan | Measurement exceeds selected range or open circuit | Select a higher range or check for an open circuit in the component/leads. |
| Bacaan yang salah | Incorrect function selected, poor lead connection, or low battery | Verify function selection, ensure leads are securely connected, or replace battery. |
| Pengukuran arus tidak berfungsi | Fius ditiup | Gantikan fius (rujuk bahagian Penyelenggaraan). |
Spesifikasi
Technical specifications for the UNI-T UT151C Digital Multimeter.
| Ciri | Spesifikasi |
|---|---|
| Model | UT151C (Internal Model: 365BG1060568) |
| DC Voltage (V) | 200mV/2V/20V/200V/1000V; ±(0.5%+1) |
| Vol. ACtage (V) | 2V/20V/200V/750V; ±(0.8%+3) |
| Arus DC (A) | 2mA/20mA/200mA/20A; ±(0.8%+1) |
| AC Semasa (A) | 20mA/200mA/20A; ±(1%+3) |
| Rintangan (Ω) | 200Ω/2KΩ/20KΩ/200KΩ/2MΩ/20MΩ; ±(1%+2) |
| Kapasitansi (F) | 2nF/20nF/200nF/2µF/100µF; ±(4%+3) |
| Suhu (°C) | -40°C ~ 1000°C; ±(1%+3) |
| Suhu (°F) | -40°F ~ 1832°F; ±(1%+4) |
| Kiraan Paparan | 1999 |
| Julat Manual | ya |
| Ujian Diod | ya |
| Auto Matikan | ya |
| Buzzer kesinambungan | ya |
| Petunjuk Bateri Rendah | ya |
| Pegangan Data | ya |
| Input Impedance for DC Voltage | ≥10MΩ |
| Bekalan Kuasa | 9V (6F22) Battery (not included) |
| Saiz LCD | 63mm x 29mm |
| Warna Produk | Red and Gray |
| Berat Bersih Produk | 300g |
Waranti dan Sokongan
Maklumat mengenai jaminan produk dan sokongan pelanggan biasanya diberikan bersama dokumentasi pembelian anda atau pada dokumen rasmi pengilang website. Please refer to those resources for specific details.