1. Maklumat Keselamatan
Please read this manual carefully before using the device to ensure proper operation and to prevent damage. Keep this manual for future reference.
- Jangan dedahkan peranti kepada suhu yang melampau, cahaya matahari langsung untuk tempoh yang lama atau kelembapan yang tinggi.
- Ensure the device is securely mounted and does not obstruct the driver's view atau mengganggu kawalan kenderaan.
- Use only the provided power adapter to prevent damage to the device and vehicle electrical system.
- Jangan cuba membuka atau membaiki peranti sendiri. Hubungi kakitangan perkhidmatan yang berkelayakan untuk mendapatkan bantuan.
- Insert and remove the microSD card only when the device is powered off to prevent data corruption.
2. Kandungan Pakej
Sahkan bahawa semua item terdapat dalam pakej:
- FOREVER VR-110 Dash Camera
- Mount Piala Sedutan
- Pengecas Kereta (penyesuai kuasa USB)
- Kabel USB
- Manual Pengguna
3. Produk Lebihview
Familiarize yourself with the components of your VR-110 dash camera.
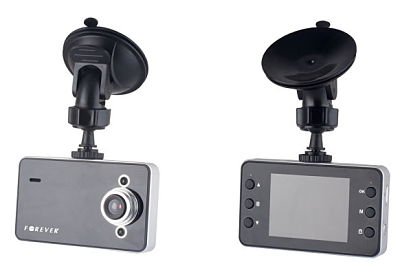
Rajah 3.1: Depan view of the FOREVER VR-110 Dash Camera attached to its suction cup mount. The camera features a screen on the front face and control buttons on the sides.
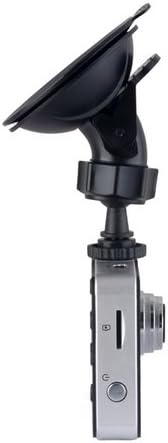
Rajah 3.2: sebelah view of the FOREVER VR-110 Dash Camera, showing the microSD card slot and the power button. The lens is visible on the opposite side.
3.1. Reka Letak Peranti
- Kanta: Rakam video footage.
- 2.4" Display Screen: Shows live view, recorded videos, and menu options.
- Butang Kawalan: Navigate menus, start/stop recording, and access functions. (Specific button functions will be detailed in the Operating section).
- Slot Kad MicroSD: For inserting the memory card (up to 32GB, not included).
- Port USB: Untuk bekalan kuasa dan pemindahan data.
- Titik Pemasangan: Connects to the suction cup mount.
4. Persediaan
4.1. Memasukkan Kad MicroSD
- Pastikan kamera papan pemuka dimatikan.
- Locate the microSD card slot on the side of the device (refer to Figure 3.2).
- Gently insert the microSD card with the gold contacts facing the back of the camera until it clicks into place.
- Untuk mengeluarkan, tolak kad masuk sedikit sehingga ia keluar.
Nota: A Class 10 or higher microSD card (up to 32GB) is recommended for reliable recording. Format the card in the camera's settings before first use.
4.2. Memasang Kamera Papan Pemuka
- Bersihkan bahagian yang dikehendaki pada cermin depan anda dengan teliti.
- Attach the suction cup mount to the dash camera's mounting point.
- Tekan cawan sedutan dengan kuat pada cermin depan dan putarkan tuil untuk memastikannya kukuh.
- Laraskan sudut kamera untuk memastikan gambar yang jelas view of the road ahead, without obstructing your driving visibility.

Rajah 4.1: The FOREVER VR-110 Dash Camera mounted on a car windshield, showing its position relative to the dashboard and road view.
4.3. Mengkuasakan Peranti
- Connect the car charger to the USB port on the dash camera.
- Pasangkan hujung pengecas kereta yang satu lagi ke soket kuasa 12V kenderaan anda (soket pemetik api).
- The camera will typically power on automatically when the vehicle's ignition is turned on and begin recording.
5. Operating the Dash Camera
5.1. Rakaman Asas
Once powered on, the VR-110 will automatically start recording. A red indicator or icon on the screen will confirm recording is active.
- Mula/Hentikan Rakaman: Press the designated button (usually 'OK' or a record icon) to manually start or stop recording if auto-record is off.
- Rakaman Gelung: The camera records video in segments (e.g., 1, 3, or 5 minutes). When the memory card is full, the oldest unlocked files are overwritten. This ensures continuous recording.
5.2. Fungsi Sensor-G
The built-in G-sensor detects sudden impacts or rapid acceleration/deceleration. When triggered, it automatically locks the current video segment, preventing it from being overwritten by loop recording. This protects important footage sekiranya berlaku kemalangan.
- Pelarasan Sensitiviti: The G-sensor sensitivity can usually be adjusted in the camera's settings menu (e.g., Low, Medium, High, Off). A higher sensitivity will trigger the lock function more easily.
5.3. Navigasi Menu
Use the control buttons on the device to navigate through the settings menu.
- Butang Menu: Tekan untuk masuk ke menu utama.
- Butang Naik / Turun: Tatal melalui pilihan menu.
- Butang OK: Pilih pilihan atau sahkan tetapan.
- Butang Mod: Switch between video recording, photo mode, and playback mode.
5.4. Video Resolution Settings
The VR-110 supports the following video resolutions:
- 1280 x 720 (HD): Provides higher detail.
- 640 x 480: Standard definition, uses less storage space.
You can select your preferred resolution in the camera's video settings menu.
6. Penyelenggaraan
6.1. Membersihkan Peranti
- Gunakan kain lembut dan kering untuk membersihkan badan dan skrin kamera.
- Untuk kanta, gunakan kain pembersih kanta khusus untuk mengelakkan calar.
- Jangan gunakan pembersih cecair atau bahan yang melelas.
6.2. Pengurusan Kad MicroSD
- Pemformatan: It is recommended to format the microSD card regularly (e.g., once a month) using the camera's format function to ensure optimal performance and prevent data corruption. Formatting will erase all data on the card.
- Storan: If not using the camera for an extended period, remove the microSD card and store it safely.
7. Penyelesaian masalah
If you encounter issues with your VR-110 dash camera, refer to the following common problems and solutions:
| Masalah | Kemungkinan Punca | Penyelesaian |
|---|---|---|
| Kamera tidak dihidupkan. | Tiada bekalan kuasa; pengecas kereta yang rosak; sambungan longgar. | Check car charger connection; ensure vehicle's 12V outlet is working; try a different USB cable/charger. |
| Camera stops recording or shows 'Card Error'. | MicroSD card full; card not formatted; faulty card; slow card speed. | Format the microSD card; replace with a new Class 10 or higher card; check for physical damage to the card. |
| Video footage is blurry. | Protective film on lens; dirty lens; incorrect focus (rare). | Keluarkan sebarang filem pelindung daripada kanta; bersihkan kanta dengan kain lembut. |
| G-sensor terlalu sensitif/tidak cukup sensitif. | G-sensor sensitivity setting is inappropriate. | Adjust G-sensor sensitivity in the camera's settings menu. |
8. Spesifikasi
- Nama Model: VR-110
- Saiz Paparan: 2.4 inci
- Resolusi Video: 1280 x 720 (HD), 640 x 480 / 30 fps
- File Format: AVI (Video), JPEG (Photo)
- Ciri Khas: G-sensor, Loop Recording
- Slot Kad Memori: MicroSD (sehingga 32GB, Kelas 10 disyorkan)
- Ketersambungan: USB
- Jenis Pemasangan: Mount Piala Sedutan
- warna: Kelabu
9. Waranti dan Sokongan
Untuk maklumat jaminan dan sokongan teknikal, sila rujuk dokumentasi yang disediakan semasa pembelian atau hubungi peruncit anda. Simpan bukti pembelian anda untuk sebarang tuntutan jaminan.