
1. Pengenalan
This manual provides detailed instructions for the safe and effective installation, operation, and maintenance of your new Optical Laser Head. This component is a precision part designed for specific AIWA audio systems, including models NSX-AV80, NSX-SZ10, NSX-F9, and NSX-SZ6. Proper installation is crucial for optimal performance.
2. Langkah-langkah Keselamatan
Always observe the following safety guidelines to prevent injury or damage to the equipment:
- Pemutusan Kuasa: Always disconnect the audio system from the main power supply before beginning any installation or maintenance.
- Elektrik Statik: Pakai tali pergelangan tangan anti-statik atau kerap sentuh objek logam yang dibumikan untuk melepaskan elektrik statik, yang boleh merosakkan komponen elektronik sensitif.
- Tangani dengan Berhati-hati: The laser head is a delicate optical component. Avoid touching the lens directly. Hold the unit by its edges.
- Pemasangan Profesional: If you are not comfortable with electronic repairs, seek assistance from a qualified technician.
3. Pemasangan (Persediaan)
Follow these steps carefully to install the new optical laser head:
- Sediakan Sistem: Ensure the AIWA audio system is unplugged and powered off. Remove the outer casing to access the CD player mechanism.
- Locate the Old Laser Head: Identify the existing optical laser head within the CD mechanism. Note its connections and mounting points.
- Putuskan sambungan dan Keluarkan: Carefully disconnect the ribbon cable and any other connectors attached to the old laser head. Unscrew or unclip the old unit from its mounting rails.
- Install New Laser Head: Position the new optical laser head into the mechanism. Ensure it aligns correctly with the guide rails. Secure it using the original screws or clips.
- Sambungkan Kabel: Reconnect the ribbon cable and any other necessary connectors to the new laser head. Ensure the ribbon cable is inserted correctly and securely.
- Remove Anti-Static Solder Point (Crucial Step): Many new optical laser heads come with a protective solder shorting point on the flexible PCB to prevent static damage during shipping. This point MUST be desoldered and removed before operation. Failure to do so will prevent the laser head from functioning. Refer to the image below for a typical location of this solder point.
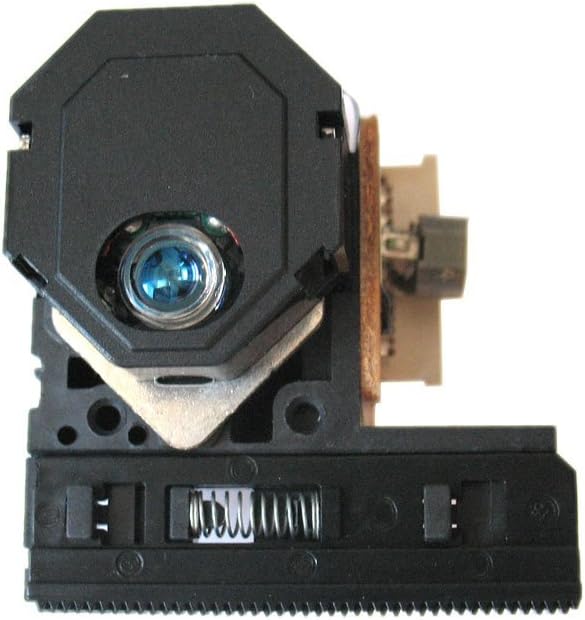
Figure 1: Typical Optical Laser Head. The protective solder point is often a small blob of solder connecting two pads on the flexible circuit board, usually near the ribbon cable connector or the main lens assembly.
- Reassemble System: Carefully reassemble the outer casing of the audio system.
4. Function Verification
Selepas pemasangan, lakukan pemeriksaan berikut:
- Hidupkan kuasa: Plug in the audio system and power it on.
- Sisipkan CD: Insert an audio CD into the tray.
- Playback Test: Attempt to play the CD. The system should recognize the disc and begin playback without skipping or errors.
- Navigasi Trek: Test skipping tracks and fast-forward/rewind functions to ensure smooth operation.
5. Penyelenggaraan
To ensure the longevity and optimal performance of your optical laser head:
- Jaga kebersihan: Avoid dust accumulation inside the CD mechanism. Use compressed air periodically to gently clear dust, ensuring the system is unplugged.
- Pembersihan Kanta: If playback issues arise due to a dirty lens, use a specialized CD lens cleaner disc or a soft, lint-free cloth with a small amount of isopropyl alcohol. Jangan sekali-kali menyentuh kanta dengan jari anda.
- Handle Discs Carefully: Use clean, scratch-free CDs. Scratched or dirty discs can cause the laser head to work harder, reducing its lifespan.
6. Penyelesaian masalah
| Masalah | Kemungkinan Punca | Penyelesaian |
|---|---|---|
| CD not recognized / No sound | Protective solder point not removed. Ribbon cable loose or incorrectly connected. Defective laser head. | Verify the solder point has been removed. Recheck all cable connections. If issues persist, the laser head may be faulty. |
| Skipping / Intermittent playback | Dirty lens. Scratched CD. Laser head misaligned or worn. | Clean the laser lens. Try a different, known-good CD. Check for proper alignment during installation. |
| Tray opens but CD doesn't spin | Motor issue (not laser head). Laser head not signaling disc presence. | Ensure the laser head is fully seated and connected. This might indicate a broader issue with the CD mechanism. |
7. Spesifikasi
- Jenis Produk: Optical Laser Head
- Keserasian: AIWA NSX-AV80, NSX-SZ10, NSX-F9, NSX-SZ6
- Komponen: CD Player Replacement Part
- Pengeluar: Generik
- ASIN: B01FGDMAC6
8. Waranti dan Sokongan
This optical laser head is a replacement component. For specific warranty information, please refer to the terms provided by your original seller at the time of purchase. For technical support regarding installation or troubleshooting beyond this guide, it is recommended to consult with a qualified electronics repair technician or the vendor from whom the part was purchased.
Note: Improper installation, including failure to remove the anti-static solder point, may void any applicable warranty.