
1. Pengenalan
This manual provides essential information for the safe and efficient operation of your KitchenAid 5KMT223GER 2-Slot Automatic Toaster. Please read all instructions carefully before first use and retain for future reference.

Imej 1.1: Depan view of the KitchenAid 5KMT223GER 2-Slot Automatic Toaster.
2. Arahan Keselamatan Penting
Apabila menggunakan peralatan elektrik, langkah berjaga-jaga keselamatan asas hendaklah sentiasa dipatuhi, termasuk yang berikut:
- Baca semua arahan.
- Jangan sentuh permukaan panas. Gunakan pemegang atau tombol.
- Untuk melindungi daripada kejutan elektrik, jangan rendam kord, palam atau pembakar roti di dalam air atau cecair lain.
- Pengawasan rapi diperlukan apabila sebarang perkakas digunakan oleh atau berhampiran kanak-kanak.
- Cabut plag dari soket apabila tidak digunakan dan sebelum membersihkan. Biarkan sejuk sebelum memakai atau menanggalkan bahagian.
- Jangan kendalikan sebarang perkakas dengan kord atau palam yang rosak, atau selepas perkakas tidak berfungsi atau terjatuh atau rosak dalam apa jua cara. Kembalikan perkakas ke kemudahan servis sah terdekat untuk pemeriksaan, pembaikan atau pelarasan.
- Penggunaan lampiran aksesori yang tidak disyorkan oleh pengilang perkakas boleh menyebabkan kecederaan.
- Jangan gunakan di luar rumah.
- Jangan biarkan kord tergantung di tepi meja atau kaunter, atau menyentuh permukaan panas.
- Jangan letakkan pada atau berhampiran gas panas atau penunu elektrik, atau dalam ketuhar yang dipanaskan.
- Untuk memutuskan sambungan, matikan mana-mana kawalan kepada "mati", kemudian tanggalkan palam daripada alur keluar dinding.
- Jangan gunakan perkakas untuk kegunaan selain daripada yang dimaksudkan.
- Makanan bersaiz besar, bungkusan kerajang logam atau perkakas tidak boleh dimasukkan ke dalam pembakar roti kerana ia mungkin melibatkan risiko kebakaran atau kejutan elektrik.
- Kebakaran mungkin berlaku jika pembakar roti ditutup atau menyentuh bahan mudah terbakar, termasuk langsir, langsir, dinding dan seumpamanya, semasa beroperasi.
- Jangan cuba menanggalkan makanan apabila pembakar roti dipasang.
- Jangan beroperasi tanpa pengawasan.
- Always remove the crumb tray for cleaning. Do not operate the toaster without the crumb tray in place.
3. Bahagian dan Ciri
Familiarize yourself with the components of your KitchenAid 2-Slot Automatic Toaster:
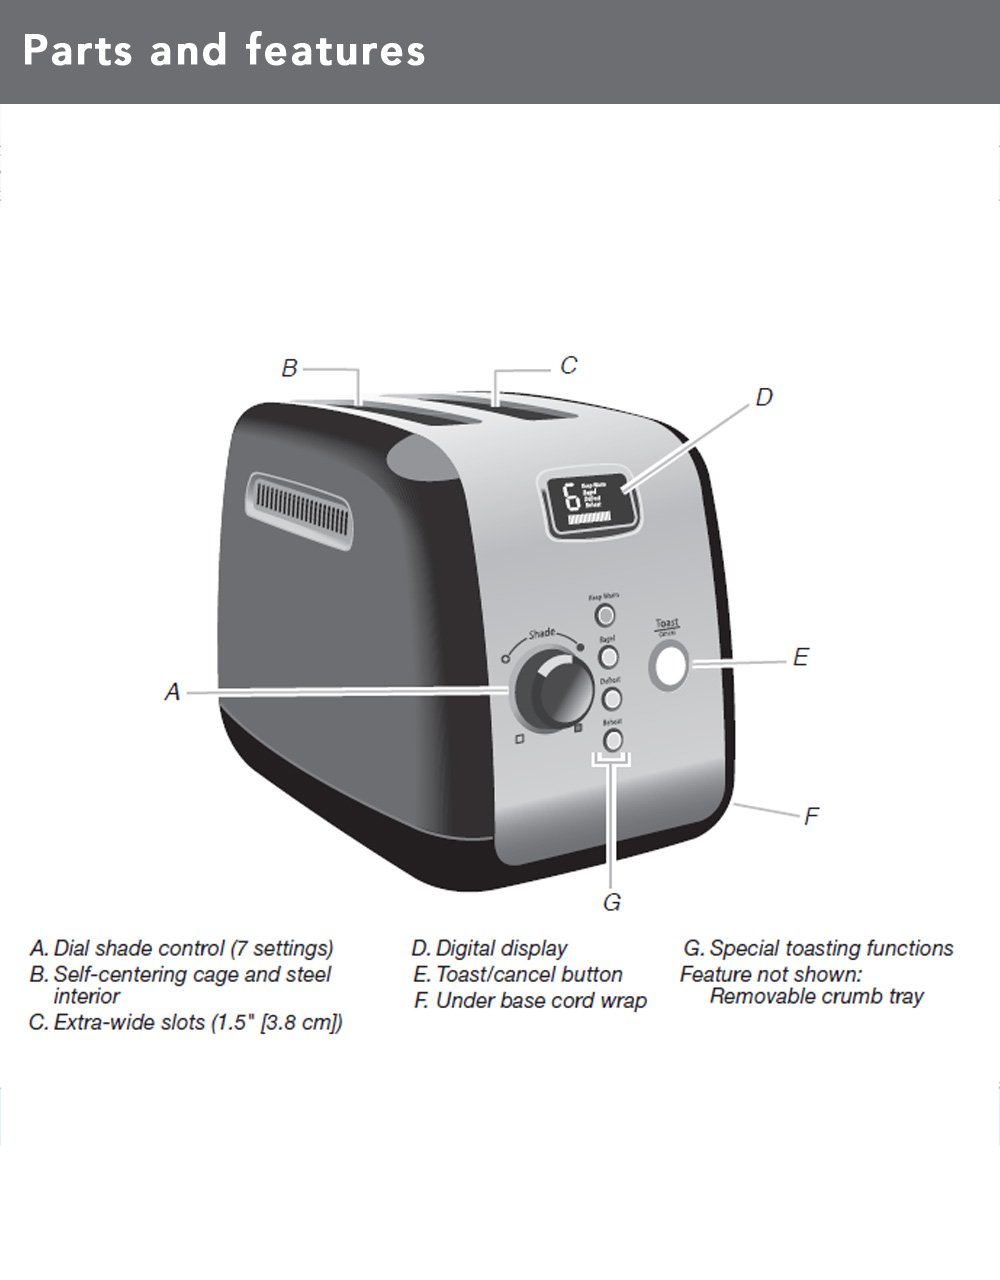
Image 3.1: Diagram illustrating the main parts and features of the toaster.
- Shade Control Dial (A): Adjusts the browning level with 7 settings.
- Self-Centering Bread Racks (B): Automatically centers bread for even toasting.
- Extra-Wide Slots (C): 3.8 cm (1.5 inches) wide slots accommodate various bread types.
- Digital Display (D): Shows selected shade setting and a countdown timer for toasting progress.
- Toast/Cancel Button (E): Initiates or cancels the toasting cycle. Features motorized lift.
- Under Base Cord Wrap (F): For convenient cord storage.
- Special Toasting Functions (G): Includes Keep Warm, Bagel, Defrost, and Reheat buttons.
- Dulang Serbuk boleh tanggal: Located at the back for easy cleaning (not shown in diagram).
4. Persediaan
Before using your toaster for the first time:
- Buka bungkusan pembakar dan keluarkan semua bahan pembungkusan.
- Lap bahagian luar pembakar roti dengan iklanamp cloth. Ensure it is completely dry before plugging in.
- Place the toaster on a stable, flat, heat-resistant surface, away from flammable materials.
- Ensure the crumb tray is properly inserted at the back of the toaster.
- For the first use, operate the toaster without bread on the highest shade setting (7) to burn off any manufacturing residues. A slight odor or smoke may be present; this is normal. Allow the toaster to cool completely.
5. Arahan Operasi
Follow these steps to toast bread and use the special functions:

Image 5.1: Bread slices inserted into the toaster's extra-wide slots.
5.1 Pembakaran Asas
- Palamkan pembakar roti ke dalam salur keluar elektrik yang dibumikan.
- Place bread slices into the toasting slots. The self-centering racks will automatically adjust.
- Pusingkan Dail Kawalan Lorek to select your desired browning level (1 for lightest, 7 for darkest). The digital display will show the selected shade.
- Tekan ke Toast/Cancel Button. The motorized lift will lower the bread into the slots, and the toasting cycle will begin. The digital display will show a countdown.
- Once the cycle is complete, the toaster will automatically raise the toasted bread.
- Untuk menghentikan kitaran pembakar pada bila-bila masa, tekan Toast/Cancel Button. The bread will be raised.
5.2 Fungsi Khas
Your toaster includes dedicated buttons for specialized toasting needs:
- SELALU HANGAT: Press this button after a toasting cycle to keep toasted food warm for up to one minute. The toaster will gently lower and raise the bread after the warming period.
- BAGEL: This function toasts the cut-side of a bagel while gently warming the outer surfaces. Insert bagels with the cut side facing inwards. Select your desired shade, then press the BAGEL butang diikuti oleh Toast/Cancel Button.
- DEFROSS: Use this function to defrost and toast frozen food. Select your desired shade, then press the DEFROSS butang diikuti oleh Toast/Cancel Button. The toaster will automatically adjust the toasting time.
- PANASKAN: This function quickly reheats previously toasted food without further browning. Press the PANASKAN butang diikuti oleh Toast/Cancel Button.
6. Pembersihan dan Penyelenggaraan
Pembersihan tetap memastikan prestasi optimum dan memanjangkan hayat pembakar roti anda.
6.1 Dulang Kerak

Image 6.1: The removable crumb tray for easy cleaning.
- Sentiasa cabut plag pembakar roti dan biarkan ia sejuk sepenuhnya sebelum dibersihkan.
- Pull out the removable crumb tray located at the back of the toaster.
- Discard crumbs. The crumb tray can be washed in the top rack of a dishwasher or by hand with warm, soapy water. Rinse thoroughly and dry completely before reinserting.
- Never operate the toaster without the crumb tray properly inserted.
6.2 Luaran
- Lap bahagian luar pembakar roti dengan iklanamp kain dan keringkan dengan teliti.
- Jangan gunakan pembersih yang melelas atau pad penyental, kerana ia boleh mencalarkan permukaan.
- Jangan sekali-kali merendam pembakar roti dalam air atau sebarang cecair lain.
7. Penyelesaian masalah
If you experience issues with your toaster, refer to the following table for common problems and solutions:
| Masalah | Kemungkinan Punca | Penyelesaian |
|---|---|---|
| Pembakar roti tidak dihidupkan. | Tidak dipasang; kuasa outage; pemutus litar tersandung. | Pastikan pembakar roti dipasang dengan kukuh ke soket yang berfungsi. Periksa pemutus litar rumah. |
| Bread does not lower or raise. | Toaster not powered; Toast/Cancel button not pressed; food jammed. | Ensure power is on. Press Toast/Cancel button. Unplug toaster and carefully remove any jammed food. |
| Pembakaran yang tidak sekata. | Ketebalan roti yang tidak konsisten; pengumpulan serbuk roti. | Ensure bread slices are of similar thickness. Clean crumb tray regularly. |
| Asap atau bau terbakar. | Food jammed; crumb buildup; high shade setting. | Immediately press Cancel. Unplug and allow to cool. Remove jammed food or clean crumb tray. Reduce shade setting for next use. |
Jika masalah berterusan selepas mencuba penyelesaian ini, sila hubungi khidmat pelanggan KitchenAid.
8. Spesifikasi
| Ciri | Perincian |
|---|---|
| Nombor Model | 5KMT223GER |
| Wattage | 1100 Watt |
| Voltage | 220 Volt |
| Slot Count | 2 |
| Tetapan Lorek | 7 |
| Fungsi Khas | Keep Warm, Bagel, Defrost, Reheat, Cancel |
| bahan | logam |
| Dimensi Produk (D x W x H) | 25D x 34W x 25.5H Sentimeter |
| Berat Barang | 2200 Gram |
| Komponen yang Disertakan | Pop-up Toaster, Removable Crumb Tray |
9. Waranti dan Sokongan
Your KitchenAid 5KMT223GER 2-Slot Automatic Toaster is covered by a Waranti terhad 2 tahun dari tarikh pembelian. Waranti ini melindungi kecacatan pada bahan dan mutu kerja di bawah kegunaan rumah biasa.
For warranty service, technical support, or to order replacement parts, please contact KitchenAid customer service. Keep your purchase receipt as proof of purchase for warranty claims.