
Maklumat Keselamatan Penting
AMARAN: To avoid electric shock, always disconnect power at the main circuit breaker or fuse box before beginning installation or performing any maintenance. This product must be installed in accordance with the applicable installation code by a person familiar with the construction and operation of the product and the hazards involved. If you are unsure about any part of the installation process, consult a qualified electrician.
Amaran Proposisi 65: Produk ini mungkin mengandungi bahan kimia yang diketahui oleh Negeri California boleh menyebabkan kanser dan kecacatan kelahiran atau bahaya pembiakan yang lain. Sila semak undang-undang tempatan anda sebelum membeli.asing produk ini.
Always use a stable ladder and ensure all connections are secure. Do not exceed the maximum wattage dinyatakan untuk mentol.
Kandungan Pakej
Verify that all components are present before beginning installation. The package should include:
- Chandelier fixture body with adjustable arms
- Mounting bracket and hardware (screws, nuts, washers)
- Kanopi
- Chain (if applicable for hanging height adjustment)
- Manual arahan
- Maklumat jaminan
Note: Light bulbs are typically sold separately. This fixture requires eight medium G40 up to 100W bulbs.
Arahan Pemasangan
Alat Diperlukan (Tidak Termasuk):
- Pemutar skru kepala Phillips
- Pemutar skru kepala rata
- Strippers wayar
- Tang
- Pita elektrik
- Voltage penguji
- Tangga langkah
Langkah 1: Sediakan untuk Pemasangan
- Putuskan Kuasa: Locate the main circuit breaker or fuse box for your home and turn off the power to the circuit where you will be installing the chandelier.
- Verify Power is Off: Gunakan voltage tester to confirm that the power is completely off at the junction box where the fixture will be installed.
- Keluarkan Lekapan Lama: Carefully remove any existing light fixture from the ceiling, disconnecting its wiring.
- Buka bungkusan dan Periksa: Unpack the new Kichler Armstrong Chandelier and all its components. Inspect for any damage or missing parts.
Langkah 2: Pasang Pendakap Pelekap
- Pasang pendakap pelekap pada kotak simpang siling menggunakan skru yang disediakan. Pastikan ia diikat dengan selamat.
- Thread the fixture's wires through the mounting box and prepare them for connection.
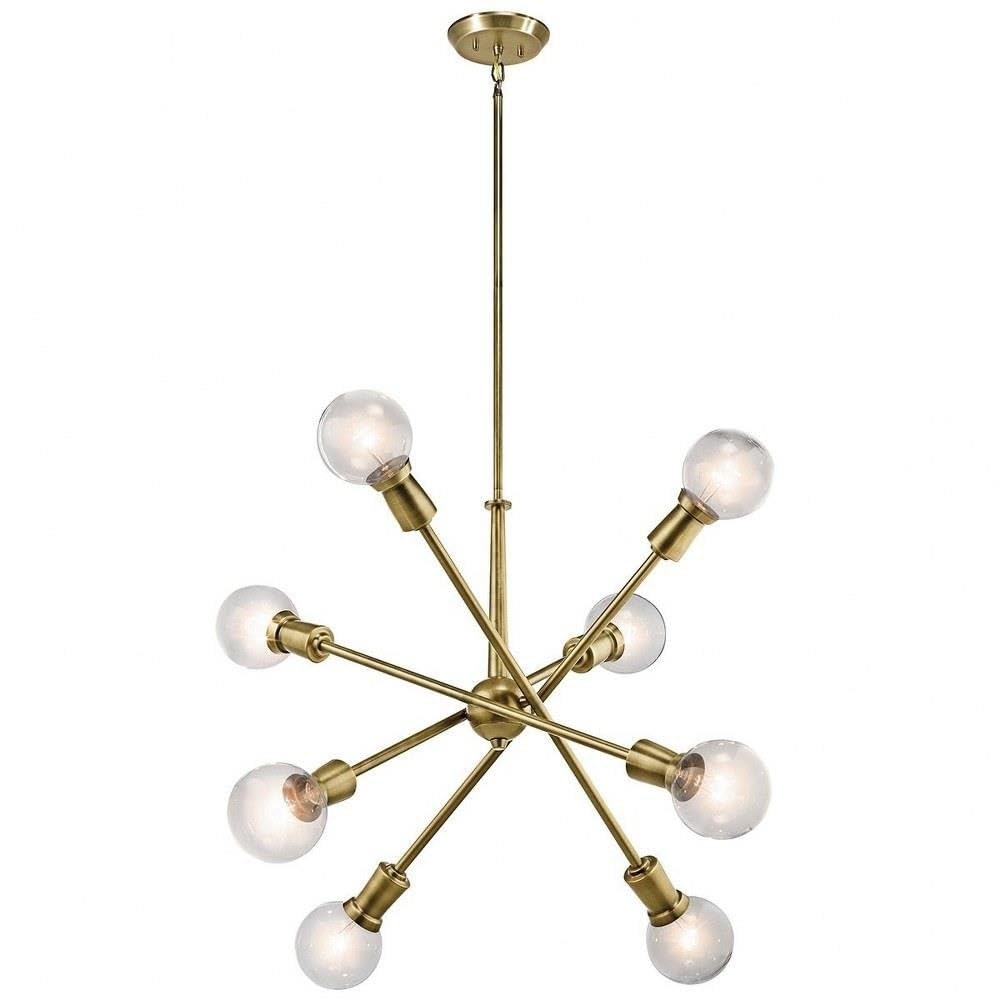
Image: The Kichler Armstrong 8-Light Chandelier in Natural Brass finish, showcasing its adjustable arms and exposed bulbs.
Langkah 3: Sambungan Wayar
- Wayar bawah tanah: Connect the bare copper ground wire from the fixture to the ground wire from the junction box (usually bare copper or green) using a wire nut. If your junction box has a ground screw, wrap the ground wire around it before connecting.
- Kawat Neutral: Sambungkan wayar putih dari lekapan ke wayar putih (neutral) dari kotak simpang menggunakan nat wayar.
- Hot Wire: Sambungkan wayar hitam dari lekapan ke wayar hitam (panas) dari kotak simpang menggunakan nat wayar.
- Sambungan Selamat: Ensure all wire nuts are tightly secured. Wrap electrical tape around each wire nut and connection for added safety.
- Selak wayar: Carefully tuck all connected wires into the junction box, ensuring no wires are pinched.
Langkah 4: Pasang Lekapan
- Raise the canopy of the chandelier to the ceiling, aligning it with the mounting bracket.
- Secure the canopy to the mounting bracket using the provided hardware (e.g., decorative nuts or screws).
- Adjust the arms of the chandelier to your desired horizontal or vertical configuration.

Image: The Kichler Armstrong Chandelier configured with its arms spread horizontally, ideal for wider spaces.

Image: The Kichler Armstrong Chandelier configured with its arms clustered vertically, suitable for narrower or taller spaces.
Step 5: Install Light Bulbs
- Carefully screw the eight medium G40 bulbs (up to 100W each) into the sockets. Do not overtighten.
Panduan Video Pemasangan:
Video: A step-by-step guide on how to install Kichler Chandeliers and Pendants. This video demonstrates general installation procedures for Kichler lighting fixtures.
Arahan Operasi
Once installation is complete and verified, restore power at the main circuit breaker. Operate the chandelier using your wall switch. The adjustable arms allow for customization of light direction and aesthetic. Gently reposition the arms as desired, ensuring not to apply excessive force.
Penyelenggaraan
- Pembersihan: To clean the fixture, ensure power is off. Wipe with a soft, dry cloth. Do not use abrasive cleaners or solvents as they may damage the finish.
- Penggantian mentol: Always turn off power before replacing bulbs. Allow bulbs to cool before handling. Replace with eight medium G40 bulbs, not exceeding 100W per bulb.
- Pemeriksaan: Periksa secara berkala semua sambungan dan perkakasan pelekap untuk kesesakan.
Menyelesaikan masalah
| Masalah | Kemungkinan Punca | Penyelesaian |
|---|---|---|
| Lampu tidak menyala |
|
|
| Lampu berkelip-kelip |
|
|
Spesifikasi
| Nombor Model | 43118NBR |
| Jenama | Kichler |
| warna | Loyang Asli |
| bahan | Keluli Aloi, Kaca |
| Gaya | Modern, Contemporary/Mid-Century Modern |
| Borang Lampu | candelier |
| Jenis Bilik | Living Room, Dining Room, Kitchen, Foyer |
| Penggunaan Dalaman/Luar | Dalaman |
| Sumber Kuasa | Elektrik Bertali |
| Sumber Cahaya | pijar |
| Bilangan Sumber Cahaya | 8 |
| Voltage | 120 Volt |
| Wattage | 100 watt (setiap mentol) |
| Pangkalan Mentol | E26 |
| Dimensi Item L x W x H | 30"L x 30"W x 26"H |
| Berat Barang | 8 paun |
| Perhimpunan yang Diperlukan | ya |
Waranti dan Sokongan
Waranti Pengilang: This Kichler product comes with a limited warranty of one (1) year from the date of purchase.
For additional support, troubleshooting, or to explore coordinating products, please visit the official Kichler Store: Kedai Kichler di Amazon.