SINGER Start 1306
SINGER Start 1306 Sewing Machine User Manual
Model: Mula 1306
1. Pengenalan
This manual provides essential instructions for the safe and efficient operation of your SINGER Start 1306 Sewing Machine. Please read it thoroughly before using the machine to ensure proper setup, usage, and maintenance. The SINGER Start 1306 is designed for home sewing projects, featuring 6 built-in stitches, easy threading, and a 4-step buttonhole function.

Imej 1.1: Depan view of the SINGER Start 1306 Sewing Machine.
2. Maklumat Keselamatan
Sentiasa ikuti langkah berjaga-jaga keselamatan asas apabila menggunakan peralatan elektrik untuk mengurangkan risiko kebakaran, renjatan elektrik atau kecederaan.
- Baca semua arahan sebelum menggunakan mesin.
- Keep the machine away from water or wet surfaces.
- Unplug the machine from the electrical outlet when not in use, when servicing, or when changing accessories.
- Never operate the machine if it has a damaged cord or plug, if it is not working properly, or if it has been dropped or damaged.
- Jauhkan jari dari semua bahagian yang bergerak. Penjagaan khas diperlukan di sekitar jarum mesin jahit.
- Gunakan hanya aksesori yang disyorkan oleh pengilang.
- Jangan sekali-kali menjatuhkan atau memasukkan sebarang objek ke dalam mana-mana bukaan.
3. Persediaan
3.1 Membongkar dan Kandungan
Carefully remove the machine from its packaging. Retain all packaging materials for future transport or storage. Verify that all included components are present:
- All-Purpose Foot
- Kaki Zip
- Kaki Lubang Butang
- Plat Darning
- Pack of Needles
- Bobbins
- Spool Pin Felts
- Needle Plate Screwdriver
- Seam Ripper / Lint Brush
- Vinyl Dust Cover
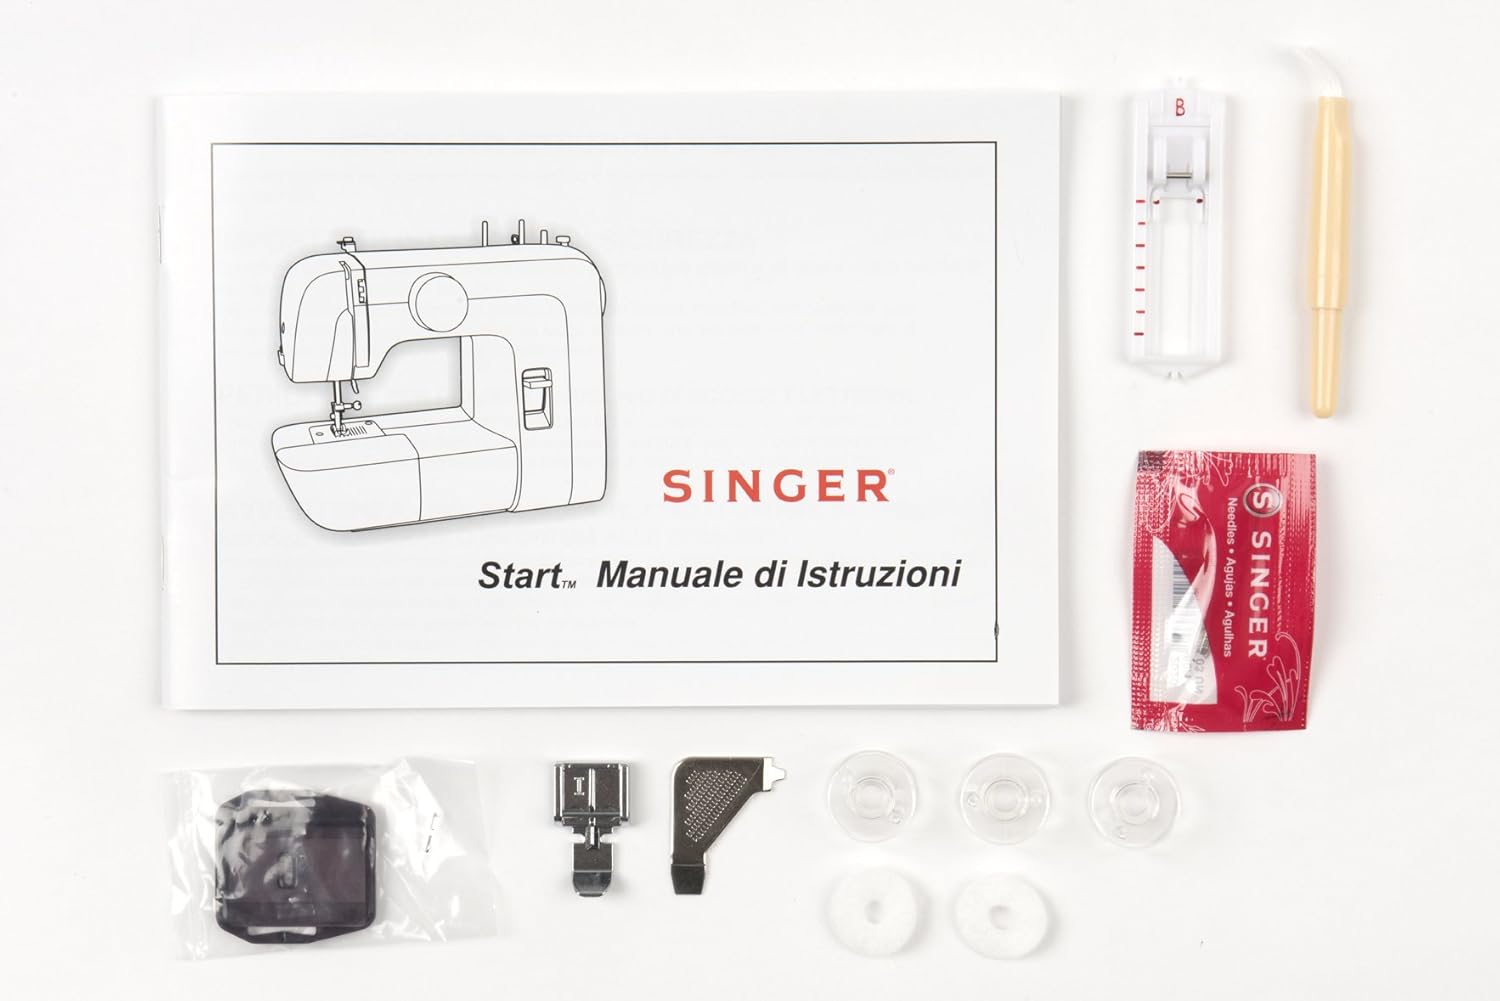
Image 3.1: Included accessories and instruction manual.
3.2 Sambungan Kuasa
Connect the power cord to the machine's power input socket and then plug it into a suitable electrical outlet (220V). Ensure the machine is switched off before connecting to power.

Imej 3.2: Belakang view showing power input and foot pedal connection.
3.3 Mengulir Mesin
Correct threading is crucial for proper stitch formation.
3.3.1 Penggulungan Bobbin
- Letakkan gelendong benang pada pin gelendong.
- Pandu benang melalui panduan benang atas.
- Wrap the thread clockwise around the bobbin winding tension disc.
- Insert the thread through the small hole in the bobbin from the inside out.
- Place the bobbin onto the bobbin winder spindle and push the spindle to the right.
- Hold the thread end and press the foot pedal. Wind a few turns, then trim the excess thread.
- Continue winding until the bobbin is full. The winder will stop automatically.
- Push the bobbin winder spindle to the left and remove the bobbin.
3.3.2 Memasukkan Bobbin
- Buka plat penutup gelendong.
- Masukkan gelendong lilit ke dalam bekas gelendong dengan benang dilonggarkan melawan arah jam.
- Guide the thread into the tension spring slot and pull it firmly until it snaps into place.
- Tutup plat penutup gelendong.
3.3.3 Penguliran Atas
- Naikkan jarum ke kedudukan tertinggi menggunakan roda tangan.
- Naikkan pengangkat kaki penekan.
- Letakkan gelendong benang pada pin gelendong.
- Pandu benang melalui panduan benang atas.
- Bring the thread down through the right channel, then up through the left channel, ensuring it passes through the take-up lever.
- Benang jarum dari depan ke belakang.

Image 3.3: Illustration of the upper threading path.
3.4 Pemasangan Jarum
To install or replace a needle:
- Putar roda tangan untuk menaikkan jarum ke kedudukan tertinggi.
- Longgarkan jarum clamp skru.
- Tanggalkan jarum lama.
- Insert the new needle with the flat side facing the back of the machine. Push it up as far as it will go.
- Ketatkan jarum clamp skru dengan selamat.

Image 3.4: Close-up of the needle and presser foot area.
4. Arahan Operasi
4.1 Pemilihan Jahitan
The SINGER Start 1306 offers 6 built-in stitch patterns. Turn the stitch selector dial to choose your desired stitch. The available stitches include 4 basic, 1 decorative, and 1 buttonhole stitch.

Image 4.1: Stitch selector dial with various stitch patterns.
4.2 Asas Jahitan
4.2.1 Starting a Seam
- Letakkan fabrik di bawah kaki penekan, sejajarkan tepi dengan panduan jahitan pada plat jarum.
- Turunkan kaki penekan.
- Turn the handwheel to lower the needle into the fabric at the starting point.
- Press the foot pedal gently to begin sewing.
4.2.2 Menyiapkan Jahitan
- Sew to the end of your seam.
- Press the reverse stitch lever to sew a few stitches backward to secure the seam.
- Naikkan jarum ke kedudukan tertinggi.
- Naikkan kaki penekan.
- Pull the fabric away from the machine, then cut the threads using the thread cutter on the machine.
4.3 4-Step Buttonhole Function
The machine features a 4-step buttonhole function for creating buttonholes. Refer to the markings on the stitch selector dial for each step (1, 2, 3, 4). Use the buttonhole foot for best results.
4.4 Zipper Insertion
Attach the zipper foot to the machine. This foot allows you to sew close to the zipper teeth, ensuring a neat finish. Follow standard zipper insertion techniques, adjusting the needle position as needed.
4.5 Free Arm Usage
The removable free arm provides access to difficult-to-reach areas such as collars, sleeves, cuffs, and pant hems. To use, slide off the accessory storage compartment to expose the free arm.
5. Penyelenggaraan
5.1 Pembersihan
Pembersihan berkala membantu mengekalkan prestasi mesin. Sentiasa cabut plag mesin sebelum membersihkan.
- Pembuangan Lint: Use the provided lint brush to remove lint and dust from the bobbin area and feed dogs.
- Pembersihan Luaran: Lap permukaan luar dengan kain lembut dan kering. Jangan gunakan bahan kimia yang keras atau pembersih yang kasar.
5.2 Penggantian Jarum
Replace needles regularly, especially when sewing different fabric types or if the needle becomes bent or dull. A damaged needle can cause skipped stitches or fabric damage. Refer to section 3.4 for needle installation instructions.
6. Penyelesaian masalah
Bahagian ini menangani isu biasa yang mungkin anda hadapi. Untuk masalah yang tidak disenaraikan di sini, hubungi sokongan pelanggan.
| Masalah | Kemungkinan Punca | Penyelesaian |
|---|---|---|
| Jahitan Terlangkau | Jarum salah, jarum bengkok, cara memasukkan benang tidak betul. | Gantikan jarum, mesin pasang semula benang, pastikan jenis jarum yang betul untuk fabrik. |
| Pecah Benang | Incorrect threading, tension too tight, damaged needle, poor quality thread. | Re-thread, adjust tension, replace needle, use good quality thread. |
| Penyekatan Benang Bobbin | Improperly wound bobbin, incorrect bobbin insertion, lint in bobbin case. | Re-wind bobbin, re-insert bobbin correctly, clean bobbin area. |
| Mesin Tidak Bermula | Power cord not connected, machine switched off, foot pedal not connected. | Check power connections, ensure switch is ON, connect foot pedal. |
7. Spesifikasi
| Ciri | Perincian |
|---|---|
| Jenama | PENYANYI |
| Nombor Model | Mula 1306 |
| Berat Barang | 4.3 kg |
| Dimensi Produk (LxWxH) | 35 x 18 x 29 cm |
| Voltage | 220V |
| Wattage | 70 Watt |
| Jahitan Terbina dalam | 6 (4 basic, 1 decorative, 1 buttonhole) |
| Jenis Lubang Butang | 4-step automatic |
| Bahan Bingkai | Logam Tugas Berat |
| Komponen yang Disertakan | All Purpose Foot, Zipper Foot, Buttonhole Foot, Darning Plate, Pack of Needles, Bobbins, Spool Pin Felts, Needle Plate Screwdriver, Seam Ripper / Lint Brush, Vinyl Dust Cover |

Image 7.1: Product dimensions of the SINGER Start 1306 Sewing Machine.
8. Waranti dan Sokongan
Your SINGER Start 1306 Sewing Machine comes with a manufacturer's warranty. Please refer to the warranty card included with your product for specific terms, conditions, and duration. For technical assistance, service, or to inquire about replacement parts, please contact SINGER customer support through their official webtapak atau maklumat hubungan yang diberikan dalam dokumentasi jaminan anda.
Ask a question about this manual
Ask about setup, troubleshooting, compatibility, parts, safety, or missing instructions. Manuals+ will review the question and use this page’s manual context to help answer it.