Mastech MS8260A
Manual Pengguna Multimeter Digital Mastech MS8260A
1. Pengenalan
This manual provides detailed instructions for the safe and effective operation of the Mastech MS8260A Digital Multimeter. The MS8260A is a versatile instrument designed for various electrical measurements, including AC/DC voltage, AC/DC current, resistance, diode check, continuity test, and transistor check. It also features a non-contact voltagfungsi pengesanan e.
Key features of the MS8260A include:
- Bukan hubungan voltagpengesanan e
- Automatic power-off function to conserve battery life
- Petunjuk bateri rendah
2. Maklumat Keselamatan
To ensure safe operation and service of the meter, please read all instructions carefully before use. Failure to observe safety warnings can result in electric shock, fire, or damage to the meter.
- Always disconnect test leads from the circuit before changing functions.
- Jangan gunakan lebih daripada vol yang dinilaitage, seperti yang ditandakan pada meter, antara terminal atau antara mana-mana terminal dan tanah bumi.
- Berhati-hati apabila bekerja dengan voltagadalah melebihi 30V AC RMS, puncak 42V atau 60V DC. Ini voltagia menimbulkan bahaya kejutan.
- Before measuring current, ensure the meter's fuses are intact and the test leads are connected correctly.
- Gantikan bateri dengan segera apabila penunjuk bateri lemah muncul untuk memastikan bacaan yang tepat.
- Jangan kendalikan meter jika ia kelihatan rosak atau jika bekasnya terbuka.
- Patuhi kod keselamatan tempatan dan kebangsaan.
3. Komponen Produk
The Mastech MS8260A Digital Multimeter consists of the main unit and essential accessories.
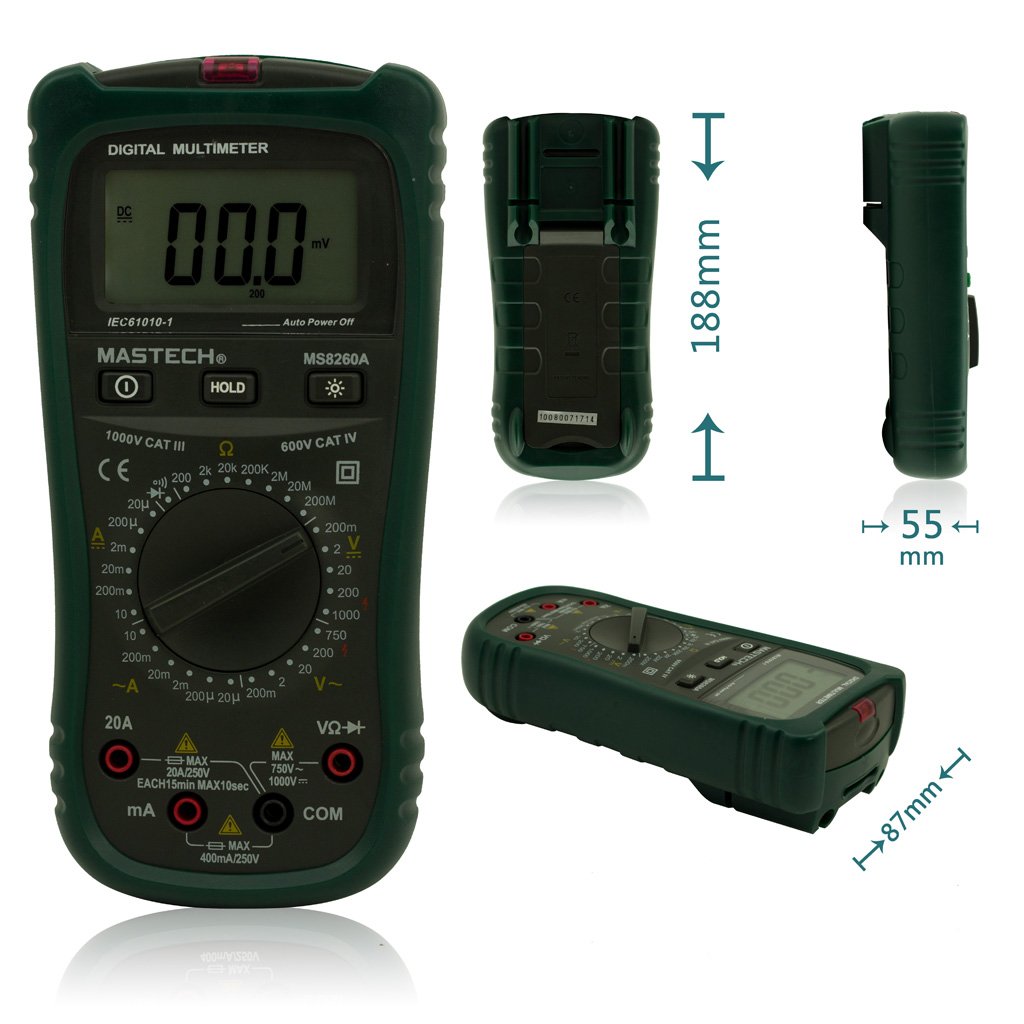
Rajah 1: Depan View of Mastech MS8260A Digital Multimeter with Dimensions
This image displays the Mastech MS8260A Digital Multimeter from the front, highlighting its LCD screen, rotary function switch, and input terminals. Key dimensions are indicated: 188mm height, 87mm depth, and 55mm width. The display shows '00.0 mV' and 'Auto Power Off' text. The rotary switch is set to 'mV' range. The input jacks are labeled 'VΩHz', 'mA', and 'COM'.
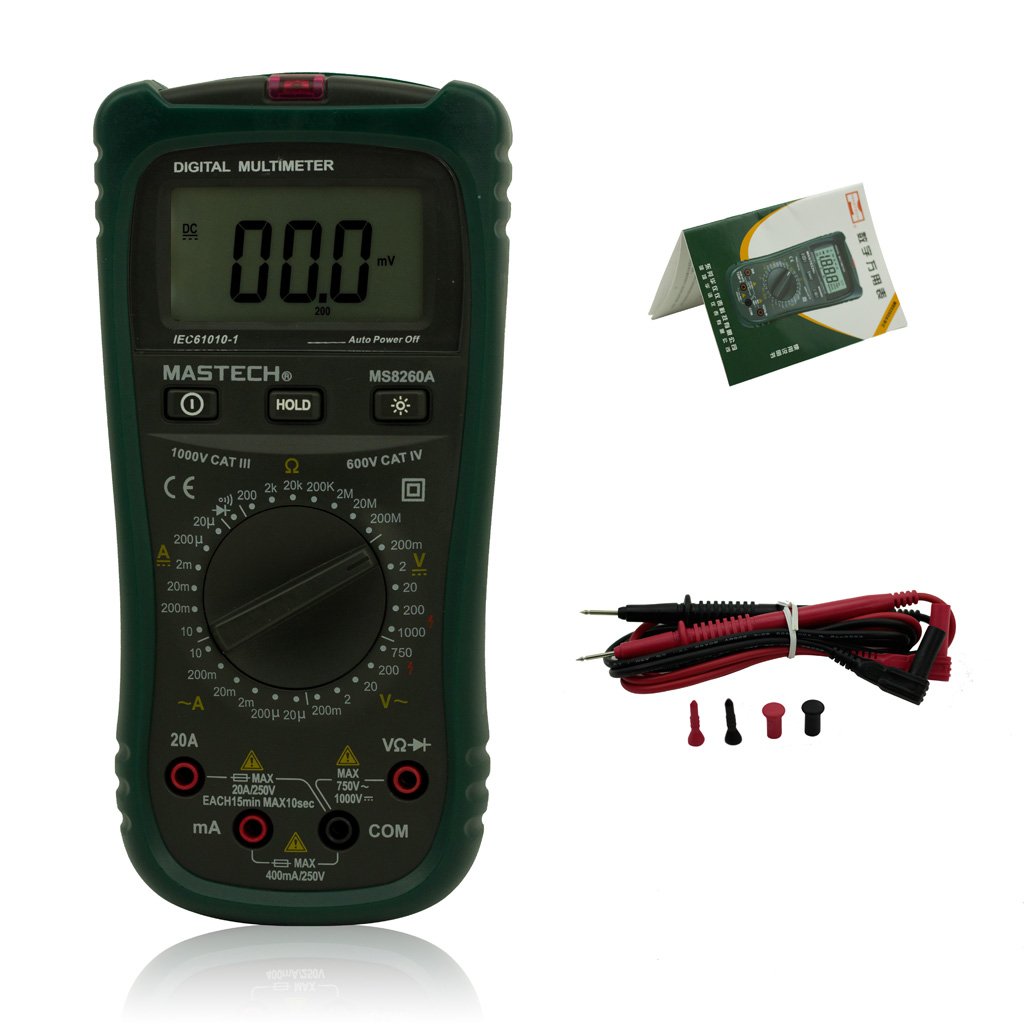
Figure 2: Mastech MS8260A Digital Multimeter and Accessories
This image shows the Mastech MS8260A Digital Multimeter accompanied by its standard accessories. These include a pair of red and black test leads with protective caps, and a printed user manual. The multimeter itself is shown from the front, similar to the main product view.
3.1 Ciri-ciri Unit Utama
- Paparan LCD: Menunjukkan bacaan ukuran, unit dan penunjuk fungsi.
- Suis Putar: Memilih fungsi dan julat ukuran yang dikehendaki.
- Bicu Input: Terminals for connecting test leads (VΩHz, mA, COM).
- Butang TAHAN: Membekukan bacaan paparan semasa.
- Butang Lampu Belakang: Activates the display backlight for improved visibility in low light.
- Vol. Bukan Kenalantage (NCV) Sensor: Mengesan AC voltage tanpa sentuhan langsung.
3.2 Aksesori Termasuk
- Petunjuk Ujian (Merah dan Hitam)
- Manual Pengguna
4. Persediaan Awal
4.1 Pemasangan Bateri
The Mastech MS8260A Digital Multimeter requires one 9V 6F22 battery for operation. Batteries are not included with the product.
- Pastikan multimeter dimatikan dan putuskan sambungan sebarang kabel ujian.
- Cari penutup petak bateri di bahagian belakang unit.
- Gunakan pemutar skru untuk menanggalkan skru yang mengikat penutup bateri.
- Keluarkan penutup dengan berhati-hati.
- Connect a new 9V 6F22 battery to the battery clips, observing correct polarity.
- Letakkan bateri ke dalam petak.
- Gantikan penutup petak bateri dan kencangkannya dengan skru.
5. Arahan Operasi
Sebelum mengambil sebarang ukuran, pastikan wayar ujian disambungkan dengan betul ke meter dan litar yang diuji.
5.1 Menghubungkan Petunjuk Ujian
- Sentiasa sambungkan hitam ujian membawa kepada COM bicu input (biasa).
- Untuk voltage, resistance, diode, continuity, and transistor measurements, connect the merah ujian membawa kepada VΩHz bicu input.
- For current measurements (mA or 20A), connect the merah test lead to the appropriate current input jack (mA or 20A).
5.2 Pemilihan Fungsi
Turn the rotary switch to the desired measurement function and range. The meter will display the reading on the LCD.
5.2.1 DC Jldtage Pengukuran (V–)
- Tetapkan suis putar kepada Vol DC yang dikehendakitagjulat e (cth, 200mV, 2V, 20V, 200V, 1000V).
- Sambungkan wayar ujian secara selari dengan litar atau komponen yang hendak diukur.
- Baca voltagnilai e pada paparan.
5.2.2 AC Jldtage Pengukuran (V∼)
- Tetapkan suis putar kepada Vol AC yang dikehendakitagjulat e (cth, 2V, 20V, 200V, 750V).
- Connect the test leads in parallel to the AC voltage sumber.
- Baca voltagnilai e pada paparan.
5.2.3 Pengukuran Arus DC (A–)
- Set the rotary switch to the desired DC Current range (e.g., 20µA, 200µA, 2mA, 20mA, 200mA, 20A).
- Penting: Disconnect power to the circuit. Break the circuit and connect the meter in series with the load.
- Guna kuasa pada litar.
- Baca nilai semasa pada paparan.
5.2.4 AC Current Measurement (A∼)
- Set the rotary switch to the desired AC Current range (e.g., 20µA, 200µA, 2mA, 20mA, 200mA, 20A).
- Penting: Disconnect power to the circuit. Break the circuit and connect the meter in series with the load.
- Guna kuasa pada litar.
- Baca nilai semasa pada paparan.
5.2.5 Pengukuran Rintangan (Ω)
- Tetapkan suis putar kepada julat Rintangan yang diingini (cth., 200Ω, 2kΩ, 20kΩ, 200kΩ, 2MΩ, 20MΩ).
- Pastikan litar dinyahtenagakan sebelum mengukur rintangan.
- Sambungkan petunjuk ujian merentasi komponen yang akan diukur.
- Baca nilai rintangan pada paparan.
5.2.6 Diode Test (→|)
- Set the rotary switch to the Diode Test position.
- Sambungkan plumbum ujian merah ke anod dan plumbum ujian hitam ke katod diod.
- Paparan akan menunjukkan vol ke hadapantage drop. Reverse the leads; the display should show 'OL' (Open Loop) for a good diode.
5.2.7 Ujian Kesinambungan (♫)
- Set the rotary switch to the Continuity Test position.
- Sambungkan petunjuk ujian merentasi litar atau komponen.
- Jika rintangan berada di bawah kira-kira 50Ω, buzzer akan berbunyi, menunjukkan kesinambungan.
5.2.8 Ujian Transistor (hFE)
- Tetapkan suis putar ke kedudukan hFE.
- Insert the transistor's emitter, base, and collector leads into the appropriate sockets on the meter's hFE test socket.
- The display will show the hFE value (DC current gain).
5.2.9 Bukan Kenalan Voltage (NCV) Pengesanan
- Tetapkan suis putar ke kedudukan NCV.
- Move the top front part of the meter (where the NCV sensor is located) close to the conductor suspected of having AC voltage.
- Sekiranya AC voltage greater than 110V is detected, the meter will emit an audible beep and the NCV indicator light will illuminate.
6. Penyelenggaraan
6.1 Pembersihan
Lap kes dengan iklanamp kain dan detergen lembut. Jangan gunakan bahan pelelas atau pelarut. Pastikan meter kering sepenuhnya sebelum digunakan.
6.2 Penggantian Bateri
When the low battery indicator appears on the display, replace the 9V 6F22 battery as described in Section 4.1. Prompt battery replacement ensures accurate measurements and proper meter function.
6.3 Penggantian Fius
If the meter fails to measure current, the fuse may be blown. Refer to the specifications for the correct fuse type and rating. Fuse replacement should only be performed by qualified personnel.
7. Penyelesaian masalah
- Tiada paparan atau paparan samar: Periksa pemasangan bateri dan ganti jika perlu.
- Bacaan yang salah: Ensure test leads are properly connected, the correct function/range is selected, and the battery is not low.
- Tiada pengukuran arus: Check the fuse. Ensure the meter is connected in series with the circuit.
- 'OL' (Lebihan) dipaparkan: The measured value exceeds the selected range. Select a higher range.
8. Spesifikasi
| Spesifikasi | Nilai |
|---|---|
| Jenama | mastech |
| Nombor Model | MS8260A |
| Jenis Pengukuran | Multimeter Digital |
| Sumber Kuasa | 9V 6F22 Battery |
| Berat Barang | 454 g |
| Pensijilan | CE |
| Bateri Termasuk | Tidak |
9. Maklumat Waranti
Please refer to the warranty card included with your product or contact Mastech customer support for detailed warranty terms and conditions. Warranty coverage typically applies to defects in materials and workmanship under normal use.
10. Sokongan Pelanggan
For technical assistance, troubleshooting, or service inquiries, please contact Mastech customer support. Refer to the official Mastech weblaman web atau pembungkusan produk untuk maklumat hubungan terkini.
Anda boleh melawat Kedai Mastech di Amazon untuk maklumat lanjut produk.
Ask a question about this manual
Ask about setup, troubleshooting, compatibility, parts, safety, or missing instructions. Manuals+ will review the question and use this page’s manual context to help answer it.