
1. Pengenalan
This manual provides detailed instructions for the installation, operation, and maintenance of the Supermicro MBD-X10SLH-F-O uATX Server Motherboard. Please read this manual thoroughly before beginning installation to ensure proper setup and to maximize the performance and longevity of your system. This motherboard is designed for server applications, supporting Intel LGA1150 processors and DDR3 memory.
2. Produk Lebihview
The Supermicro MBD-X10SLH-F-O is a high-performance uATX server motherboard featuring the Intel C226 chipset. It is engineered for reliability and efficiency in server environments.
Ciri-ciri Utama:
- Soket CPU: LGA1150, supporting Intel Xeon E3-1200 v3/v4 series, 4th/5th Gen Core i3, Pentium, Celeron processors.
- Ingatan: 4x 204-pin DDR3-1600 SODIMM slots, supporting up to 32GB ECC/non-ECC Unbuffered memory.
- Slot Pengembangan: 1x PCI-Express 3.0 x16, 1x PCI-Express 2.0 x8, 1x PCI-Express 2.0 x4.
- Storan: 6x SATA3 (6Gbps) ports.
- Ketersambungan: Dual Gigabit Ethernet LAN ports (2x RJ45) and 1x Dedicated IPMI LAN port (RJ45).
- Port USB: 4x USB 3.0 ports, 6x USB 2.0 ports.
- Output Video: 1x VGA port.
- Faktor Bentuk: uATX (9.6" x 9.6").
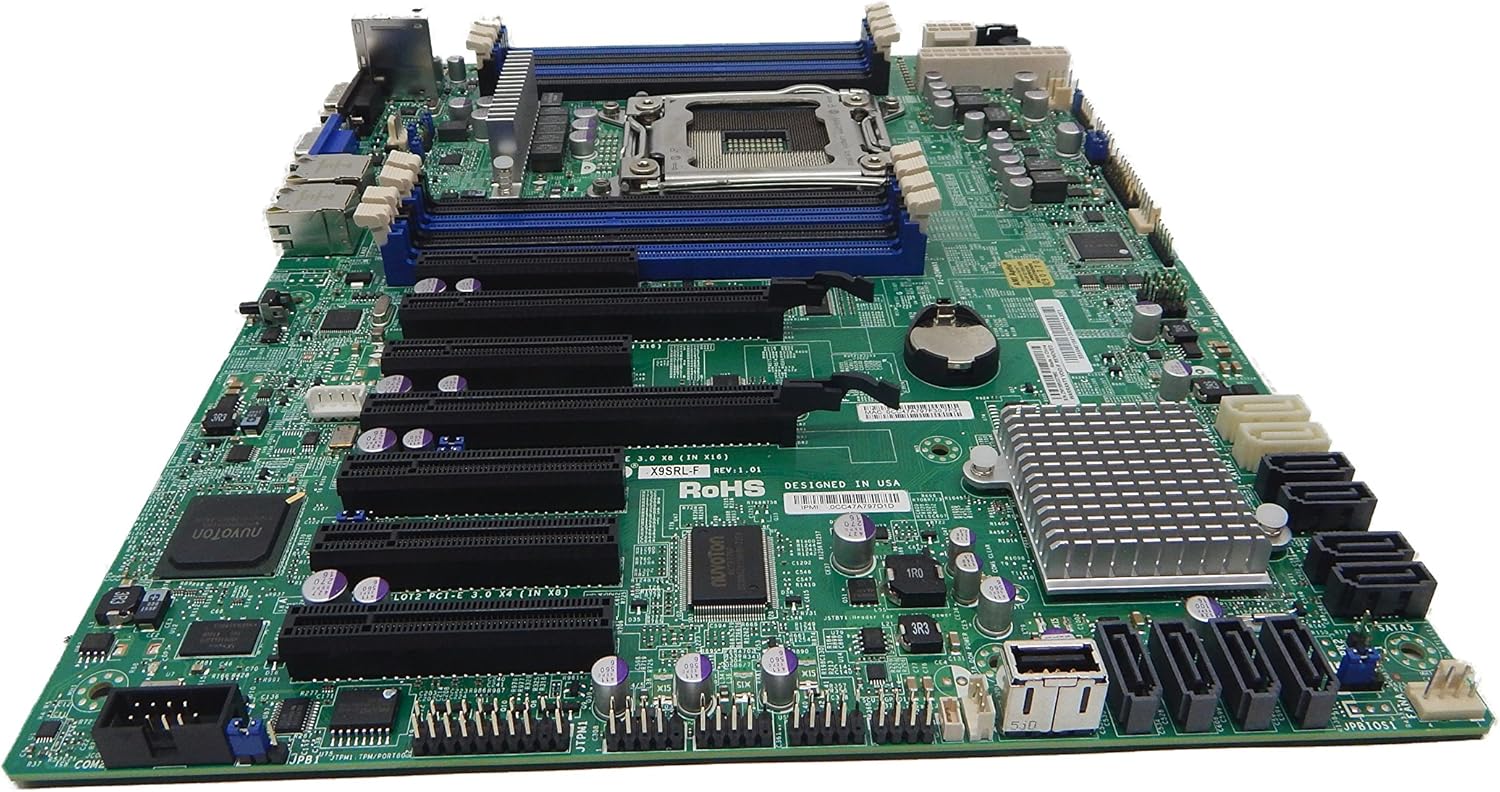
Rajah 2.1: Atas ke bawah view of the Supermicro MBD-X10SLH-F-O motherboard, showing the CPU socket, RAM slots, and various expansion slots.

Rajah 2.2: bersudut view of the motherboard, highlighting the LGA1150 CPU socket and the four DDR3 SODIMM memory slots.

Rajah 2.3: belakang view of the Supermicro MBD-X10SLH-F-O motherboard, displaying the I/O panel with USB, VGA, LAN, and IPMI ports.

Rajah 2.4: jarak dekat view of the motherboard, showing the six SATA3 ports and other onboard connectors.
3. Spesifikasi
| Ciri | Spesifikasi |
|---|---|
| Jenama | Supermikro |
| Nama Model | MBD-X10SLH-F-O |
| Soket CPU | LGA 1150 |
| Jenis Chipset | Intel C226 |
| Pemproses yang Serasi | Intel Core i3-4xxx, i5-4xxx, i7-4xxx, i3-5xxx, i5-5xxx, i7-5xxx, Intel Xeon E3-1200 v3/v4 series |
| Teknologi Memori RAM | DDR3 |
| Kelajuan Memori | 1600 MHz |
| RAM Maks Disokong | 32 GB |
| Bilangan USB 2.0 Port | 6 |
| Bilangan USB 3.0 Port | 4 |
| Pelabuhan SATA | 6x SATA3 (6Gbps) |
| Slot Pengembangan | 1x PCIe 3.0 x16, 1x PCIe 2.0 x8, 1x PCIe 2.0 x4 |
| Faktor Bentuk | uATX |
| Dimensi (LxWxH) | 14 x 11 x 3.5 inci |
| Berat Barang | 3.52 auns |
4. Persediaan
Before beginning installation, ensure your system is powered off and disconnected from the power source. Always handle the motherboard by its edges to avoid static discharge.
4.1. Pemasangan CPU
- Gently lift the CPU socket lever.
- Sejajarkan CPU dengan soket, pastikan segitiga emas pada CPU sepadan dengan segitiga pada soket.
- Letakkan CPU ke dalam soket dengan berhati-hati tanpa memaksanya.
- Lower the socket lever and secure it.
- Sapukan pes haba dan pasangkan penyejuk CPU mengikut arahan pengeluarnya.
4.2. Pemasangan Memori
- Buka klip di kedua-dua hujung slot DIMM.
- Align the memory module's notch with the key in the DIMM slot.
- Tekan ke bawah dengan kuat pada kedua-dua hujung modul memori sehingga klip terpasang pada tempatnya.
4.3. Pemasangan Kad Pengembangan
- Remove the corresponding slot cover from your chassis.
- Sejajarkan kad pengembangan dengan slot PCIe yang dikehendaki.
- Tekan dengan kuat sehingga kad diletakkan sepenuhnya.
- Secure the card with a screw or retention clip.
4.4. Sambungan Peranti Storan
- Sambungkan satu hujung kabel data SATA ke port SATA pada papan induk.
- Sambungkan hujung kabel data SATA yang satu lagi ke peranti storan anda (HDD/SSD).
- Sambungkan kabel kuasa SATA daripada bekalan kuasa anda ke peranti storan.
4.5. Sambungan Kuasa
- Sambungkan penyambung kuasa utama ATX 24-pin daripada bekalan kuasa anda ke papan induk.
- Connect the 8-pin (or 4-pin) ATX 12V CPU power connector to the motherboard.
4.6. Sambungan Panel Depan
Connect the front panel headers (Power LED, HDD LED, Power Switch, Reset Switch, USB, Audio) to the corresponding pins on the motherboard. Refer to the motherboard's silkscreen labels for correct pin orientation.
5. Arahan Operasi
5.1. Boot-Up Awal
- After all components are installed and connected, connect the power cord to your power supply and turn on the power switch.
- Press the power button on your chassis.
- The system should power on, and you should see a display on your monitor.
5.2. Akses BIOS/UEFI
Untuk memasuki utiliti persediaan BIOS/UEFI, tekan kekunci yang ditetapkan (biasanya DEL or F2) during the initial boot sequence. The exact key may vary; observe the on-screen prompts.
5.3. IPMI Remote Management
This motherboard features a dedicated IPMI LAN port for remote management. To access the IPMI interface, connect the IPMI LAN port to your network. Obtain the IP address assigned to the IPMI interface (either from BIOS or a network scan) and access it via a web browser from another computer on the same network. Java may be required for remote console functionality.
6. Penyelenggaraan
Penyelenggaraan berkala membantu memastikan kestabilan dan jangka hayat papan induk dan sistem anda.
- Penyingkiran habuk: Bersihkan habuk dari papan induk dan komponen secara berkala menggunakan udara termampat. Pastikan sistem dimatikan dan dicabut plag sebelum dibersihkan.
- Pengurusan Kabel: Ensure all cables are neatly routed and secured to prevent obstruction of airflow and accidental disconnections.
- BIOS/Firmware Updates: Periksa Supermicro website for the latest BIOS and IPMI firmware updates. Follow the provided instructions carefully. Note that IPMI BIOS upgrades may require a separate license. Always update BIOS before IPMI firmware.
- Pemeriksaan Komponen: Occasionally inspect all connections (power, data, expansion cards) to ensure they are securely seated.
7. Penyelesaian masalah
Bahagian ini menangani isu biasa yang mungkin anda hadapi.
7.1. System Fails to Boot
- Semak Sambungan Kuasa: Ensure the 24-pin ATX and 8-pin CPU power connectors are securely attached.
- Pasang semula Komponen: Remove and re-install the CPU, memory modules, and any expansion cards to ensure they are properly seated.
- Kosongkan CMOS: Refer to your motherboard's detailed manual for instructions on how to clear the CMOS, which can resolve boot issues caused by incorrect BIOS settings.
- Konfigurasi Minimum: Try booting with only essential components (CPU, one RAM stick, power supply, and display) to isolate the problem.
7.2. Fan Speed Issues
Some low RPM, high-efficiency fans may not be accurately detected by the motherboard's fan controller, leading to erratic fan speed behavior (e.g., fans spinning up to max RPM). This is often due to the controller expecting server-grade fans with higher RPM ranges.
- Tetapan BIOS: Check BIOS settings for fan control options. Adjust fan curves or modes if available.
- 3-Pin vs. 4-Pin Fans: If using 4-pin PWM fans that exhibit this behavior, consider using 3-pin adapters if available with your fans. This can sometimes provide a more stable, albeit less precise, fan control.
- IPMI Fan Control: While IPMI offers fan control, it may have limitations for low RPM fans.
7.3. SATA Port Obstruction
When installing a full-size graphics processing unit (GPU), some SATA ports may become physically blocked or difficult to access.
- Rancang Hadapan: Connect SATA cables to the necessary ports before installing large expansion cards.
- Angled SATA Cables: Use SATA cables with angled connectors if straight connectors are obstructed.
- Alternative Ports: Utilize any unblocked SATA ports first.
8. Maklumat Waranti dan Sokongan
For detailed warranty information, including terms, conditions, and duration, please refer to the official Supermicro website or the warranty card included with your product. For technical support, driver downloads, and additional documentation, visit the Supermicro support portal.
Supermicro Official Webtapak: www.supermicro.com