
1. Pengenalan
Thank you for choosing the Fonestar AS-24U Hi-Fi USB/SD/MP3 Amppenghawa dingin. Manual ini menyediakan maklumat penting untuk pengendalian peranti anda yang selamat dan cekap. Sila baca dengan teliti sebelum digunakan dan simpan untuk rujukan pada masa hadapan.
2. Arahan Keselamatan
- Bekalan Kuasa: Memastikan amplifier is connected to a power source matching the specified voltage (230V).
- Pengudaraan: Jangan sekat bukaan pengudaraan. Benarkan ruang yang mencukupi di sekeliling unit untuk aliran udara yang betul untuk mengelakkan terlalu panas.
- Kelembapan: Simpan amplifier away from water, moisture, and high humidity environments. Do not expose it to dripping or splashing.
- Sumber Haba: Elakkan meletakkan unit berhampiran sumber haba seperti radiator, daftar haba, dapur atau peralatan penghasil haba yang lain.
- Pembersihan: Disconnect the power cord before cleaning. Use a dry, soft cloth. Do not use liquid cleaners or aerosol cleaners.
- Servis: Jangan cuba servis produk ini sendiri. Rujuk semua perkhidmatan kepada pegawai perkhidmatan yang berkelayakan.
- Kemasukan Objek/Cecair: Jangan sekali-kali menolak objek dalam apa jua bentuk ke dalam produk ini melalui bukaan kerana ia boleh menyentuh vol berbahayatagmata e atau bahagian pendek yang boleh mengakibatkan kebakaran atau kejutan elektrik.
3. Produk Lebihview
3.1 Panel Depan
The front panel features controls for power, input selection, volume adjustment, and USB/SD media playback. It also includes a display for media information.
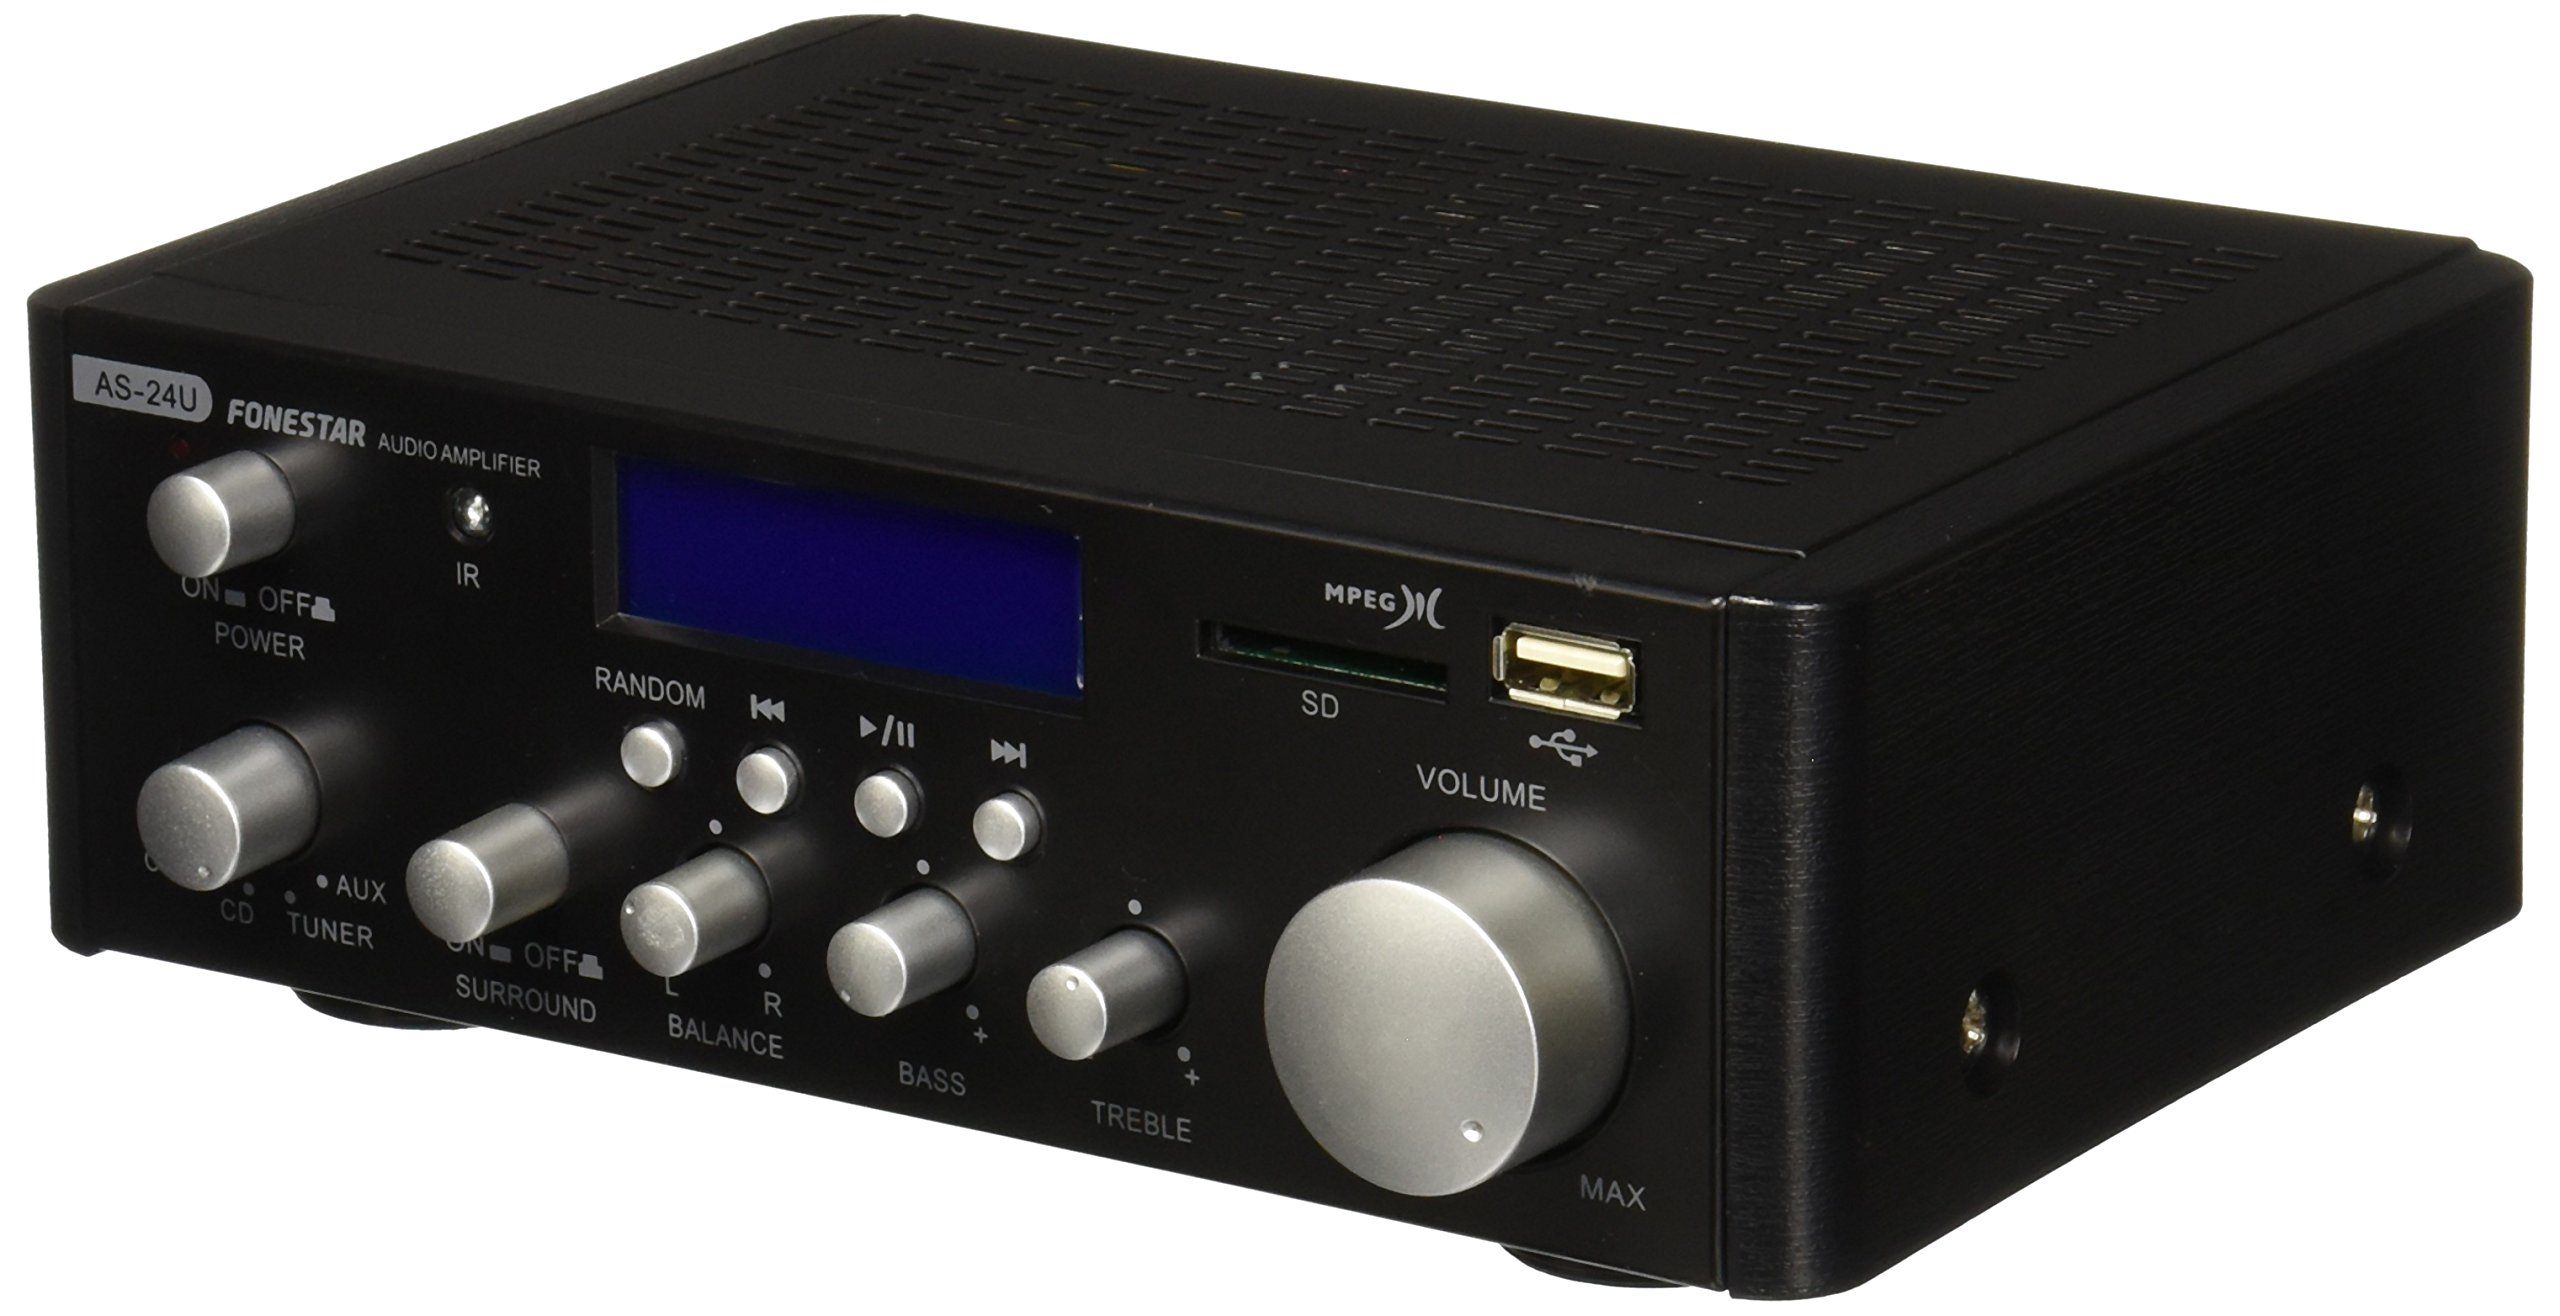
Imej 1: Depan view of the Fonestar AS-24U amplifier, showing the main controls and display.
3.2 Panel Belakang
The rear panel provides all necessary connections for audio input sources, speaker outputs, and power.

Imej 2: Belakang view of the Fonestar AS-24U amplifier, detailing input/output ports and power connection.
- INPUT (AUX, TUNER, CD): Input stereo RCA untuk menyambungkan sumber audio luaran.
- SPEAKER OUT (STEREO): Spring clip terminals for connecting passive speakers (4-8 Ω).
- SPEAKER OUT (SURROUND): Additional spring clip terminals for surround speakers (8 Ω).
- KUASA DALAM: AC power input for the main power cable.
- VOLTAGE PEMILIH: Switch for selecting between 115V and 230V power input. Ensure this is set correctly for your region.
3.3 Alat Kawalan Jauh
Alat kawalan jauh yang disertakan membolehkan pengendalian yang mudah amplifier's media playback functions.
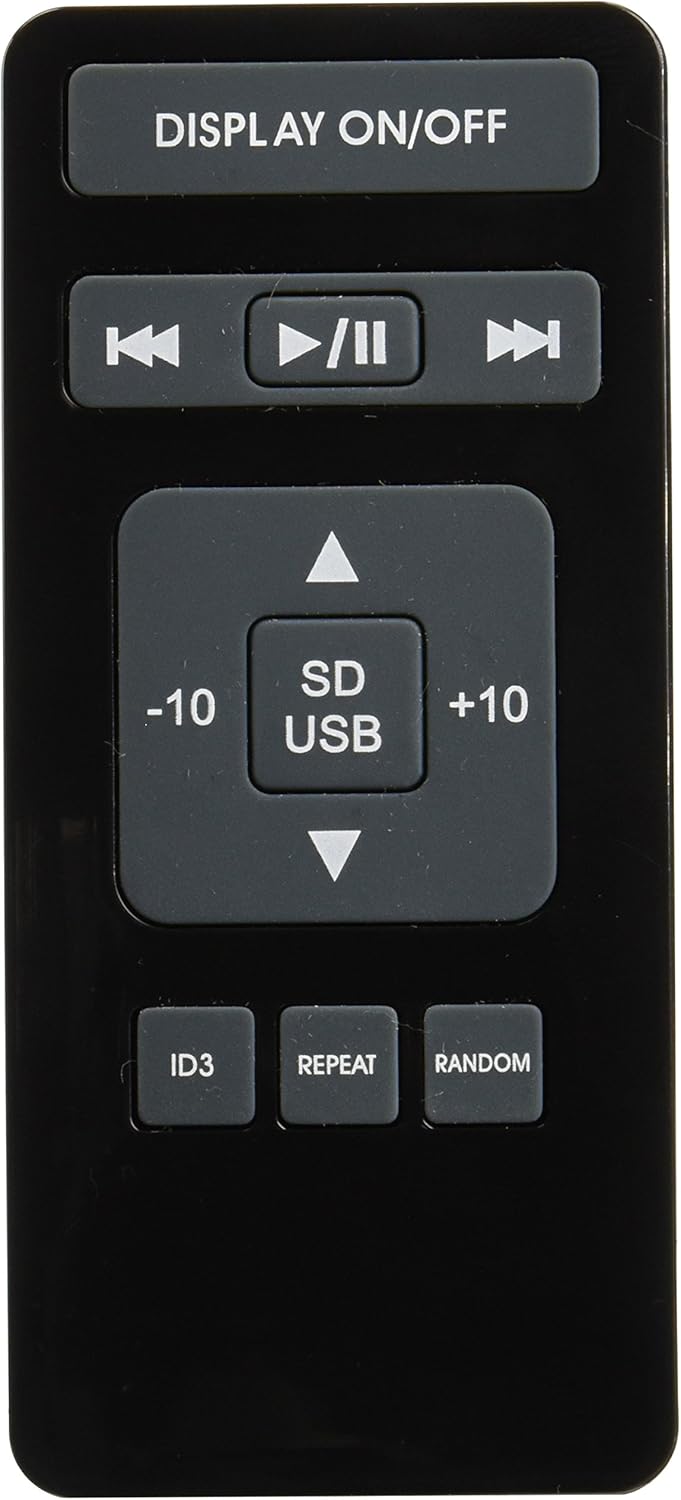
Image 3: Remote control for the Fonestar AS-24U amplifier, showing buttons for media playback and display control.
- TAMPILKAN ON / OFF: Toggles the front panel display.
- PLAY/PAUSE, PREVIOUS/NEXT: Controls for media playback.
- SD/USB: Selects between SD card and USB drive as the media source.
- -10/+10: Skips tracks by 10.
- ID3: Memaparkan ID3 tag maklumat untuk MP3 files.
- ULANGAN: Toggles repeat modes (e.g., repeat one, repeat all).
- RANDOM: Toggles random playback.
4. Persediaan
4.1 Pembesar Suara Penyambung
- Memastikan ampPemanas elektrik dimatikan dan dicabut daripada plag.
- Connect your passive speakers to the SPEAKER OUT terminals on the rear panel.
- Match the positive (+) terminal on the amplifier to the positive (+) terminal on your speaker, and the negative (-) to the negative (-).
- For stereo speakers, use the 4-8 Ω terminals. For surround speakers, use the 8 Ω terminals. Ensure your speakers' impedance matches the ampspesifikasi liifier.
4.2 Menyambungkan Sumber Audio
- Connect your audio devices (e.g., CD player, tuner, auxiliary device) to the corresponding RCA INPUT jacks (CD, TUNER, AUX) on the rear panel.
- Ensure left and right channels are correctly matched (red for right, white for left).
4.3 Sambungan Kuasa
- Sahkan VOLTAGE SELECTOR switch on the rear panel is set to the correct voltage for your region (e.g., 230V).
- Connect the power cable to the POWER IN socket on the rear panel and then to a suitable wall outlet.
5. Arahan Operasi
5.1 Menghidupkan/Mematikan
Press the power button on the front panel to turn the amplifier on or off. A soft start protection circuit is integrated.
5.2 Memilih Sumber Input
Use the input selector knob or buttons on the front panel to choose between CD, TUNER, AUX, USB, or SD inputs.
5.3 Melaraskan Kelantangan
Rotate the main volume knob on the front panel to adjust the overall sound level. Start with a low volume and gradually increase it to a comfortable listening level.
5.4 Main Semula USB/SD
- Masukkan pemacu kilat USB atau kad SD yang mengandungi audio MP3 files into the respective slot on the front panel.
- Select the USB or SD input using the input selector.
- Use the playback controls (Play/Pause, Previous/Next) on the front panel or remote control to manage your music.
- The remote control allows for additional functions like skipping 10 tracks (+10/-10), displaying ID3 tags, repeating tracks, and random playback.
6. Penyelenggaraan
6.1 Pembersihan
Untuk membersihkan amplifier, first unplug it from the power outlet. Use a soft, dry cloth to wipe down the exterior surfaces. Do not use abrasive cleaners, waxes, or solvents as they may damage the finish.
6.2 Penyimpanan
Jika menyimpan amplifier for an extended period, ensure it is unplugged, clean, and stored in a cool, dry place away from direct sunlight and extreme temperatures.
7. Penyelesaian masalah
- Tiada Kuasa:
- Periksa sama ada kabel kuasa disambungkan dengan selamat ke kedua-dua amplampu dan soket dinding.
- Pastikan alur keluar dinding berfungsi.
- Sahkan VOLTAGE SELECTOR switch is set correctly.
- Tiada Bunyi:
- Confirm that the correct input source is selected.
- Periksa semua sambungan pembesar suara untuk memastikan kekutuban yang betul dan padanan yang kukuh.
- Pastikan kelantangan dinaikkan dan tidak diredamkan.
- Uji dengan sumber audio yang berbeza.
- Bunyi Herot:
- Kurangkan kelantangan.
- Check speaker impedance compatibility.
- Ensure audio cables are not damaged and are securely connected.
- Isu Main Semula USB/SD:
- Ensure the USB drive or SD card is formatted to a compatible file sistem (cth, FAT32).
- Sahkan bahawa audio files dalam format MP3.
- Cuba pemacu USB atau kad SD lain.
8. Spesifikasi
| Jenama | FONESTAR |
| Model | AS-24U |
| Stereo Power Output | 25 + 25 W max, 15 + 15 W RMS (4 Ω), 12 + 12 W RMS (8 Ω) |
| Surround Power Output | 10 + 10 W max, 6 + 6 W RMS (8 Ω) |
| Input | 3 stereo (CD, Tuner, AUX), 2 x RCA 400 mV |
| Perlindungan | Permulaan lembut, litar pintas, beban berlebihan |
| Voltage | 230 Volt |
| Dimensi (L x W x H) | 5 x 5 x 10 sm (lebih kurang 50 x 50 x 100 mm) |
| Berat badan | 1.9 kg |
| Ketersambungan Pembesar Suara | berwayar |
9. Waranti dan Sokongan
This Fonestar AS-24U amplifier comes with a standard manufacturer's warranty. Please refer to the warranty card included with your purchase for specific terms and conditions. For technical support, service, or warranty claims, please contact your retailer or the official Fonestar customer service.