
Diamond C101NMO
Manual Pengguna Pemasangan Kabel Pemasangan Antena Diamond C101NMO
Model: C101NMO
1. Pengenalan
The Diamond C101NMO Antenna Mount Cable Assembly is designed for connecting NMO-style mobile antennas to radio equipment. This assembly features a durable 6-foot RG316 Teflon cable, ensuring reliable signal transmission and longevity. It includes a PL-259 adapter for versatile connectivity with various radio systems.
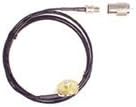
This image displays the complete Diamond C101NMO Antenna Mount Cable Assembly. It features a black, coiled 6-foot RG316 Teflon cable, an NMO connector at one end, and a separate PL-259 adapter for connecting to radio equipment.
2. Kandungan Pakej
Sila sahkan bahawa semua item terdapat dalam pakej:
- 1x Diamond C101NMO Antenna Mount Cable Assembly (6ft RG316 Teflon cable with NMO connector)
- 1x PL-259 Adapter
3. Persediaan dan Pemasangan
Follow these steps for proper installation of your C101NMO cable assembly:
- Langkah 1: Penyediaan Gunung
Ensure the NMO mount point on your vehicle (e.g., trunk, roof) is clean, dry, and securely installed. The mounting surface should be free of debris or corrosion to ensure a good electrical connection. - Langkah 2: Penghalaan Kabel
Carefully route the 6ft RG316 Teflon cable from the NMO mount location to your radio equipment. Avoid sharp bends, kinks, or areas where the cable could be pinched, abraded, or exposed to excessive heat. Secure the cable along its path to prevent movement and damage. - Langkah 3: Sambungan Antena
Securely attach your NMO-style antenna to the NMO connector on the cable assembly. Hand-tighten the antenna until snug, ensuring a firm electrical and mechanical connection. Do not overtighten. - Step 4: Radio Connection
The cable assembly terminates with a standard coaxial connector. If your radio has a PL-259 (UHF) connector, attach the included PL-259 adapter to the end of the cable assembly and then connect it to your radio. If your radio uses a different connector type, an appropriate adapter (not included) may be required. Ensure all connections are tight. - Langkah 5: Ujian Sistem
After installation, perform a system test to ensure proper antenna functionality and signal transmission. Check your radio's SWR (Standing Wave Ratio) to confirm optimal performance and minimize potential damage to your radio.
4. Garis Panduan Operasi
Once installed, the C101NMO cable assembly facilitates the transmission of radio signals between your antenna and radio. For optimal performance:
- Ensure all connections (antenna to NMO, cable to radio/adapter) remain tight and free from corrosion.
- Avoid placing heavy objects on the cable or subjecting it to sharp impacts.
- Regularly check the cable's routing to ensure it has not become dislodged or damaged.
5. Penjagaan dan Penyelenggaraan
Proper care will extend the life and performance of your cable assembly:
- Pemeriksaan Berkala: Periodically inspect the entire cable for any signs of wear, cuts, cracks, or damage to the outer jacket. Check connectors for corrosion, looseness, or bent pins.
- Pembersihan: Keep connectors clean and free of dirt, dust, or moisture. Use a dry, lint-free cloth for cleaning. Avoid using harsh chemicals or abrasive materials.
- Pengurusan Kabel: Ensure the cable is not subjected to excessive tension, sharp bends, or abrasion, which can degrade performance or cause internal damage. Re-secure any loose sections of the cable.
- Perlindungan Alam Sekitar: While the RG316 Teflon cable is durable, prolonged exposure to extreme weather conditions or harsh chemicals should be minimized where possible.
6. Penyelesaian masalah
If you experience issues with your C101NMO cable assembly, consider the following:
- No Signal or Poor Performance:
- Check all connections (antenna to NMO, cable to radio/adapter) for tightness. Loose connections are a common cause of signal loss.
- Inspect the cable for visible damage, such as cuts, kinks, or severe bends.
- Ensure the antenna itself is properly tuned and functional. Test with a known good antenna if possible.
- Verify the PL-259 adapter is correctly installed and making good contact.
- Sambungan Terputus-putus:
- Tighten all connectors. Vibration during vehicle operation can sometimes loosen connections.
- Check for any movement or vibration that might cause connections to become intermittent.
- Inspect for internal cable damage, though this is less common with RG316 Teflon cable.
Jika langkah penyelesaian masalah tidak menyelesaikan masalah, hubungi khidmat pelanggan.
7. Spesifikasi
| Ciri | Spesifikasi |
|---|---|
| Jenama | Diamond Antenna |
| Nama Model | C101NMO |
| Connector Type (Antenna End) | NMO |
| Jenis Kabel | RG316 Teflon |
| Panjang Kabel | 6 kaki (lebih kurang 1.83 meter) |
| Penyesuai Disertakan | PL-259 (UHF Male) |
| Peranti Serasi | NMO Antennas, Two-way Radios |
| Penggunaan yang Disyorkan | Vehicle trunk mount or remote head installations for two-way radio antennas |
| warna | Hitam |
| Bahan Luar | Teflon |
| Berat Barang | 0.24 Paun (lebih kurang 109 gram) |
| Negara Asal | Jepun |
8. Maklumat Waranti
The Diamond C101NMO Antenna Mount Cable Assembly is covered by a Waranti pengilang 1 tahun dari tarikh pembelian. Waranti ini meliputi kecacatan bahan dan mutu kerja di bawah penggunaan biasa. Ia tidak meliputi kerosakan akibat salah guna, kemalangan, pengubahsuaian tanpa kebenaran atau pemasangan yang tidak betul.
To make a warranty claim, please retain your original proof of purchase (receipt or invoice) and contact Diamond Antenna customer support. The manufacturer reserves the right to repair or replace the defective product at its discretion.
9. Sokongan Pelanggan
For technical assistance, troubleshooting guidance, or warranty inquiries regarding your Diamond C101NMO Antenna Mount Cable Assembly, please contact Diamond Antenna customer support.
Please refer to the official Diamond Antenna website or your product packaging for the most current contact information, including phone numbers, email addresses, and support hours.
Ask a question about this manual
Ask about setup, troubleshooting, compatibility, parts, safety, or missing instructions. Manuals+ will review the question and use this page’s manual context to help answer it.