
1. Arahan Keselamatan
Sentiasa baca dan fahami semua amaran keselamatan, arahan, ilustrasi dan spesifikasi yang disediakan dengan alat kuasa ini. Kegagalan mematuhi semua arahan yang disenaraikan di bawah boleh mengakibatkan renjatan elektrik, kebakaran dan/atau kecederaan serius.
1.1 Keselamatan Alat Kuasa Am
- Keselamatan Kawasan Kerja: Pastikan kawasan kerja bersih dan terang. Kawasan bersepah atau gelap mengundang kemalangan. Jangan kendalikan alatan kuasa dalam atmosfera yang mudah meletup, seperti di hadapan cecair mudah terbakar, gas atau habuk.
- Keselamatan Elektrik: Elakkan sentuhan badan dengan permukaan yang dibumikan atau dibumikan seperti paip, radiator, julat dan peti sejuk. Terdapat peningkatan risiko kejutan elektrik jika badan anda dibumikan atau dibumikan.
- Keselamatan Diri: Always wear eye protection. Use personal protective equipment such as dust masks, non-skid safety shoes, hard hats, or hearing protection when appropriate.
- Penggunaan dan Penjagaan Alat: Jangan paksa alat kuasa. Gunakan alat kuasa yang betul untuk aplikasi anda. Ia akan melakukan kerja dengan lebih baik dan lebih selamat pada kadar yang ia direka bentuk.
1.2 Penggunaan dan Penjagaan Alat Bateri
- Isi semula hanya dengan pengecas yang ditentukan oleh pengilang. Pengecas yang sesuai untuk satu jenis pek bateri mungkin menimbulkan risiko kebakaran apabila digunakan dengan pek bateri yang lain.
- Gunakan alatan kuasa hanya dengan pek bateri yang ditetapkan secara khusus. Penggunaan mana-mana pek bateri lain boleh menyebabkan risiko kecederaan dan kebakaran.
- Apabila pek bateri tidak digunakan, jauhkan ia daripada objek logam lain, seperti klip kertas, syiling, kunci, paku, skru atau objek logam kecil lain, yang boleh membuat sambungan dari satu terminal ke terminal yang lain. Pemintas terminal bateri boleh menyebabkan melecur atau kebakaran.
- Dalam keadaan kesat, cecair mungkin dikeluarkan daripada bateri; elakkan bersentuhan. Jika terkena secara tidak sengaja, siram dengan air. Jika cecair terkena mata, dapatkan bantuan perubatan tambahan. Cecair yang dikeluarkan daripada bateri boleh menyebabkan kerengsaan atau melecur.
2. Kandungan Pakej
Buang semua barang dengan berhati-hati dan pastikan anda telah menerima yang berikut:
- Pro'sKit PT-1080A 10.8V Cordless Drill Driver
- Pek Bateri Li-ion 10.8V
- Pengecas Bateri (110V)
- Manual Arahan
3. Produk Lebihview
The Pro'sKit PT-1080A is a versatile 10.8V cordless drill driver designed for various drilling and fastening tasks. It features a keyless chuck, variable speed control, and adjustable torque settings.
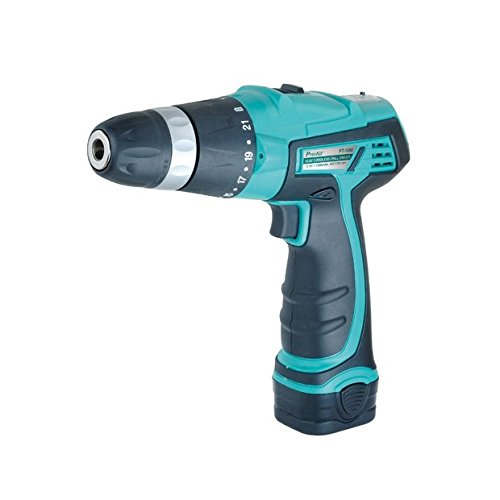
Figure 1: Pro'sKit PT-1080A 10.8V Cordless Drill Driver. This image shows the main body of the drill driver, highlighting its compact design and keyless chuck.
3.1 Komponen Utama
- Chuck tanpa kunci: Untuk perubahan yang cepat dan mudah.
- Cincin Pelarasan Tork: Selects the desired torque setting or drill mode.
- Pemilih Gear: Switches between high and low-speed ranges.
- Suis Hadapan/Undur: Mengawal arah putaran.
- Pencetus Kelajuan Berubah: Controls the operating speed based on pressure applied.
- Pek bateri: Removable 10.8V Li-ion battery.
4. Persediaan
4.1 Mengecas Bateri
- Ensure the battery charger is connected to a standard 110V power outlet.
- Slide the 10.8V Li-ion battery pack onto the charger until it clicks into place.
- The charger's indicator light will show the charging status (refer to charger manual for specific light patterns).
- Once fully charged, remove the battery pack from the charger. Do not overcharge.
4.2 Memasang/Membuang Pek Bateri
- Untuk Memasang: Jajarkan pek bateri dengan pangkal pemegang gerudi dan luncurkannya ke dalam sehingga ia terkunci dengan selamat pada tempatnya.
- Untuk Alih Keluar: Press the battery release buttons (usually on the sides of the battery pack) and slide the battery pack out of the drill handle.
4.3 Memasang/Menanggalkan Mata Gerudi atau Mata Pemacu
- Rotate the keyless chuck counter-clockwise to open the chuck jaws.
- Insert the desired drill bit or driver bit into the chuck, ensuring it is centered.
- Rotate the keyless chuck clockwise to tighten the jaws firmly around the bit. Ensure the bit is secure before operation.
- Untuk Alih Keluar: Putar chuck lawan jam untuk melonggarkan rahang dan tarik bit keluar.
5. Arahan Operasi
5.1 Selecting Speed Range
The drill driver has two speed ranges, selected by the gear selector switch located on top of the tool:
- Kedudukan 1 (Kelajuan Rendah): 0-350 RPM. Ideal for high torque applications like driving screws or drilling large diameter holes.
- Kedudukan 2 (Kelajuan Tinggi): 0-1100 RPM. Suitable for fast drilling of small diameter holes.
Nota: Always change the speed range when the tool is stopped to prevent gear damage.
5.2 Melaraskan Tetapan Tork
The torque adjustment ring allows you to select from 21 torque settings for screwing applications, plus an additional position for drilling.
- Tetapan 1-21: For driving screws. Lower numbers are for smaller screws or softer materials, higher numbers for larger screws or harder materials. The clutch will disengage when the set torque is reached, preventing overtightening or stripping.
- Drill Symbol (⚒): For drilling applications. This setting provides maximum torque without clutch disengagement.
5.3 Putaran Hadapan/Undur
Suis hadapan/undur, yang terletak di atas picu, mengawal arah putaran:
- Pushing the switch to the kiri (bila viewed from the rear) sets the drill to ke hadapan rotation for drilling and driving screws.
- Pushing the switch to the betul sets the drill to terbalik rotation for removing screws or backing out drill bits.
- Apabila suis berada di dalam pusat position, the trigger is locked, preventing accidental starting.
5.4 Pencetus Kelajuan Boleh Ubah
The variable speed trigger allows for precise control over the operating speed. Press the trigger lightly for slower speeds and increase pressure for higher speeds. This feature provides complete control for various tasks.
6. Penyelenggaraan
6.1 Pembersihan
- Sentiasa putuskan sambungan pek bateri sebelum melakukan sebarang pembersihan atau penyelenggaraan.
- Pastikan bukaan pengudaraan alat bersih untuk mengelakkan terlalu panas.
- Gunakan yang lembut, damp kain untuk membersihkan bahagian luar alat. Jangan gunakan bahan kimia yang keras atau pembersih yang kasar.
- Never immerse the tool or battery in liquid.
6.2 Penyimpanan
- Store the tool and battery pack in a cool, dry place, away from direct sunlight and moisture.
- Ensure the battery pack is partially charged before long-term storage to prolong its lifespan.
- Simpan di luar jangkauan kanak-kanak.
6.3 Penjagaan Bateri
- Do not store battery packs in temperatures above 120°F (50°C) or below 0°F (-18°C).
- Do not dispose of battery packs in fire or water.
- If the battery pack is damaged, do not attempt to repair it. Contact customer service for replacement.
7. Penyelesaian masalah
| Masalah | Kemungkinan Punca | Penyelesaian |
|---|---|---|
| Gerudi tidak bermula | Battery not charged or improperly installed; Forward/Reverse switch in center (locked) position; Faulty battery or tool. | Charge battery and ensure it is securely installed; Move F/R switch to forward or reverse; Test with another charged battery if available; Contact support. |
| Bateri tidak dicas | Charger not plugged in; Faulty charger or battery; Temperature too extreme. | Ensure charger is plugged into a live outlet; Check charger indicator lights; Move to a moderate temperature environment; Contact support. |
| Kehilangan kuasa semasa operasi | Battery low; Overload protection activated. | Recharge battery; Reduce pressure on the tool or use a lower speed setting. |
| Sedikit tergelincir dalam chuck | Chuck not tightened sufficiently; Bit shank is dirty or damaged. | Retighten chuck firmly; Clean or replace bit. |
8. Spesifikasi
| Ciri | Spesifikasi |
|---|---|
| Nombor Model | PT-1080A |
| Jenama | Pro'sKit |
| Voltage | 10.8 Volt |
| Sumber Kuasa | Dikuasakan Bateri |
| No-load Speed (Low) | 0-350 RPM |
| Kelajuan Tanpa beban (Tinggi) | 0-1100 RPM |
| Maximum Output Torque | 14 Nm |
| Saiz Chuck | 3/8 inch (10mm) Keyless |
| Tetapan Tork | 21 + 1 (Mod Gerudi) |
| Amppemadam | 1300 Miliamps |
9. Waranti & Sokongan
For information regarding warranty coverage, terms, and conditions, please refer to the warranty card included with your product or contact Pro'sKit customer support directly.
If you encounter any issues or require technical assistance, please contact the retailer where you purchased the product or visit the official Pro'sKit webtapak untuk maklumat hubungan sokongan.


