
1. Pengenalan
This manual provides detailed instructions for the installation, operation, and maintenance of your Soundstream VL-11A Single DIN Digital Media Receiver. Please read this manual thoroughly before using the product to ensure proper operation and to prevent damage.
The Soundstream VL-11A is designed to provide high-quality audio playback from various digital sources, including USB drives, SD cards, and auxiliary input devices. It features a compact single DIN chassis for easy integration into most vehicle dashboards.
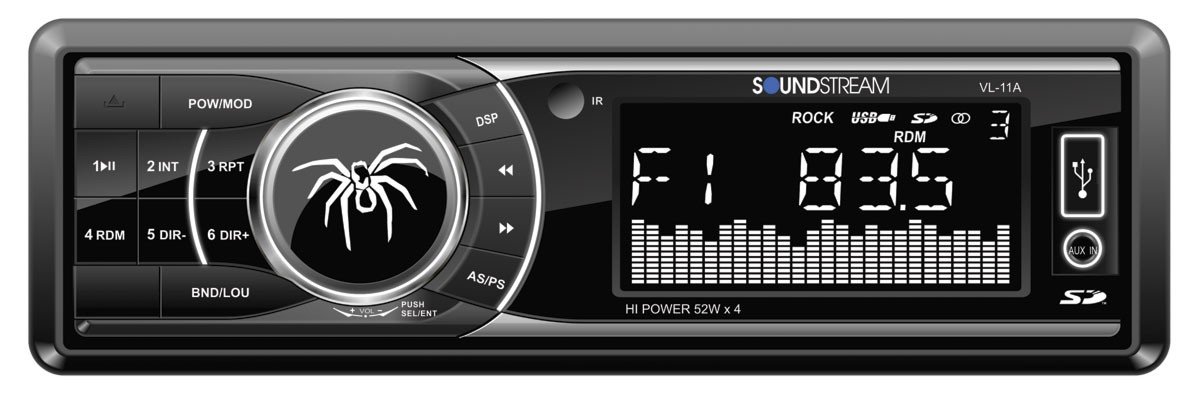
Rajah 1.1: Depan view of the Soundstream VL-11A Digital Media Receiver. This image displays the main unit with its control buttons and display panel.
2. Maklumat Keselamatan
Observe the following safety precautions to prevent injury or damage to the unit:
- Jangan kendalikan unit dengan cara yang mengalihkan perhatian anda daripada memandu. Sentiasa mengutamakan keselamatan jalan raya.
- Ensure proper wiring connections. Incorrect wiring can cause fire or damage to the vehicle's electrical system.
- Elakkan daripada mendedahkan unit kepada kelembapan atau suhu yang melampau.
- Jangan cuba membuka atau mengubah suai unit. Rujuk semua servis kepada kakitangan yang berkelayakan.
- Pastikan kelantangan pada tahap yang membolehkan anda mendengar bunyi trafik di luar.
3. Kandungan Pakej
Sahkan bahawa semua item terdapat dalam pakej:
- Soundstream VL-11A Digital Media Receiver
- Pendawaian abah-abah
- Perkakasan Pemasangan (Skru, Lengan Pemasangan)
- Alat Kawalan Jauh
- Manual Pengguna (dokumen ini)
4. Produk Lebihview
4.1 Kawalan Panel Hadapan
The front panel provides access to primary functions and media inputs.
Rajah 4.1: Illustrative diagram of the VL-11A front panel. This image highlights the display, volume knob, mode button, track controls, USB port, SD card slot, and auxiliary input.
- Butang Kuasa / Mod: Press to turn on/off. Short press to cycle through audio sources (Radio, USB, SD, AUX).
- Tombol Kelantangan: Putar untuk melaraskan kelantangan. Tekan untuk mengakses tetapan audio (Bes, Treble, Imbangan, Fader, EQ).
- paparan: Menunjukkan status semasa, maklumat trek dan tetapan.
- Port USB: Sambungkan peranti storan USB untuk main balik media.
- Slot Kad SD: Insert SD cards for media playback.
- Input AUX: Sambungkan peranti audio luaran melalui bicu 3.5mm.
- Track/Tune Buttons: Navigate tracks or tune radio frequencies.
4.2 Sambungan Belakang
The rear of the unit contains the main wiring harness and preamp keluaran.
Rajah 4.2: Illustrative diagram of the VL-11A rear connections. This image shows the main wiring harness connector and the RCA preamp keluaran.
- Main Wiring Harness: Connects to vehicle power, ground, accessory, and speaker wires.
- RCA Praamp Keluaran: Two sets of 2V outputs for connecting external amppenyelamat.
5. Persediaan
5.1 Pemasangan
Professional installation is recommended. If installing yourself, ensure the vehicle's battery is disconnected before beginning.
- Pemasangan: Insert the metal mounting sleeve into the vehicle's dashboard opening. Bend the tabs to secure it.
- Pendawaian: Connect the supplied wiring harness to the vehicle's wiring. Match wire colors and functions carefully.
- Sambungan Pembesar Suara: Connect the speaker wires from the harness to your vehicle's speakers. Ensure correct polarity.
- Sambungan Kuasa: Connect the yellow wire (constant 12V), red wire (switched 12V), and black wire (ground) to the appropriate vehicle circuits.
- Antena: Connect the vehicle's antenna cable to the unit's antenna input.
- Unit Selamat: Slide the VL-11A into the mounting sleeve until it clicks into place.
Warning: Incorrect wiring can cause severe damage to the unit or vehicle. Consult a professional if unsure.
5.2 Kuasa Permulaan
After installation, reconnect the vehicle's battery. Press the power button on the unit or remote control to turn it on. The display should illuminate.
6. Arahan Operasi
6.1 Kawalan Asas
- Hidupkan/Mati Kuasa: Tekan ke PWR/MODE butang.
- Pelarasan Kelantangan: Putar JILID tombol.
- Pemilihan Sumber: Tekan pendek PWR/MODE button to cycle through Radio, USB, SD, and AUX.
6.2 Tetapan Audio
Tekan ke JILID knob to enter the audio menu. Rotate the knob to navigate options and press to select.
- BASS/TREBLE: Adjust bass and treble levels.
- BAKI: Adjust audio balance between left and right speakers.
- PUDAR: Adjust audio balance between front and rear speakers.
- EQ (Penyama): Select from preset EQ curves (e.g., Pop, Rock, Classic) or a custom setting.
6.3 Main Semula USB/SD
Insert a USB drive into the USB port or an SD card into the SD card slot. The unit will automatically switch to the respective source and begin playback.
- Main/Jeda: Tekan ke MAIN/JEDA butang.
- Trek Seterusnya / Sebelumnya: Tekan ke SETERUSNYA / PREV butang.
- Navigasi Folder: Gunakan FOLDER UP/DOWN buttons (if available on remote or unit).
6.4 Input Tambahan (AUX)
Connect an external audio device (e.g., smartphone, MP3 player) to the 3.5mm AUX input on the front panel using an audio cable. Select AUX as the source using the MODE butang.
6.5 Penala Radio
Select Radio as the source. The unit supports AM/FM bands.
- Pemilihan Band: Tekan ke BAND butang untuk bertukar antara FM1, FM2, FM3 dan AM.
- Penalaan Manual: Tekan pendek TUNE UP/DOWN buttons to adjust frequency step-by-step.
- Cari Penalaan: Tekan lama TUNE UP/DOWN butang untuk mencari stesen kuat seterusnya secara automatik.
- Stesen Pratetap: Press and hold a numbered preset button (1-6) to save the current station. Short press to recall a saved station.
6.6 Alat Kawalan Jauh
The included remote control provides convenient access to most functions. Point the remote control towards the unit's front panel sensor.
Rajah 6.1: Illustrative diagram of the VL-11A remote control. This image shows the various buttons for power, mode, volume, track control, and numeric presets.
7. Penyelenggaraan
7.1 Membersihkan Unit
- Gunakan kain lembut dan kering untuk mengelap panel hadapan dan paparan.
- Jangan gunakan pembersih yang melelas, lilin atau pelarut.
- Elakkan menyembur larutan pembersih terus ke atas unit.
7.2 Penjagaan Am
- Pastikan pengudaraan yang betul di sekeliling unit untuk mengelakkan terlalu panas.
- Elakkan meletakkan objek berat pada unit.
- If the unit is exposed to extreme cold, allow it to warm up before operation to prevent condensation.
8. Penyelesaian masalah
If you encounter issues, refer to the following table before contacting support:
| Masalah | Kemungkinan Punca | Penyelesaian |
|---|---|---|
| Tiada kuasa | Blown fuse; Incorrect wiring; Disconnected battery. | Check vehicle fuses and unit fuse. Verify wiring connections. Ensure battery is connected. |
| Tiada bunyi | Kelantangan terlalu rendah; Redam diaktifkan; Pendawaian pembesar suara yang salah; Sumber tidak dipilih. | Increase volume. Deactivate mute. Check speaker connections and polarity. Select correct audio source. |
| USB/SD tidak dimainkan | Tidak disokong file format; Corrupt media; Incorrectly inserted device. | Ensure media contains supported audio files (e.g., WMA). Try a different USB/SD. Reinsert device. |
| Penerimaan radio lemah | Antena tidak disambungkan; Kawasan isyarat lemah. | Periksa sambungan antena. Cuba tala ke stesen yang lebih kukuh. |
| Alat kawalan jauh tidak berfungsi | Dead battery; Obstruction; Not pointing at sensor. | Replace remote battery. Remove obstructions. Ensure direct line of sight to unit's IR sensor. |
9. Spesifikasi
Technical specifications for the Soundstream VL-11A Digital Media Receiver:
- model: VL-11A
- Jenama: Aliran bunyi
- Pengeluar: Aliran bunyi
- Dimensi Produk: 22.35 x 20.32 x 9.65 cm
- Berat Barang: 771.11 g (1.7 Paun)
- Audio Wattage: 52 Watt (Maksimum)
- Bilangan Saluran: 4
- Praamp Keluaran: 2 Sets of 2V
- Format Media: WMA (and other common digital audio formats)
- Ciri Khas: SD Card Input, USB Input, Auxiliary Input
- Jenis Penyambung: Auxiliary, USB, 3.5mm Jack
- Peranti Serasi: Penceramah
- Kaedah Kawalan: Jauh
10. Waranti & Sokongan
Soundstream products are designed and manufactured to the highest quality standards. For specific warranty information, please refer to the warranty card included with your product or visit the official Soundstream webtapak.
For technical support or service inquiries, please contact Soundstream customer service through their official channels. Keep your purchase receipt and product model number (VL-11A) handy when contacting support.