pengenalan
Terima kasih kerana membeliasing the Edifier Tick Tock Retro Multifunctional Alarm Clock. This device combines a retro design with modern functionality, offering an alarm clock, FM radio, and media playback from SD cards, USB drives, and auxiliary input. This manual provides detailed instructions for setup, operation, and maintenance to ensure optimal performance and longevity of your device.
Ciri-ciri Produk
- SD card reader and USB input port for media playback.
- LCD display screen for time, date, alarm status, and input mode (SD/USB/FM/AUX).
- Alarm clock function with customizable audio sources: SD card, USB drive, FM radio, or Auxiliary input.
- Auxiliary 3.5mm input jack for connecting external audio devices.
- FM radio function with 24 preset channels for easy access to your favorite stations.
- Two 360° omni-directional full-range speakers for rich, multi-directional sound.
Kawalan dan Pelabuhan
Pelabuhan Panel Belakang
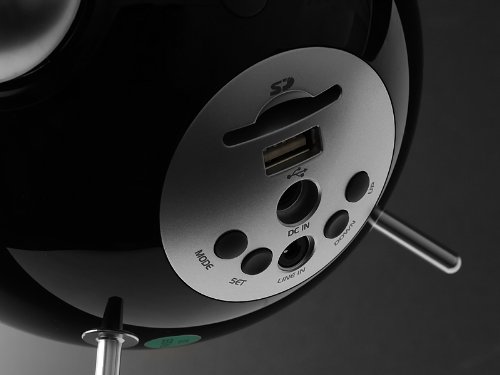
This image displays the rear panel of the Edifier Tick Tock alarm clock. Visible ports and buttons include:
- Slot Kad SD: Insert an SD card for music playback.
- Port USB: Connect a USB flash drive for music playback.
- DC DALAM: Input kuasa untuk penyesuai AC yang disertakan.
- LINE IN (AUX): Input audio 3.5mm untuk peranti luaran.
- Butang MOD: Cycles through input modes (SD, USB, FM, AUX).
- Butang SET: Used for entering settings menus (e.g., time, alarm).
- Butang ATAS/BAWAH: Navigate menus, adjust volume, or change settings.
Kawalan Panel Atas

This image shows the top panel controls of the Edifier Tick Tock alarm clock. These include:
- Butang Main/Jeda: Starts or pauses media playback.
- Butang Trek Sebelumnya/Seterusnya: Skips to the previous or next track during media playback. Also used for tuning FM radio.
- Butang Kelantangan / Turun Kelantangan: Melaraskan kelantangan output audio.
- SNOOZE/LIGHT Button: Mengaktifkan tunda semasa penggera atau melaraskan kecerahan paparan.
Persediaan
- Membongkar: Carefully remove the alarm clock and all accessories from the packaging. Ensure all components are present: the alarm clock unit, AC power adapter, and this user manual.
- Sambungan Kuasa: Connect the AC power adapter to the "DC IN" port on the rear of the alarm clock. Plug the adapter into a standard wall outlet. The display should illuminate.
- Kuasa Awal Hidup: The unit should power on automatically. If not, press the power button (if available, otherwise it's always on when plugged in).
- Antenna (FM Radio): Extend the FM antenna located at the back of the unit for optimal radio reception.
Arahan Operasi
Menetapkan Masa dan Tarikh
- Tekan dan tahan butang SET butang sehingga paparan masa mula berkelip.
- Gunakan UP dan TURUN butang untuk melaraskan jam. Tekan SET untuk mengesahkan dan beralih kepada minit.
- Adjust minutes using UP dan TURUN. Tekan SET untuk mengesahkan.
- Continue this process to set the year, month, and day. Press SET to exit the time/date setting mode.
Menetapkan Penggera
- Tekan ke SET button once (do not hold) to enter alarm setting mode. The alarm time will flash.
- Gunakan UP dan TURUN buttons to adjust the alarm hour. Press SET untuk mengesahkan dan beralih kepada minit.
- Adjust minutes using UP dan TURUN. Tekan SET untuk mengesahkan.
- Next, select the alarm source (FM, SD, USB, AUX). Use UP dan TURUN to cycle through options. Press SET untuk mengesahkan.
- If FM is selected, use UP dan TURUN to select a preset FM station (P01-P24).
- If SD or USB is selected, ensure a card/drive with audio is inserted. The alarm will play the first track.
- If AUX is selected, ensure an external device is connected and playing audio.
- Tekan SET again to activate the alarm. An alarm icon will appear on the display.
- To deactivate the alarm, press SET until the alarm icon disappears.
- Apabila penggera berbunyi, tekan SNOOZE / CAHAYA button to activate snooze (typically 9 minutes). To turn off the alarm completely, press any other button.
Operasi Radio FM
- Tekan ke MODE butang berulang kali sehingga "FM" muncul pada paparan.
- Auto Scan and Preset: Tekan dan tahan butang MAIN/JEDA button. The radio will automatically scan for available stations and save them to presets (P01-P24).
- Penalaan Manual: Gunakan TRACK SEBELUMNYA/SETERUSNYA butang untuk memperhalusi frekuensi.
- Memilih Pratetap: Dalam mod FM, tekan sebentar TRACK SEBELUMNYA/SETERUSNYA butang untuk mengitar semula stesen pratetap yang disimpan.
- Laraskan kelantangan menggunakan UP dan TURUN buttons on the rear panel.
SD Card / USB Playback
- Insert an SD card into the SD card slot or a USB flash drive into the USB port on the rear panel.
- Tekan ke MODE button repeatedly until "SD" or "USB" appears on the display. The device will automatically start playing audio files.
- Gunakan MAIN/JEDA butang untuk menjeda atau menyambung semula main semula.
- Gunakan TRACK SEBELUMNYA/SETERUSNYA buttons on the top panel to skip tracks.
- Laraskan kelantangan menggunakan UP dan TURUN buttons on the rear panel.
Auxiliary Input (LINE IN)
- Connect an external audio device (e.g., smartphone, MP3 player) to the "LINE IN" (3.5mm) port on the rear panel using an audio cable (not included).
- Tekan ke MODE butang berulang kali sehingga "AUX" muncul pada paparan.
- Mulakan main balik pada peranti luaran anda yang disambungkan.
- Laraskan kelantangan menggunakan UP dan TURUN buttons on the rear panel, and also control volume from your external device.
Kecerahan Paparan
Tekan sebentar SNOOZE / CAHAYA button on the top panel to cycle through different display brightness levels.
Penyelenggaraan
- Pembersihan: Use a soft, dry cloth to clean the surface of the alarm clock. Do not use abrasive cleaners, waxes, or solvents.
- penempatan: Place the unit on a stable, flat surface. Avoid direct sunlight, high temperatures, humidity, or dusty environments.
- Kuasa: Putuskan sambungan penyesuai kuasa daripada soket dinding jika unit ini tidak akan digunakan untuk tempoh yang lama.
Menyelesaikan masalah
| Masalah | Kemungkinan Punca / Penyelesaian |
|---|---|
| Tiada kuasa / Paparan dimatikan |
|
| Tiada suara dari pembesar suara |
|
| Penerimaan radio FM yang lemah |
|
| Alarm does not sound or plays static |
|
| Display is too bright at night |
|
Spesifikasi
| Jenama | edifier |
| Nombor Model | MF240Reto |
| Jenis Paparan | LCD |
| Teknologi Ketersambungan | AUX, USB |
| Ciri Khas | Alarm, Radio, SD Card Reader, USB Playback |
| Sumber Kuasa | Elektrik Bertali |
| bahan | plastik |
| Berat Barang | 0.74 Paun (lebih kurang 0.34 kg) |
| Pengeluar | Edifier USA |
Waranti dan Sokongan
This Edifier product comes with a Waranti pengilang 2 tahun. For warranty claims, technical support, or further assistance, please contact Edifier USA customer service. Please retain your proof of purchase for warranty validation.
Untuk maklumat sokongan terkini, sila lawati laman web rasmi Edifier webtapak.