
1. Pengenalan
The InFocus IN1112 Ultra Mobile Widescreen DLP Projector is designed for professionals requiring a portable and high-performance display solution. Its combination of high brightness, lightweight design, and compact size makes it suitable for various environments, from brightly lit rooms to limited spaces. This manual provides essential information for setting up, operating, maintaining, and troubleshooting your projector.
Ciri-ciri Utama:
- Compact and lightweight (approximately 2.7 lbs / 1.2 kg) for easy portability.
- 2200 lumens of brightness for clear projection in various lighting conditions.
- HDMI input for versatile connectivity with modern devices including laptops, smartphones, and gaming consoles.
- Durable design built for frequent travel.
- Widescreen (WXGA) resolution to match contemporary laptop displays.
2. Maklumat Keselamatan
Please read all safety instructions before operating the projector to prevent injury or damage to the unit.
- Do not look directly into the projector lens apabila lamp sedang aktif. Cahaya yang terang boleh menyebabkan kerosakan mata.
- Ensure proper ventilation. Do not block ventilation openings, as this can lead to overheating and damage.
- Letakkan projektor di atas permukaan yang stabil dan rata untuk mengelakkannya daripada jatuh.
- Gunakan hanya kord kuasa yang dibekalkan dengan projektor.
- Do not expose the projector to rain, moisture, or excessive humidity.
- Rujuk semua servis kepada kakitangan servis yang berkelayakan. Jangan cuba membuka atau membaiki projektor sendiri.
- Jauhkan projektor daripada sumber haba dan cahaya matahari langsung.
3. Kandungan Pakej
Sahkan bahawa semua item terdapat dalam pakej:
- InFocus IN1112 Projector
- Kabel Kuasa
- Alat Kawalan Jauh (dengan bateri)
- Kabel VGA
- Kabel HDMI
- Manual Pengguna (dokumen ini)
- Beg Pembawa (mungkin berbeza mengikut wilayah)
4. Produk Lebihview
Familiarize yourself with the main components of your InFocus IN1112 projector.
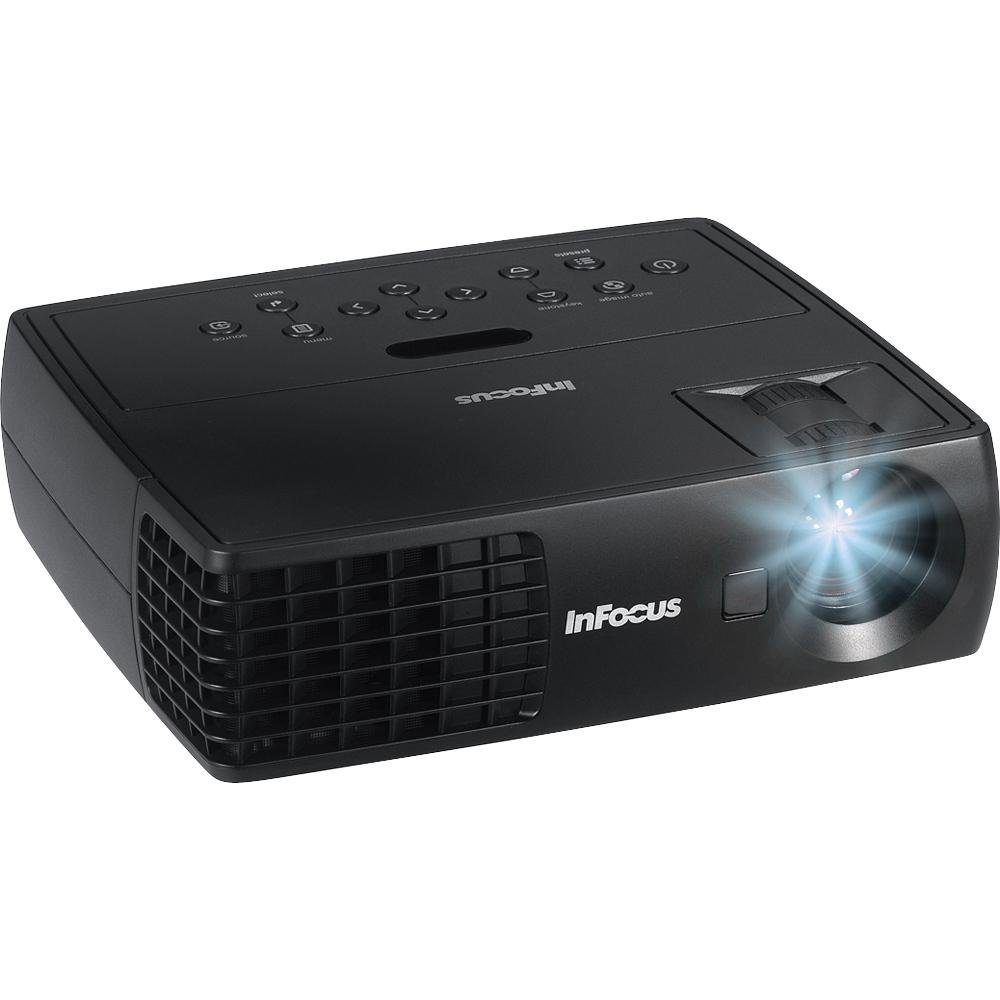
Rajah 4.1: Depan view of the InFocus IN1112 Projector. This image displays the projector's lens, ventilation, and part of the control panel.

Rajah 4.2: Sisi view of an InFocus projector, illustrating typical connectivity ports such as HDMI and VGA.
4.1. Panel hadapan
- Kanta Tayangan: Memancarkan imej ke skrin.
- Cincin Fokus: Adjusts the sharpness of the projected image.
- Tuas Zum: Adjusts the size of the projected image.
4.2. Top Panel (Control Panel)
- Butang Kuasa: Menghidupkan atau mematikan projektor.
- Butang Menu: Mengakses menu Paparan Atas Skrin (OSD).
- Butang Navigasi (Atas/Bawah/Kiri/Kanan): Menavigasi melalui pilihan menu.
- Butang Masukkan: Mengesahkan pilihan dalam menu.
- Butang Sumber: Selects the input source (HDMI, VGA, USB).
4.3. Rear Panel (Connectivity)
- Port HDMI: Connects to devices with HDMI output (laptops, media players).
- Port VGA: Connects to computers with VGA output.
- Port USB: Untuk servis atau menyambungkan peranti USB yang serasi.
- Input Kuasa: Menyambungkan kabel kuasa.
5. Persediaan
5.1. penempatan
- Letakkan projektor pada permukaan yang rata dan stabil.
- Ensure there is adequate space around the projector for ventilation (at least 30 cm / 12 inches).
- Letakkan projektor pada jarak yang sesuai dari skrin untuk mencapai saiz imej yang diingini.
5.2. Sambungan Kuasa
- Sambungkan kabel kuasa ke port input kuasa projektor.
- Palamkan hujung kabel kuasa yang lain ke dalam salur keluar elektrik yang dibumikan.
5.3. Connecting a Source Device
Choose the appropriate cable for your source device:
- HDMI: Connect one end of the HDMI cable to the projector's HDMI port and the other end to your laptop, media player, or other HDMI-enabled device.
- VGA: Connect one end of the VGA cable to the projector's VGA port and the other end to your computer's VGA output. Secure the screws on the VGA connector if available.
6. Beroperasi
6.1. Menghidupkan/Mematikan
- Untuk Menghidupkan: Press the Power button on the projector's control panel or the remote control. The power indicator light will turn steady blue.
- Untuk Mematikan: Press the Power button again. A confirmation message may appear. Press Power again to confirm shutdown. The projector will enter a cooling cycle, and the power indicator will flash before turning off.
6.2. Selecting an Input Source
Tekan ke Sumber button on the projector or remote control repeatedly to cycle through available input sources (e.g., HDMI, VGA). The projector will automatically detect an active signal if connected.
6.3. Adjusting the Image
- Fokus: Putarkan gelang fokus pada kanta sehingga imej kelihatan tajam dan jelas.
- Zum: Use the zoom lever on the lens to adjust the size of the projected image.
- Pembetulan Keystone: If the image appears trapezoidal, use the Keystone Correction function in the OSD menu to square the image.
6.4. Using the On-Screen Display (OSD) Menu
- Tekan ke Menu button on the projector or remote control to open the OSD menu.
- Gunakan Navigasi butang (Atas/Bawah/Kiri/Kanan) untuk beralih melalui pilihan menu.
- Tekan ke Masuk butang untuk memilih pilihan atau mengesahkan tetapan.
- Gunakan Navigasi buttons to adjust values or select sub-options.
- Tekan ke Menu button again to exit the OSD menu.
Common OSD settings include Brightness, Contrast, Color Temperature, Aspect Ratio, and Advanced Settings.
7. Penyelenggaraan
7.1. Membersihkan Projektor
- Casing: Gunakan kain lembut dan tidak berbulu sedikit dampened with water or a mild cleaner. Do not use abrasive cleaners or solvents.
- Kanta: Use a professional lens cleaning cloth and lens cleaning solution. Gently wipe the lens in a circular motion. Avoid touching the lens with your fingers.
- Bukaan Pengudaraan: Periodically clean the ventilation openings with a soft brush or compressed air to prevent dust buildup.
7.2. Lamp Peduli
Projektor lamp has an operating life of approximately 5000 hours. When the lamp reaches the end of its life, the image brightness may decrease, or the lamp indicator may illuminate. Refer to the full service manual for lamp replacement procedures, which should be performed by qualified personnel.
8. Penyelesaian masalah
Bahagian ini menangani isu biasa yang mungkin anda hadapi dengan projektor anda.
| Masalah | Kemungkinan Punca | Penyelesaian |
|---|---|---|
| Tiada imej ditayangkan | Power cable loose; Source not selected; Input device off; Lamp isu. | Check power connection; Select correct input source; Ensure input device is on; Contact support if lamp indicator is active. |
| Imej kabur | Lens out of focus; Projector too close/far from screen. | Adjust the focus ring on the lens; Adjust projector distance or zoom. |
| Imej adalah trapezoid | Projektor tidak berserenjang dengan skrin. | Use Keystone Correction in the OSD menu; Reposition the projector. |
| Alat kawalan jauh tidak berfungsi | Batteries dead; Obstruction between remote and projector; Remote sensor blocked. | Replace batteries; Remove obstructions; Ensure remote is pointed at the projector's sensor. |
| Projektor terlalu panas dan mati | Blocked ventilation; High ambient temperature. | Ensure ventilation openings are clear; Operate in a well-ventilated area. |
9. Spesifikasi
Detailed technical specifications for the InFocus IN1112 Projector.
| Ciri | Spesifikasi |
|---|---|
| Jenama | InFokus |
| Nama Model | IN1112 Ultra |
| Jenis Paparan | DLP |
| Kecerahan | 2200 Lumen (2100 ANSI Lumen) |
| Resolusi Asli | 1920 x 1080 (Full HD, though WXGA is mentioned in title, 1920x1080 is in specs) |
| Resolusi Paparan Maksimum | 1920 x 1080 |
| Nisbah Kontras | 2600:1 |
| Teknologi Ketersambungan | HDMI, VGA, USB |
| Hayat Operasi Sumber Cahaya | 5000 jam |
| Berat Barang | 1.2 kg (2.65 lbs) |
| Wattage | 185 watts (Lamp Wattage: 165 watts) |
| warna | Black (Note: Product images may show white units for illustration) |
| Penggunaan yang Disyorkan | Business, Traveling |
| Jenis Pemasangan | Pemasangan Atas Meja |
| Kaedah Kawalan | Alat Kawalan Jauh, Butang |
10. Waranti dan Sokongan
10.1. Maklumat Waranti
The InFocus IN1112 Projector typically comes with a manufacturer's limited warranty. Please refer to the warranty card included with your product or visit the official InFocus webtapak untuk terma dan syarat jaminan tertentu, termasuk tempoh dan butiran perlindungan. Simpan bukti pembelian anda untuk tuntutan jaminan.
10.2. Sokongan Pelanggan
For technical assistance, troubleshooting beyond this manual, or service inquiries, please contact InFocus customer support. You can find contact information, FAQs, and additional resources on the official InFocus webtapak: www.infocus.com