
1. Pengenalan
Terima kasih kerana membeliasing the Karcher KA 350 Compact Stereo System. This versatile audio system combines modern design with a wide range of playback options, including a 3-disc CD changer, dual cassette deck, turntable, USB port, SD card reader, and an integrated radio. This manual provides essential information for safe operation, setup, and maintenance of your device. Please read it thoroughly before use and retain it for future reference.
2. Arahan Keselamatan Penting
- Sumber Kuasa: Pastikan bekalan kuasa voltage sepadan dengan label penilaian pada unit.
- Pengudaraan: Jangan sekat sebarang bukaan pengudaraan. Benarkan ruang yang mencukupi di sekeliling unit untuk aliran udara yang betul.
- Air dan Kelembapan: Do not expose the unit to rain, moisture, dripping, or splashing. Do not place objects filled with liquids, such as vases, on the apparatus.
- haba: Jauhkan unit daripada sumber haba seperti radiator, daftar haba, dapur, atau radas lain (termasuk amppenghidup) yang menghasilkan haba.
- Pembersihan: Cabut palam unit dari salur keluar dinding sebelum membersihkan. Gunakan kain lembut dan kering sahaja.
- Servis: Jangan cuba servis produk ini sendiri. Rujuk semua perkhidmatan kepada pegawai perkhidmatan yang berkelayakan.
- Kanak-kanak: Keep the unit and its accessories out of reach of children.
- Keselamatan Laser: This product uses a laser. Use of controls or adjustments or performance of procedures other than those specified herein may result in hazardous radiation exposure.
3. Kandungan Pakej
Sila pastikan semua item ada dan dalam keadaan baik:
- Karcher KA 350 Compact Stereo System (Main Unit)
- Alat Kawalan Jauh
- Manual Arahan
- Stereo Speakers (2 units)
- Kabel Kuasa
- Antena FM (jenis wayar)
4. Produk Lebihview
4.1 Kawalan Panel Hadapan
The front panel provides access to all primary functions and controls for the KA 350 system.

Rajah 4.1: Kawalan Panel Hadapan
- ON/STANDBY Button: Menghidupkan atau mematikan unit.
- Butang FUNGSI: Selects between CD, Tuner (Radio), Phono (Turntable), Tape (Cassette), and USB/SD modes.
- Tombol VOLUME: Melaraskan tahap kelantangan induk.
- Kawalan CD: Play/Pause, Stop, Skip/Search (Forward/Backward), Open/Close CD tray.
- Cassette Deck Controls: Play, Record, Fast Forward, Rewind, Stop/Eject for Deck 1 and Deck 2.
- USB/SD Controls: Play/Pause, Stop, Skip/Search (Forward/Backward).
- Kawalan Penala: Band selection (AM/FM), Tuning Up/Down, Memory presets.
- paparan: Shows current mode, track information, radio frequency, and time.
4.2 Sambungan Panel Belakang
The rear panel houses all necessary input and output connections for the system.
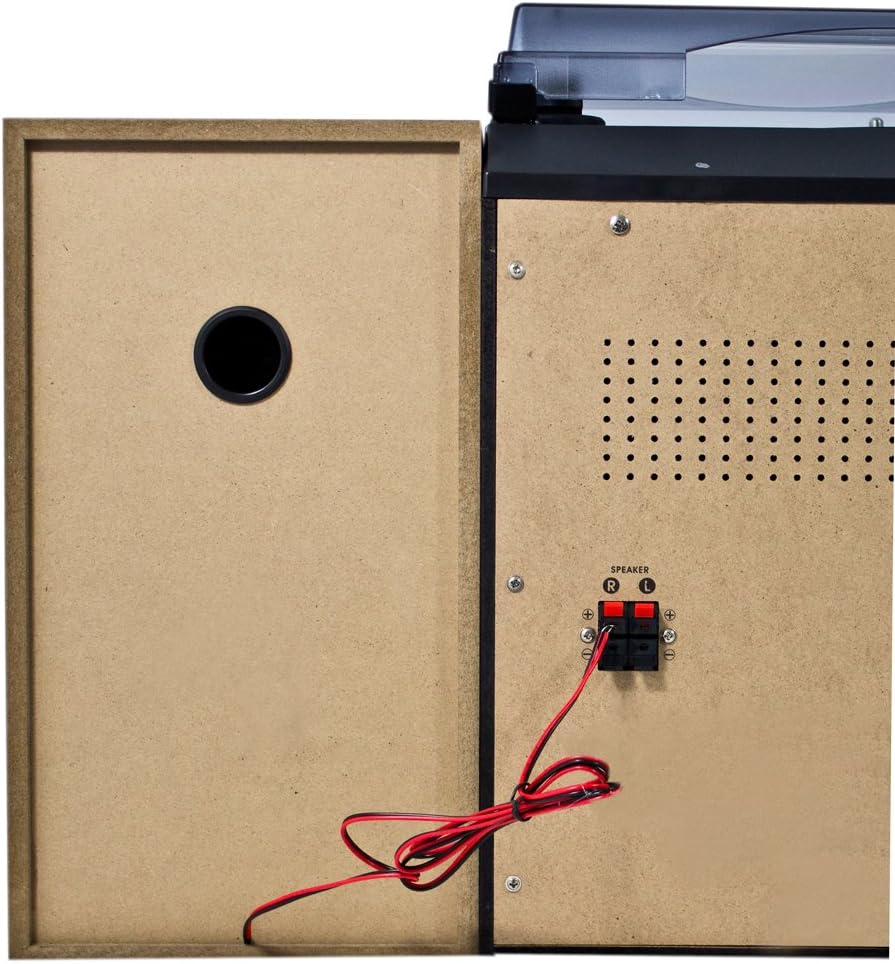
Rajah 4.2: Sambungan Panel Belakang
- Speaker Terminals (R/L): Connect the included stereo speakers. Ensure correct polarity (+ to + and - to -).
- Input Kuasa AC: Sambungkan kabel kuasa di sini.
- Terminal Antena FM: Connect the supplied FM wire antenna for radio reception.
4.3 Komponen Utama

Figure 4.3: Karcher KA 350 Main Components
- Meja Putar: Located on top, for playing vinyl records.
- 3-Disc CD Changer: Front-loading tray for multiple CDs.
- Dual Cassette Deck: Two cassette compartments for playback and recording.
- Port USB: Untuk menyambung pemacu kilat USB.
- Slot Kad SD: Untuk memasukkan kad memori SD.
- Pembesar Suara Stereo: Two external speakers for audio output.
5. Persediaan
5.1 Membongkar dan Meletakkan
- Keluarkan semua komponen dari pembungkusan dengan berhati-hati.
- Letakkan unit utama di atas permukaan yang stabil dan rata.
- Position the speakers on either side of the main unit, ensuring they are at an equal distance for optimal stereo sound.
- Pastikan terdapat pengudaraan yang mencukupi di sekitar unit.
5.2 Menyambung Pembesar Suara
Connect the supplied speakers to the speaker terminals on the rear of the main unit.

Figure 5.1: Speaker Unit
- Identify the speaker wires. Each wire typically has two strands, one marked for positive (+) and one for negative (-).
- Connect the positive (+) terminal of the left speaker to the 'L+' terminal on the main unit's rear panel.
- Connect the negative (-) terminal of the left speaker to the 'L-' terminal on the main unit's rear panel.
- Repeat the process for the right speaker, connecting it to the 'R+' and 'R-' terminals.
- Ensure all connections are secure to prevent sound distortion or damage.
5.3 Menyambungkan Antena FM
For optimal radio reception, connect the supplied FM wire antenna.
- Insert the FM antenna plug into the FM antenna jack on the rear panel.
- Extend the wire antenna fully and position it for the best possible reception. You may need to experiment with its placement.
5.4 Sambungan Kuasa
- Plug the AC power cable into the AC power input on the rear of the main unit.
- Pasangkan hujung kabel kuasa yang satu lagi ke soket dinding standard.
6. Arahan Operasi
6.1 Hidupkan/Mati Kuasa
Tekan ke BERSIAP SEDIA butang pada panel hadapan atau alat kawalan jauh untuk menghidupkan atau mematikan unit.
6.2 Pemilihan Mod
Tekan ke FUNGSI button repeatedly to cycle through the available modes: CD, Tuner (Radio), Phono (Turntable), Tape (Cassette), and USB/SD.
6.3 Operasi Pemain CD

Figure 6.1: CD Changer Tray
- Tekan ke FUNGSI butang untuk memilih mod CD.
- Tekan ke BUKA/TUTUP butang untuk membuka dulang CD.
- Place up to three CDs onto the disc trays, label side up.
- Tekan ke BUKA/TUTUP butang sekali lagi untuk menutup dulang.
- Tekan ke MAIN/JEDA butang untuk memulakan main balik.
- Gunakan Langkau / CARI buttons to navigate between tracks or fast forward/rewind.
6.4 Operasi Pemain/Perakam Kaset
- Tekan ke FUNGSI butang untuk memilih mod TAPE.
- Tekan ke BERHENTI/EJECT button on either Deck 1 or Deck 2 to open the cassette compartment.
- Masukkan pita kaset dan tutup petak.
- Tekan ke BERMAIN butang untuk memulakan main balik.
- To record, insert a blank tape into Deck 2 (for recording from Deck 1 or other sources) or Deck 1 (for recording from external sources if applicable). Press the REKOD butang.
6.5 Operasi Meja Putar
- Tekan ke FUNGSI button to select PHONO mode.
- Buka penutup habuk.
- Letakkan rekod vinil di atas pinggan.
- Pilih kelajuan yang sesuai (33, 45 atau 78 RPM) menggunakan suis pemilih kelajuan.
- Carefully lift the tone arm and place the stylus onto the desired groove of the record.
- At the end of the record, manually return the tone arm to its rest.
6.6 Main Semula USB/SD
- Tekan ke FUNGSI button to select USB/SD mode.
- Masukkan pemacu kilat USB ke dalam port USB atau kad SD ke dalam slot kad SD.
- Unit akan secara automatik mengesan dan mula memainkan audio yang serasi files (MP3, WMA, AAC).
- Gunakan MAIN/JEDA dan Langkau / CARI butang untuk mengawal main balik.
6.7 Operasi Radio
- Tekan ke FUNGSI button to select TUNER mode.
- Tekan ke BAND button to select between FM and AM bands.
- Gunakan MENALA buttons to manually tune to a station or press and hold for automatic scanning.
- Untuk menyimpan stesen, tekan butang MEMORI butang, kemudian gunakan Langkau / CARI butang untuk memilih nombor pratetap, dan tekan MEMORI sekali lagi untuk mengesahkan.
6.8 Alat Kawalan Jauh
The included remote control allows convenient operation of all functions from a distance. Ensure batteries are correctly inserted.
7. Penyelenggaraan
7.1 Membersihkan Unit
- Sentiasa cabut plag unit daripada salur keluar kuasa sebelum membersihkan.
- Gunakan kain lembut dan kering untuk mengelap permukaan luar.
- Jangan gunakan pembersih, lilin atau pelarut yang melelas kerana ia boleh merosakkan kemasan.
7.2 Turntable Stylus Care
- Handle the stylus with extreme care. Only touch the tone arm, not the stylus itself.
- Bersihkan stylus secara berkala dengan berus lembut, berus dari belakang ke hadapan.
- Replace the stylus when it shows signs of wear (e.g., distorted sound, skipping).
7.3 Cassette Deck Care
- Bersihkan kepala pita, kapstan dan penggelek picit secara berkala dengan kapas yang dilap perlahan-lahan.ampditambah dengan isopropil alkohol.
- Demagnetize the tape heads periodically to maintain sound quality.
8. Penyelesaian masalah
| Masalah | Kemungkinan Punca | Penyelesaian |
|---|---|---|
| Tiada kuasa | Kabel kuasa tidak disambungkan; Salur keluar kuasa tidak aktif | Periksa sambungan kabel kuasa; Cuba soket yang berbeza |
| Tiada bunyi | Volume too low; Speakers not connected correctly; Incorrect function mode selected | Increase volume; Check speaker connections and polarity; Select correct function mode |
| CD melangkau atau tidak dimainkan | CD is dirty or scratched; CD inserted incorrectly | Clean or replace CD; Insert CD label side up |
| Penerimaan radio yang lemah | Antenna not connected or poorly positioned; Weak signal | Connect and adjust FM antenna; Try repositioning the unit |
| Turntable speed incorrect | Kelajuan yang salah dipilih | Adjust the speed selector switch (33/45/78 RPM) |
| Isu main balik USB/SD | Tidak serasi file format; Kad USB/SD tidak dimasukkan dengan betul; Rosak files | pastikan files are MP3, WMA, or AAC; Reinsert USB/SD card; Try a different USB/SD card |
9. Spesifikasi
| Ciri | Spesifikasi |
|---|---|
| Jenama | Karcher |
| Nombor Model | KA 350 |
| Teknologi Ketersambungan | FM/MW Tuner, USB, SD |
| warna | Hitam |
| Jenis Pembesar Suara | Stereo (2 speakers included) |
| Dimensi Item (L x W x H) | 70.5 x 41 x 37.3 cm |
| Sumber Kuasa | Elektrik Bertali |
| Peranti Serasi | Smartphone, Tablet, MP3 Player, Personal Computer |
| Berat Barang | 10.8 Kilogram |
| Output Kuasa (RMS) | 2 x 5 W (Total 50 W) |
| Supported Media Standards | MP3, CD, Cassette, USB, SD |
| Format Audio yang Disokong | CD-DA, MP3, WMA, AAC |
| Sokongan Bluetooth | Tidak |
| Bilangan Speaker | 2 |
| Mod Keluaran Audio | Stereo |
| Konfigurasi Bunyi Sekeliling | 2.0 |
| Komponen yang Disertakan | Compact system, Remote control, Instruction manual |
10. Waranti dan Sokongan
For warranty information and technical support, please refer to the warranty card included with your product or visit the official Karcher webtapak. Simpan bukti pembelian anda untuk sebarang tuntutan waranti.
Pengeluar: Karcher


