
pengenalan
Thank you for choosing the TFA Dostmann 30.3016.01 Wave Radio Thermometer. This device provides accurate indoor and outdoor temperature readings, along with time and date display. It utilizes a wireless outdoor sensor to transmit temperature data to the main unit. Please read this manual carefully to ensure proper setup and operation.
The main unit measures indoor temperature, while the wireless outdoor transmitter measures outdoor temperature. This system helps monitor your living climate and can contribute to energy saving by optimizing heating. The device also stores minimum and maximum temperature values and displays the current time and date.
Maklumat Keselamatan
- Jauhkan peranti dan bateri daripada kanak-kanak.
- Jangan dedahkan peranti kepada suhu yang melampau, getaran atau kejutan.
- Elakkan cahaya matahari langsung dan kelembapan.
- Jangan rendam peranti di dalam air.
- Replace batteries promptly when indicated to prevent leakage. Dispose of used batteries according to local regulations.
- Do not attempt to repair or modify the device. Contact qualified personnel for service.
Persediaan
1. Pemasangan Bateri
The main unit requires 2 x 1.5V AA batteries, and the outdoor transmitter requires 2 x 1.5V AA batteries. Batteries are included with the product.
- Buka penutup petak bateri di belakang unit utama.
- Masukkan 2 bateri AA, dengan memerhatikan kekutuban yang betul (+/-).
- Tutup penutup petak bateri.
- Repeat the process for the outdoor transmitter.
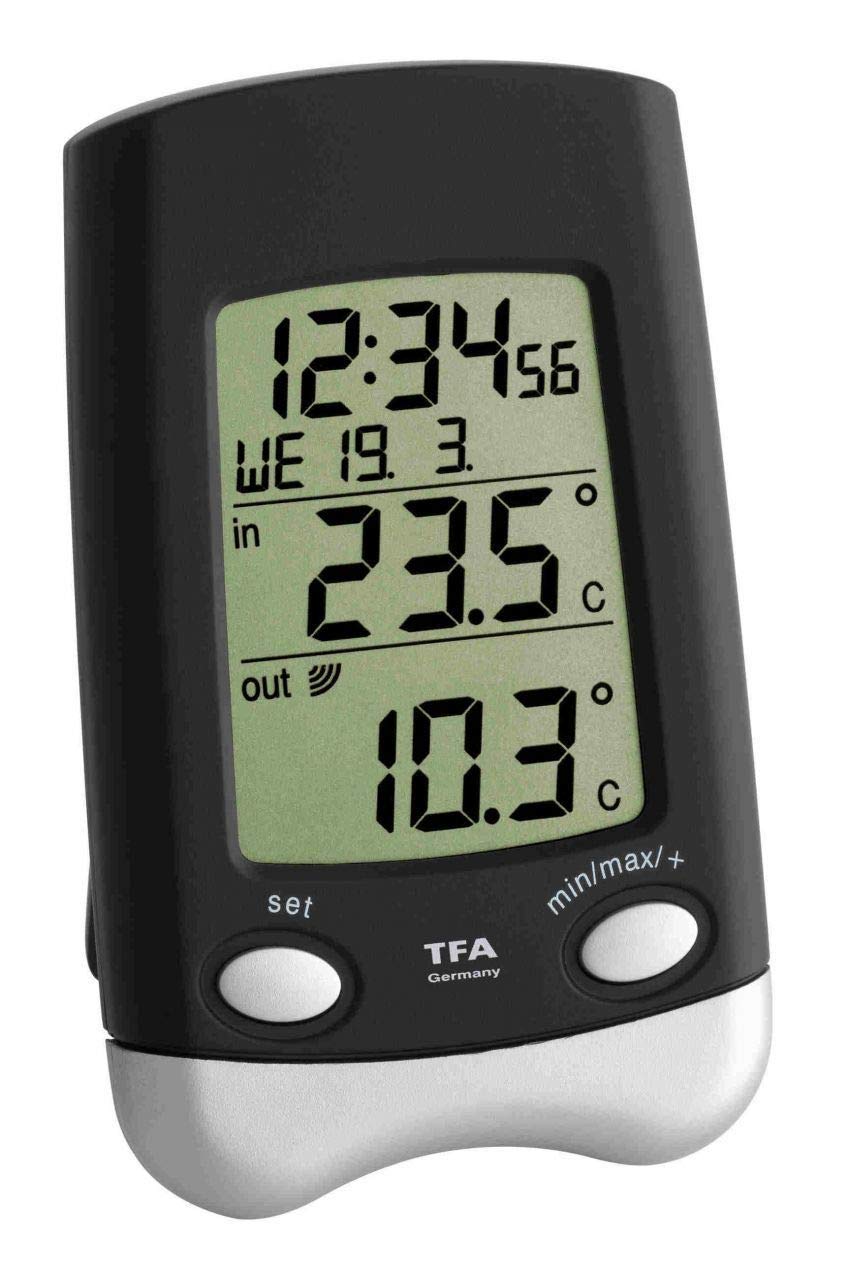
Image: Main unit of the TFA Dostmann 30.3016.01 Wave Radio Thermometer. This shows the front display and overall design.

Image: The wireless outdoor sensor (model 30.3159.IT) for the TFA Dostmann Wave Radio Thermometer. This sensor transmits outdoor temperature data to the main unit.
2. Initial Synchronization and Placement
After battery insertion, the main unit will automatically search for the outdoor sensor and the radio time signal. This process may take a few minutes.
- Place the outdoor transmitter in a sheltered location, away from direct sunlight and rain, to ensure accurate readings and prolong its lifespan. Ensure it is mounted vertically as designed to prevent water ingress into the battery compartment.
- Position the main unit indoors, away from electronic devices that might cause interference (e.g., TVs, computers).
- Ensure the distance between the main unit and the outdoor sensor is within the effective transmission range (typically up to 100 meters in open air, less with obstacles).
- The time and date will automatically synchronize via the radio signal.
Arahan Operasi
Paparan Maklumat
Paparan menunjukkan maklumat berikut:
- Suhu Dalaman: Measured by the main unit's internal sensor.
- Suhu Luaran: Received from the wireless outdoor transmitter.
- Masa: Automatically synchronized via radio signal.
- Date and Day of the Week: Automatically synchronized via radio signal.
Viewing Minimum and Maximum Values
The device stores the highest (maximum) and lowest (minimum) temperatures recorded since the last reset. To view nilai-nilai ini:
- Press the "MAX/MIN" button (or similar, refer to device buttons) once to display the maximum recorded indoor and outdoor temperatures.
- Press the "MAX/MIN" button again to display the minimum recorded indoor and outdoor temperatures.
- To clear the recorded maximum and minimum values, press and hold the "MAX/MIN" button for a few seconds while the respective values are displayed.
Manual Time and Date Setting (if automatic synchronization fails)
In rare cases where the radio time signal is not received, you may need to set the time and date manually. Refer to the specific buttons on your device (e.g., "SET", "MODE", "UP", "DOWN").
- Press and hold the "SET" or "MODE" button until the time display starts flashing.
- Use the "UP" or "DOWN" buttons to adjust the hour, then press "SET" or "MODE" to confirm and move to the minutes.
- Ulang selama beberapa minit, tahun, bulan dan hari.
- Press "SET" or "MODE" one last time to exit the setting mode.
Penyelenggaraan
Pembersihan
Bersihkan peranti dengan lembut, damp cloth. Do not use abrasive cleaners or solvents. Ensure no moisture enters the device.
Penggantian Bateri
When the battery indicator appears on the display, replace the batteries in both the main unit and the outdoor sensor. Always replace all batteries at the same time to ensure optimal performance.
- Buka petak bateri.
- Tanggalkan bateri lama dan buang dengan betul.
- Insert new 1.5V AA batteries, observing correct polarity.
- Tutup petak bateri.
- After replacing batteries, the units may need to re-synchronize. This usually happens automatically within a few minutes.
Menyelesaikan masalah
| Masalah | Kemungkinan Punca | Penyelesaian |
|---|---|---|
| No outdoor temperature display or "---" shown. |
|
|
| Incorrect time or date display. |
|
|
| Buttons are unresponsive or erratic. |
|
|
| Temperature readings fluctuate significantly or are inaccurate. |
|
|
Spesifikasi Teknikal
- model: 30.3016.01
- Jenama: TFA Dostmann
- Outdoor Temperature Measurement Range: -40 hingga +60 °C (-40 hingga +140 °F)
- Indoor Temperature Measurement Range: -10 hingga +60 °C (+14 hingga +140 °F)
- Ketepatan Suhu: 1 °C
- Bahan: plastik
- Kekerapan Penghantaran: 868 MHz
- Outdoor Transmitter Model: 30.3159.IT
- Pilihan Pemasangan: Wall hanging or freestanding
- Dimensi (Unit Utama): (L) 70 x (W) 30 (66) x (H) 115 mm
- Batteries (Main Unit): 2 x 1.5V AA (termasuk)
- Batteries (Transmitter): 2 x 1.5V AA (termasuk)
- Berat: 101 g (main unit, without batteries)
- Teknologi Ketersambungan: Frekuensi Radio (RF)
Waranti dan Sokongan
TFA Dostmann products are manufactured with quality and precision. For warranty information and technical support, please refer to the official TFA Dostmann website or contact their customer service directly. The contact details can usually be found in the packaging or on the manufacturer's webtapak.
Pengeluar: TFA Dostmann
rasmi Webtapak: www.tfa-dostmann.de (This is a general link, specific support pages may vary by region).