1. Pengenalan
This manual provides essential information for the safe and efficient operation of your Singer Tiny Tailor Mending Sewing Machine, Model TT600. Designed for quick mending tasks, this compact and portable machine offers a durable lockstitch for various fabric repairs.

Image 1.1: The Singer Tiny Tailor Mending Sewing Machine shown in its original packaging. This image provides a general overview of the product as it appears when unboxed.
2. Arahan Keselamatan
Sila baca semua arahan sebelum menggunakan perkakas ini untuk mengurangkan risiko kebakaran, kejutan elektrik atau kecederaan kepada orang.
- Always unplug the machine from the electrical outlet immediately after using and before cleaning, making any adjustments, or removing/attaching any parts.
- Do not operate the machine with a damaged cord or plug, or if it has been dropped or damaged.
- Jauhkan jari dari semua bahagian yang bergerak. Penjagaan khas diperlukan di sekitar jarum mesin jahit.
- Gunakan hanya lampiran yang disyorkan oleh pengilang.
- Jangan sekali-kali menjatuhkan atau memasukkan sebarang objek ke dalam mana-mana bukaan.
- Jangan gunakan di luar rumah.
- Jangan beroperasi di tempat produk aerosol (semburan) digunakan atau di mana oksigen diberikan.
3. Kandungan Pakej
Sahkan bahawa semua item terdapat dalam pakej:
- Singer Tiny Tailor Mending Sewing Machine (Model TT600)
- Kawalan Kaki
- Penyesuai Kuasa
- Extra Needle
- Bobbins (pre-wound or empty)
- Benang Jarum
- Seam Opener/Thread Trimmer
- Manual Arahan (dokumen ini)
4. Pengenalan Bahagian
Familiarize yourself with the components of your sewing machine:
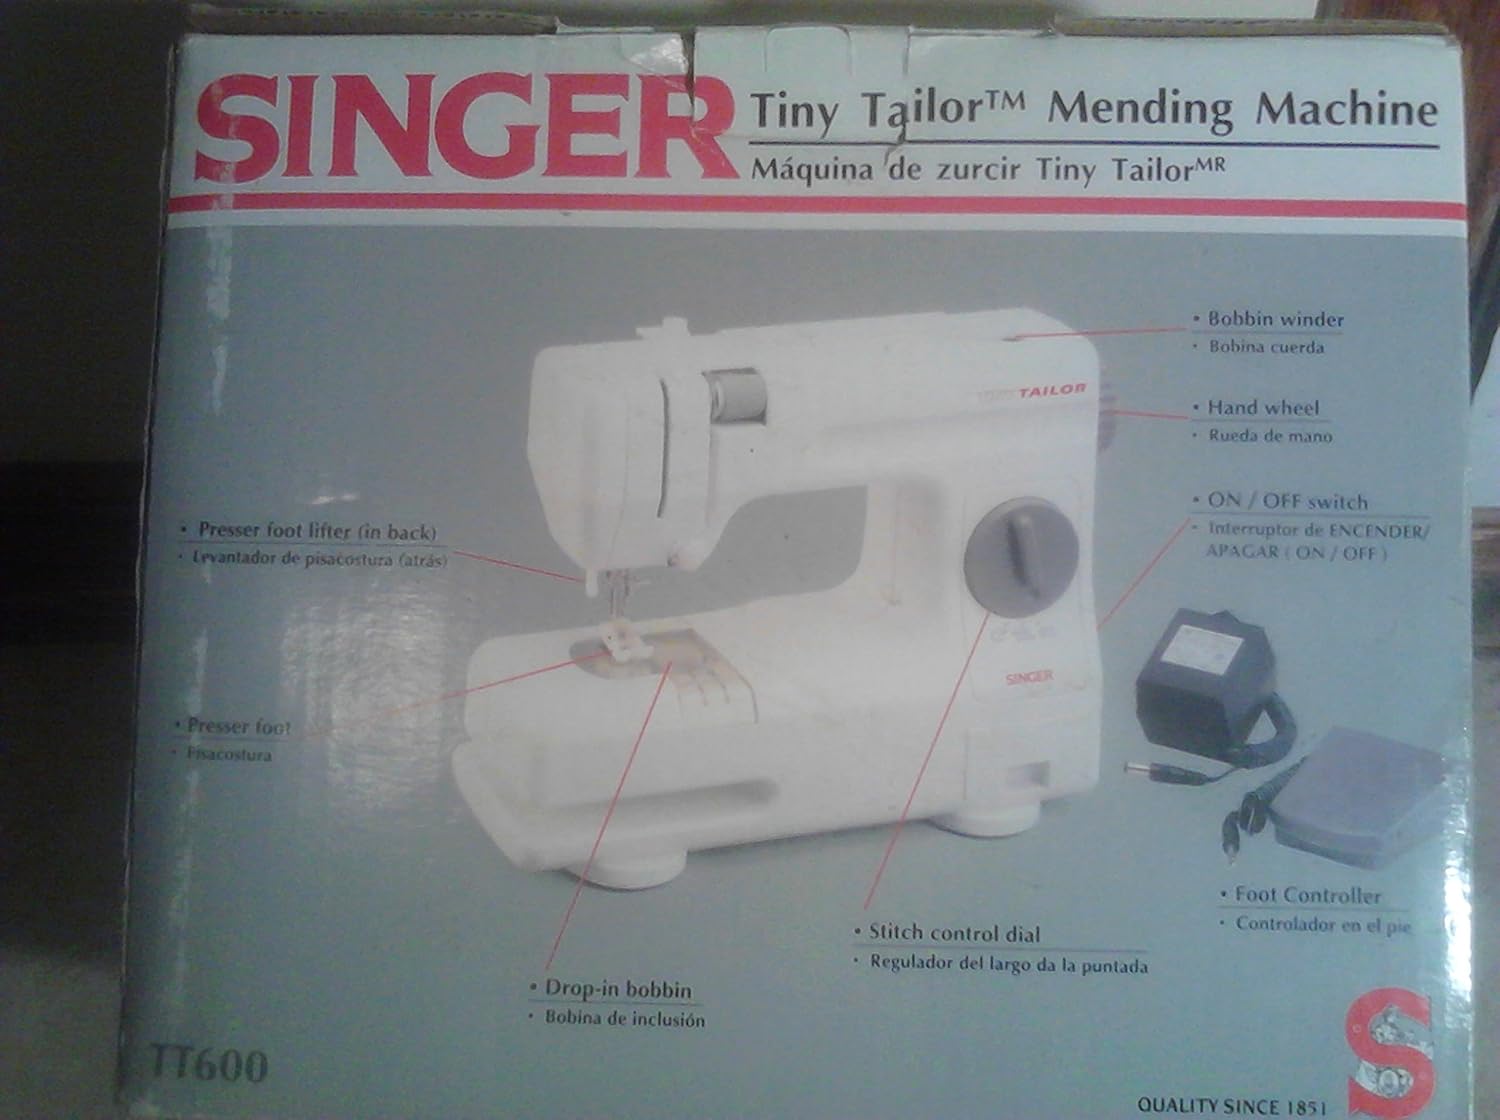
Image 4.1: Diagram illustrating the key parts of the Singer Tiny Tailor Mending Sewing Machine, including the bobbin winder, hand wheel, ON/OFF switch, presser foot lifter, presser foot, drop-in bobbin, stitch control dial, and foot controller.
- Penggulung Bobbin: Used to wind thread onto bobbins.
- Roda Tangan: Menaikkan dan menurunkan jarum secara manual.
- Suis ON / OFF: Powers the machine on or off.
- Presser Foot Lifter: Raises and lowers the presser foot.
- Kaki Penekan: Holds fabric firmly in place while sewing.
- Drop-in Bobbin: Easy access bobbin system.
- Stitch Control Dial: Adjusts the length of the stitch.
- Pengawal Kaki: Controls the sewing speed, freeing hands for fabric guidance.
5. Persediaan
5.1 Sambungan Kuasa
- Ensure the ON/OFF switch is in the "OFF" position.
- Insert the power adapter plug into the machine's power jack.
- Palamkan penyesuai kuasa ke soket elektrik standard.
5.2 Foot Control Connection
- Locate the foot control jack on the machine.
- Insert the foot control plug firmly into the jack.
5.3 Menggulung Bobbin
- Letakkan gelendong benang pada pin gelendong.
- Pandu benang melalui cakera tegangan untuk penggulungan gelendong.
- Letakkan gelendong kosong pada gelendong penggulung gelendong.
- Lilitkan benang di sekeliling gelendong beberapa kali, kemudian tolak gelendong penggulung gelendong ke kanan.
- Turn on the machine and gently press the foot control until the bobbin is sufficiently wound.
- Push the bobbin winder spindle back to the left and trim the thread.
5.4 Inserting the Drop-in Bobbin
- Buka plat penutup gelendong.
- Masukkan gelendong lilit ke dalam bekas gelendong, pastikan benang terurai ke arah yang betul (biasanya lawan arah jam).
- Guide the bobbin thread through the tension spring and into the thread guide slot.
- Tutup plat penutup gelendong.
5.5 Menjahit Benang Atas
- Naikkan pengangkat kaki penekan.
- Letakkan gelendong benang pada pin gelendong.
- Guide the thread through the upper thread guides and tension discs as indicated by the machine's markings.
- Thread the needle from front to back using the needle threader or manually.
- Tarik kira-kira 6 inci benang melalui lubang jarum.
5.6 Membuka Benang Bobbin
- Pegang benang atas dengan lembut menggunakan tangan kiri anda.
- Turn the hand wheel towards you to lower the needle into the needle plate and then raise it again.
- The needle thread will catch the bobbin thread, forming a loop.
- Pull the loop to bring the bobbin thread up through the needle plate opening.
- Pull both upper and bobbin threads under the presser foot and towards the back of the machine.
6. Mengendalikan Mesin
6.1 Jahitan Asas
- Place the fabric under the presser foot, aligning the edge with a seam guide if available.
- Lower the presser foot using the presser foot lifter.
- Hidupkan mesin menggunakan suis ON/OFF.
- Gently press the foot control to start sewing. The harder you press, the faster the machine will sew.
- Guide the fabric gently with both hands, ensuring it feeds evenly. Do not pull or push the fabric forcefully.
- To stop sewing, release the foot control.
- Raise the needle to its highest position by turning the hand wheel.
- Raise the presser foot and pull the fabric away from the machine.
- Trim the threads using the seam opener/thread trimmer or scissors.
6.2 Adjusting Stitch Length
The Stitch Control Dial allows you to adjust the length of your stitches. Turn the dial to select the desired stitch length. Experiment on scrap fabric to find the appropriate setting for your project.
6.3 Mending Techniques
The Tiny Tailor is ideal for quick mending. For tears, align the edges of the fabric and stitch across the tear, overlapping the stitches slightly for reinforcement. For seams, simply stitch along the original seam line. For delicate fabrics, use a finer needle and thread and a shorter stitch length.
7. Penyelenggaraan
7.1 Pembersihan
Regular cleaning helps maintain your machine's performance:
- Sentiasa cabut plag mesin sebelum membersihkan.
- Use a soft brush or lint brush to remove lint and dust from the bobbin area and under the needle plate.
- Lap bahagian luar mesin dengan kain lembut dan kering. Jangan gunakan pembersih cecair atau bahan kimia yang keras.
7.2 Penggantian Jarum
Replace the needle regularly, especially if it becomes bent, dull, or if you experience skipped stitches or thread breakage.
- Pastikan mesin dicabut plag.
- Longgarkan jarum clamp skru.
- Tanggalkan jarum lama.
- Masukkan jarum baharu dengan bahagian rata menghadap bahagian belakang mesin, tolak ke atas sejauh yang boleh.
- Ketatkan jarum clamp skru dengan selamat.
8. Penyelesaian masalah
| Masalah | Kemungkinan Punca | Penyelesaian |
|---|---|---|
| Mesin tidak dihidupkan | Power cord not plugged in; ON/OFF switch off. | Check power connections; ensure switch is ON. |
| Jahitan yang dilangkau | Bent or dull needle; incorrect needle size; improper threading. | Replace needle; ensure correct needle for fabric; re-thread machine. |
| Pecah benang | Incorrect tension; poor quality thread; needle bent or dull; improper threading. | Adjust tension; use good quality thread; replace needle; re-thread machine. |
| Fabrik tidak menyusu | Presser foot not lowered; lint under needle plate. | Lower presser foot; clean bobbin area. |
| Bobbin thread tangling | Improper bobbin insertion; incorrect bobbin winding. | Re-insert bobbin correctly; re-wind bobbin evenly. |
9. Spesifikasi
| Nombor Model | TT600 |
| Jenama | PENYANYI |
| ASIN | B000KGIHVI |
| UPC | 037431203144 |
| warna | putih |
| Adalah Elektrik | ya |
| Bateri Diperlukan | Tidak |
| Berat Barang | 6.05 paun |
| Dimensi Pakej | 13.4 x 10.3 x 8.5 inci |
10. Waranti dan Sokongan
For warranty information, product registration, or technical support, please refer to the official SINGER webtapak atau hubungi perkhidmatan pelanggan mereka secara langsung. Simpan resit pembelian anda sebagai bukti pembelian.
Nota: Terma jaminan khusus mungkin berbeza mengikut rantau dan peruncit.